
Before we begin, it’s important to know that formatting a drive will erase everything on it, so you’ll want to make sure that you back up or save anything that you don’t want to lose.
After you’ve saved everything you don’t want erased from the drive, the first step is to open Disk Management. The easiest way to do this is to click on the Start button and type diskmgmt.msc into the search bar.
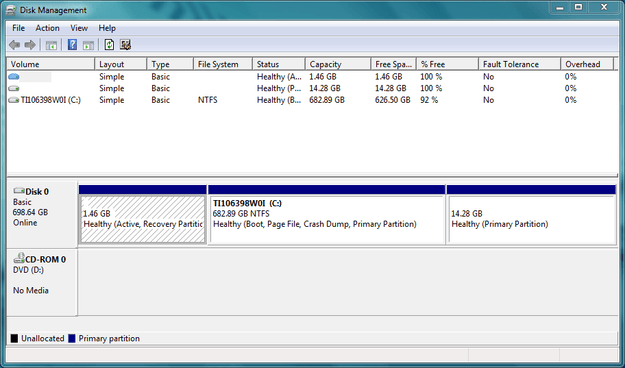
After typing this, Microsoft’s instant search function should quickly narrow it down to just one option. Click it, and a window should appear that looks similar to the one below.
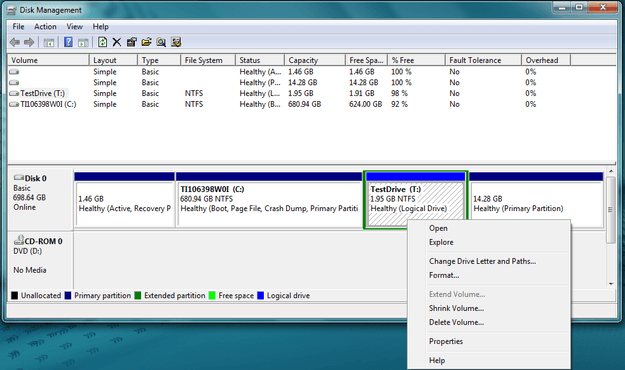
Second, you’ll want to choose the drive you’re trying to format. Up in the top right corner of the window, there should be a list of drives. Find the drive you’d like to format, right click on it and choose Format. Before doing this, it’s best to make absolutely certain that you’ve chosen the correct drive. A clicking mistake here would be highly unfortunate.
*Note: if you’re trying to format the C drive — the primary partition that your operating system is installed on — you can’t do it this way. It’s impossible. In order to format C you’ll need to boot an operating system from another source — this can be a CD drive, flash drive, or even a floppy drive if necessary. If you want to format C, we suggest using this tutorial.
If you’re formatting any other drive, keep reading. The process is relatively simple. After clicking Format, a small window will appear. Here you’ll be able to give the hard drive a name, choose which file system the drive will use, and determine the allocation unit size.
In the text box next to Volume Label, go ahead and give your hard drive a name. We used the name TestDrive for this tutorial.
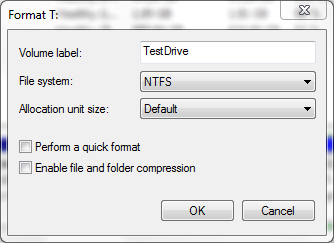
Next, you’ll need to choose a file system. Windows should give you three options: NTFS, FAT, and FAT32. NTFS is almost always the way to go, so unless you need FAT32 for a specific program you’re planning on running, choose NTFS.
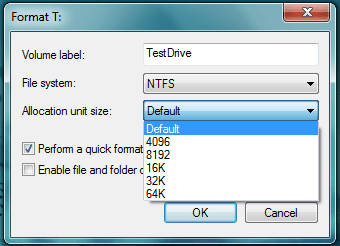
Set Allocation Unit Size to Default. This will choose the best allocation size based on the size of the hard drive. Steer clear of custom allocation sizes unless you know what you’re doing.
Next you’ll see a pair of check boxes. If the Perform a quick format box is checked, uncheck it before proceeding. You want to perform a standard format.

The next check box gives you the option to enable file and folder compression. Checking the box will allow you to choose files and folders to be compressed/decompressed on the fly, which can help you save hard drive space. The only problem is that this can sometimes effect the disk’s performance over time. We recommend keeping file compression disabled (box unchecked) because file compression isn’t really necessary when you have access to today’s large and inexpensive hard drives.
Once you’ve got everything filled out, go ahead and click OK. Windows will warn you that formatting a hard drive is irreversible, but you already knew that. Go ahead and click OK.
Aaaand we’re off! Your format has begun. Depending on how big your drive is, this will take anywhere from a few minutes to a few hours. If you’ve got a big drive, we suggest doing the format at a time when you won’t need to use your computer for anything.
When the format is complete, window’s wont flash you a big “FINISHED” message or anything of the sort, but you’ll know it’s done when the format percentage indicator reaches 100%, and then lists the drive’s status as “Healthy.”


