
If you just picked up a new Mac or want to try the slideshow app that comes with macOS, it’s time to learn how to use Apple Keynote. Like using Google Slides or Microsoft PowerPoint, you can create a slideshow in Keynote and present it to an audience.
Here, we’ll walk you through the basics you need to know as an Apple Keynote beginner.
Create a new slideshow in Keynote
You can make a basic slideshow in Keynote or choose a colorful template for a jumpstart on your presentation’s appearance.
Step 1: Open Keynote from the Applications folder. Make sure Finder is active, and select Go > Applications from the menu bar.
Step 2: In the window that appears, select New document on the bottom left.

Step 3: You’ll then see the templates you can choose from with categories along the left. You can pick something super basic or go big with a bold or dynamic template. Each template gives you a background and formatting.
Choose the template and select Create on the bottom right. For this how-to, we’ll use the simple white option.

Step 4: Before you start creating your slideshow, it’s a good idea to name it. You can then save it as you progress through the creation process.
Name your slideshow one of these ways:
- Select the Title drop-down box at the top of the Keynote window. Enter the name, pick a location, and optionally add a tag.
- Choose File > Save from the menu bar. Then, enter the name, pick the location, and optionally add tags.
Now that you have your new slideshow open and named, you’re ready to get started.

Use slideshow views
As you set up your slides and objects, you can use the view the works best for you. Select the View button on the top left of Keynote or View in the menu bar to pick an option.
Navigator: This displays thumbnails of the slides on the left you can pick from with the currently selected slide in the workspace to the right.
Slide only: This gives you a complete view of the slide without distractions.
Light table: This puts your slides in a grid format. While you can’t work on a particular slide in this view, it’s a good way to see all of the slides at once.
Outline: This lets you work on your slideshow using a text outline. Type your outline in the sidebar on the left using your Tab key to indent for sublevels.
Add and format slides
You can add slides that follow the format of the template you pick or choose a particular layout for the new slide.
Step 1: To insert a slide based on the type that comes next with the template, either right-click a slide in the navigator on the left or pick Slide in the menu bar. Then, choose New slide.
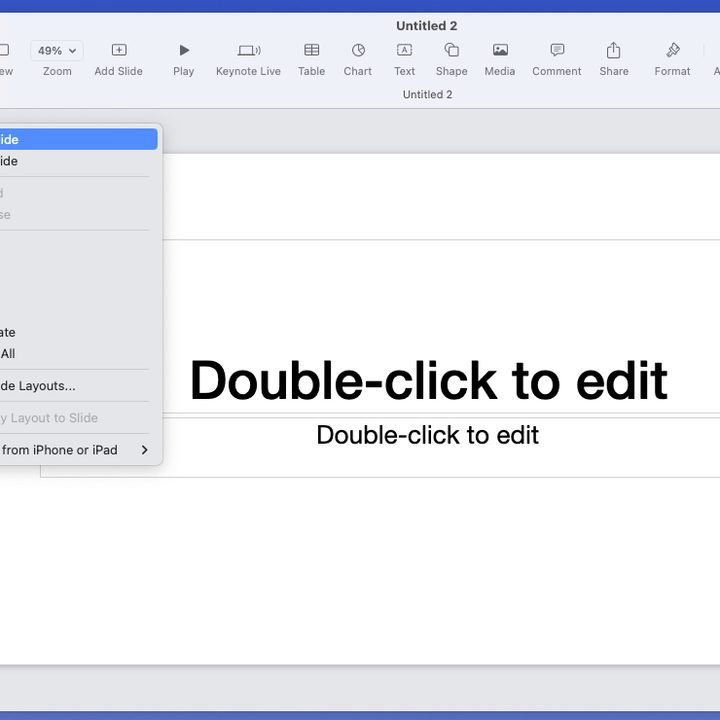
Step 2: To insert a slide with a certain layout, select Add slide in the toolbar at the top. Then, pick the layout you want to use.

Step 3: You’ll then see the new slide pop into view. If you’d like to include a title, add a slide number, or change the background, select Format on the right side of the toolbar.
This opens a sidebar on the right for you to adjust these options. You can also change the layout using the drop-down box at the top of the sidebar.

Insert and format objects
Because slideshows are visual presentations, you can insert things like pictures, shapes, tables, charts, and various types of media in addition to text.
Step 1: To add text, simply type it into the box on the slide for the layout you choose. You can also insert a text box using the Text button in the toolbar.
To change the font style, size, format, color, or other text attribute, select the box containing the text. Then, use the Format button in the toolbar to open the sidebar and make your changes on the Text tab.

Step 2: If you choose a slide layout that includes a photo, you can easily swap it out for your own. Select the icon in the bottom-right corner of the sample image. Browse for and choose your image, and then select Insert to place it on the slide.

Step 3: To insert things like a table, chart, or shape, you can use the same-named toolbar buttons to see previews of the items. This makes it a little easier to pick and format the item from the start.

Step 4: If you want to add a photo, movie, video, audio, or similar type of media, select the Media button in the toolbar or Insert from the menu bar and choose the item.

Step 5: Once you insert the item, you can format its size, border, volume, playback, and other features. Select the object and use the Format button in the toolbar to open the sidebar.
You’ll then see the features available for you to adjust on the right. Use the tabs at the top of the sidebar to pick from style options, item features, and arrangement.

Adjust the slideshow settings
Depending on how you want to play your slideshow, you can adjust its settings next.
Step 1: On any slide in the presentation, select the Document button on the right side of the toolbar.
Step 2: Then, pick the Document tab at the top of the sidebar.
Step 3: Below Slideshow settings, use the check boxes to automatically play the slideshow when the file opens, loop the slideshow, or restart the show when idle for a designated time.

Step 4: For links only or a self-playing presentation, use the drop-down menu and subsequent boxes in the Presentation type section of the sidebar.

Step 5: To change the slide size from widescreen to standard or set a custom size, select the drop-down menu in the Slide size area.

Step 6: Finally, if you want to password-protect the file, check the box at the bottom of the sidebar. Then, create and verify the password, include a hint, and optionally check the box to allow opening with Touch ID.

Present a Keynote slideshow
When you’re ready to present your Keynote slideshow, you can do so using multiple monitors or in the same window.
Step 1: If you use more than one monitor, you can display the presentation on one screen and control it on the other. Start by selecting Play in the toolbar.
Step 2: In the controller view you see on one screen, you can open the navigator on the left, use the icons on the top right to adjust the tools, and select the X to end the show.

Step 3: If you’re only using one monitor, you can display the presentation and the controls on the same screen. Start by selecting Play in Window in the toolbar.
Step 4: You’ll then see the presentation in one window with your controls in another. Use the icon on the top left of the control window to open the Slide navigator and the Display options icon on the top right to adjust the settings.

Apple Keynote comes with macOS, making it convenient for creating slideshows. Not only that, but the app also has a solid set of features for making powerful presentations.
For more of those handy features, look at how to undo changes you make in Keynote on Mac.