Partitioning your hard drive is a great way to organize your files, folders, and applications into multiple virtual drives. Although there are advantages to having multiple physical drives, the increase in storage capacity has changed the game. Partitioning a single drive is a viable method to give your system that multi-drive functionality, with plenty of space on each, without shelling out for a second drive.
If you just bought a new drive and want to split it up, you must partition it before using it. Whether you have a new drive or want to partition an existing one, the process is much the same.
Fortunately, learning how to partition your hard drive using Windows 11 is quick and easy. If you follow the steps below, we’ll help take you from a single-drive system to one with as many virtual drives as you want.
Options
If you’re looking to create new volumes for making a backup, we’d still recommend you use one of the best external hard drives instead. If you’d prefer someone else to handle the backup process for you, consider a cloud provider like Microsoft OneDrive or Dropbox.
Also, keep in mind that we’ll be using the term “hard drive” throughout this piece, but the same steps and procedures will apply to a solid-state drive as well. We dive deeper into the differences between SSDs and hard drives in this comparison.
Windows Disk Management
The simplest way to partition your new or existing hard drive is with Windows’ built-in Disk Management tool. Although some third-party applications have slightly expanded feature sets, the standard Windows tool is perfectly capable of creating new partitions. Although the below steps are specifically for Windows 11 and Windows 10, they are also applicable to older versions of Windows, where the process is much the same.
Step 1: Use the Windows search box to search for Disk Management. Select Create and Format Hard Disk Partitions from the results box. Alternatively, use the Windows Power User menu (via the Windows key + X keyboard shortcut) and click Disk Management.

Step 2: Select the hard drive you want to partition from the list of drives available. If it is a new drive, skip to step 5. If it is an existing drive with files and your operating system installed on it, you must create some unallocated space before you can partition it. Right-click and select Shrink Volume from the resulting drop-down menu.

Step 3: Your PC will then calculate how much free space you can allocate to the new partition. Once completed, it will ask you how much of it you want to use. If you’re going to use all the free space on the hard drive, click the Shrink button. If you’re going to specify the eventual partition size, input it in megabytes in the respective field before hitting Shrink.
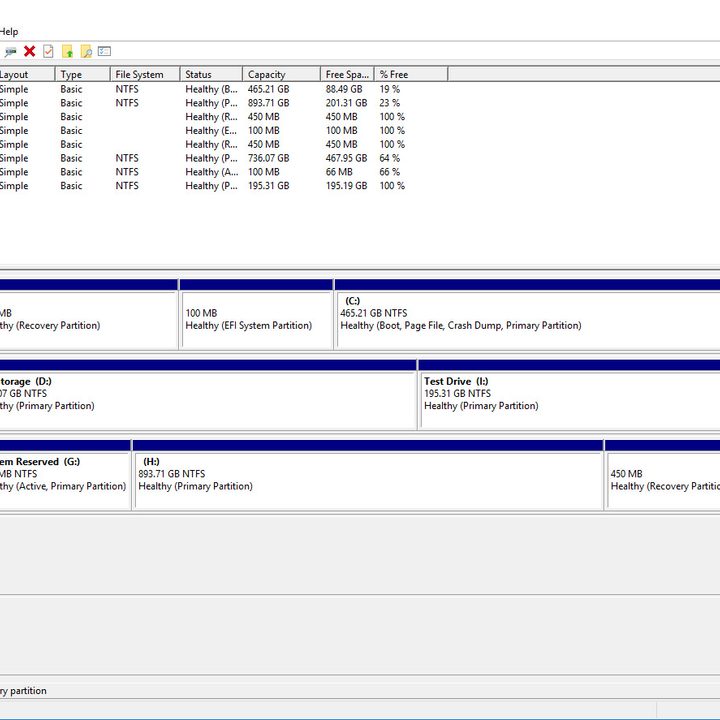
Step 4: The process can take a minute depending on the speed of your drive. When complete, you’ll have new unallocated space shown next to the corresponding physical drive in the bottom half of the Disk Management screen.

Step 5: Right-click the unallocated space and select New Simple Volume from the resulting menu.

Step 6: Follow the on-screen instructions and select the size of the volume (the default will use all unallocated space) and the drive letter.

Step 7: It’s wise to format new and old drives when creating a new partition. When given the option, do so.
Step 8: For File System, choose NTFS. The ExFAT option is often used for portable devices.
Step 9: You can also add a volume label (a name) should you desire. You can leave the allocation unit size at default. Select Quick Format if you are short on time — it rarely requires a full format.

Step 10: Continue to click through the Next buttons and, finally, hit Finish to create the volume. Your hard drive will now have a new partition with its very own designation. You’ll be able to see it and all the information about it on the Disk Management page.
Third-party alternatives
If the manual process involves too many clicks for your taste, there are alternatives. You can find a long list of third-party tools that help with partitioning your hard drive on Windows. However, there are only a few we’d recommend using. Here are a handful of options we’ve had pleasant experiences using.
EaseUS Partition Master Free
EaseUS’s Partition Master Free is a great tool enjoyed by millions of users worldwide. It features means for moving and resizing partitions, wiping them clean, and altering labels and designations. It even comes with a Partition Recovery Wizard, so you can recover lost or deleted partitions after a hard drive failure.
Mini Tool Partition Wizard Free
Mini Tool has a free version that comes with a plentiful array of features to complement its primary partitioning mechanism. It lets you freely convert file systems without formatting a drive. It also allows you to test out how dependable your hard drive is through a thorough process of sector-by-sector examination.
GParted
While GParted has fewer features than competitor partition managers, its best attribute is its compatibility with various systems and formats. It also lets you make and resize partitions.
Partitioning your hard drive is the best way to ensure proper organization. You can partition on your own, or use a third-party app for extra help. With some patience, you’ll figure out what is best for you.