Tired of being the only wireless network in your apartment building without a clever name like “Wu-tang LAN” or “Bill Wi the Science Fi”? Or maybe you want to make your network password more secure so that it prevents your neighbors from mooching off your internet connection.
To make these changes, you need to know your router’s IP address. Why? Most routers provide a control panel that’s only accessible through a web browser. You must enter the router’s IP address into the browser’s address bar to access that panel.
But what if you don’t know the address or forgot it? We show you how to find the IP address of your router.
Router tips and tricks
If you’re searching for a new router, be sure to check out our guide on the best routers available on the market.
Public versus private IP addresses

Did you know your computer can be associated with two different IP addresses? They are usually called public versus private or external versus internal. When we talk about a private or internal IP address, it’s the address assigned to your computer by the router. However, here are important differences you still need to know.
Public IP address
This is the address that your internet service provider (ISP) assigns to your modem’s connection to the internet. Think of it as the public-facing address of a house or building. If your PC moves to a different wireless network, the public IP address will change.
When people usually talk about an IP address or protecting their IP address for privacy, this is the one they’re talking about. Unless you are using encryption to protect your location, you can find it instantly by going to sites like whatismyip.org, or even simply Googling “IP address.”
Private IP address
Your router sets a private IP address for every device connected to your local network. This is how your router recognizes your computer and knows what data to send to it as you browse the internet.
This private IP address can be useful when checking how your router is interacting with devices, what devices are connected to it, and so on. The private IP address is a bit more complicated to find, and it’s what we’re looking for in this article.
Finding the private IP address through your computer
Regardless of your router’s manufacturer or model, there is a surefire way to find its IP address, even if it isn’t operating on the default settings. This is the fastest way to get your IP address when you’re logged into your operating system.
Windows 10

Step 1: Enter “cmd” in the search field and click the top result to access the Command Prompt.
Alternatively, right-click on the Start button and select Windows PowerShell listed on the Power User Menu.
Step 2: With PowerShell or Command Prompt open, type “ipconfig /all” to bring up a window with information on your network’s connection.
This is one of the most important commands to know when using the Command Prompt interface.
The field marked Default Gateway shows the IP address of whatever router you’re connected to at the time. For almost all routers, you can enter this IP address in your browser’s URL bar to access your router’s login page.
MacOS

MacOS makes it very easy to find your IP address in the right settings.
Step 1: Open System Preferences from the Dock — it’s the gear-based icon.
Step 2: Select the globe-shaped Network icon.
The next window says Status: Connected. Look immediately below, and you should see information about what network you are connected to and your current IP address. However, we want the router’s address, so let’s move on.
Step 3: Click the Advanced button.
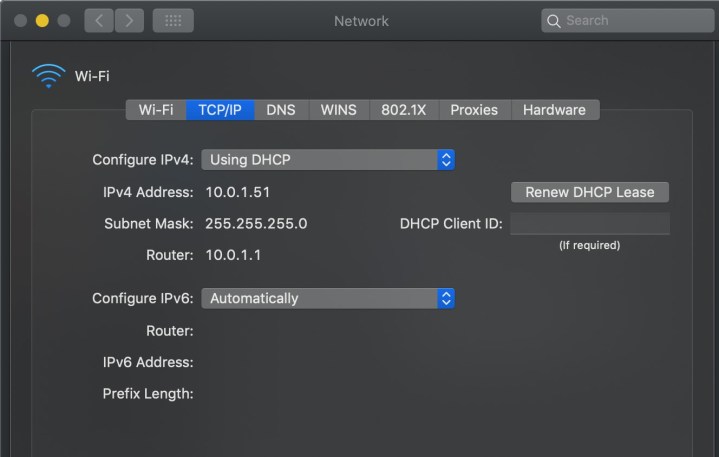
Step 4: Select the TCP/IP tab on the following screen. This will break down more specific address info for your router if necessary.
Router settings logins

You also have the option to log in to your router settings online and check your IP address there, along with plenty of other router information and tools. This is an ideal option if you want to change some settings, improve your password, check all connected devices, and perform other various maintenance tasks.
Many different companies make routers, and below you will find the login information for all the major brands. RouterPasswords has a large database of default usernames and passwords sorted by make and model if your router isn’t listed.
If you find that you aren’t able to log in to the admin panel with one of these, then your login credentials may have been changed at some point. Need some help tracking that password? Consider a password manager such as those featured in our guide.
Linksys
Step 1: Most Linksys routers have the same default settings. The admin panel can be accessed on most Linksys routers by entering 192.168.1.1 in your browser’s address bar. If you own a smart router, enter myrouter.local instead.
Step 2: Log in using “admin” for both the username and password, assuming you haven’t changed the default username and password already.
Step 3: You’ll want to make sure to change your router passwords the first time you log in. Otherwise, you leave yourself susceptible to anyone on your Wi-Fi network accessing your router’s admin page.
Step 4: If you have a newer Linksys router, you may also have the Linksys app for setup and management. You can log in and choose your router to see more information about it, including the IP address and other data.
If you need more help, use Linksys’ official support portal.
D-Link
Step 1: You’ll be able to log in to your D-Link router by using mydlinkrouter.local or 192.168.0.1. If that doesn’t work, try 192.168.1.1 instead.
Step 2: The default username is “admin,” and you’ll want to leave the password field blank.
Step 3: Since most D-Link routers are not password-protected by default, you need to add a password as soon as possible to prevent hackers from accessing your network.
Step 4: D-Link also has various apps to manage its devices, including the D-Link Wi-Fi app. If you have the Wi-Fi app or a similar D-Link app, it may be easier to log in, go to the settings, and select the Internet icon to see more information about your connection.
D-Link also has a dedicated support knowledge base should you need more help.
Belkin
Step 1: For almost all Belkin routers, the default web setup is located at 192.168.2.1, though http://router may also work for you. Due to the method in which login credentials are set up, you likely won’t have to enter anything in the username and password fields when accessing the admin panel.
Step 2: By default, Belkin routers have no password on the admin account. This means the username field should be left blank, though you may have to enter “admin” instead.
Step 3: You’ll definitely want to change the username and password if you have a Belkin router. It’s simple for someone with access to your network to make changes in the admin panel that could open security holes or allow them to install malware and hacking software.
More information can be found for specific router models on the Belkin support site.
TP-Link
Step 1: The default TP-Link address should be 192.168.1.1, so start with this link to sign in.
Step 2: The default username and password for TP-Link routers are both “admin,” which you can use to sign in if you have not before (and should certainly change after). This will give you a variety of basic options to view your wireless network settings.
Step 3: Newer TP-Link routers are compatible with the TP-Link Tether app. This may be an easier way to access router info like your IP address. In the Tether app, go to the Tools section and then choose Internet Connection to see the details.
Netgear
Step 1: Several Netgear routers feature the login credentials on the bottom or back of the device, but if yours does not, the company has still made it easy to access your admin panel. Enter routerlogin.net in your browser’s address bar, or navigate to 192.168.0.1 to access the login screen.
Step 2: The username is almost always “admin,” and the password will either be “password” or “1234” if you’re using an older device.
Step 3: Having a text URL makes things easy to remember, but it also makes your router’s settings more vulnerable. If someone has access to your network, they don’t need to determine its IP address. For this reason, it’s particularly important to change the default login to prevent any unwanted changes to your network settings.
Step 4: Netgear routers may also use the Nighthawk app for settings management, speed tests, and more. If you have the Nighthawk app, you can go directly to Wi-Fi Settings to see connection information, which may be an easier alternative.
Netgear’s support knowledge base will give you more information on specific router models if you need it.
Asus
Step 1: Nearly all Asus routers use 192.168.1.1 by default, which makes it easy to access the admin panel in your browser. Newer routers, however, will direct requests to router.asus.com to your local router’s setup page.
Step 2: The username and password should be “admin” on almost all models and firmware revisions.
Step 3: The default passwords can help if you’ve never changed your settings before, but it’s recommended that you change them the first time you access the admin panel to prevent unauthorized access by anyone who’s able to access your Wi-Fi network.
Step 4: Asus uses the Asus Router app to help manage setup, settings, security, and more. If you have this app, you can open it up, select Devices, and select your router to view your IP address at any time.
The support team at Asus can give you more help if needed and have access to various articles on its range of devices.
Step 1: Head online and navigate to your Google Fiber account and sign in.
Step 2: Once logged in, look at the top-left corner of the webpage and select Network (in some formats, you’ll need to press the Menu button first).
Step 3: In the new section, you will see a Devices menu on the left with all the devices connected to your network. Choose the particular device you want to investigate — your active router, in this case — and then select Advanced to unveil extra information about it. You should now be able to see your IP address for that particular device on Google Fiber.
Note on IPv4 and IPv6
IPv6 is a newer protocol that’s already available to handle the ever-expanding World Wide Web. Yet, the adoption rate is extremely slow. For now, a blank for IPv6 may be the only indicator of the changes to come. The transition over from IPv4 includes new hardware, reworked software, overhauled infrastructures, and so on. That translates to loads of time and money.
IPv6 protocol, created in 1998, was designed to become the future of IP addresses. As designed, the IPv6 protocol provides many benefits over its predecessor in terms of reliability, security, and speed.
It’s not all cupcakes and rainbows, though. Tech companies, network engineers, and data centers have been slow to make the change, mostly due to security concerns. This is because the IPv4 and IPv6 protocols can’t communicate without passing through a bridge that handles the translation.
It isn’t outside of the realm of possibilities to create a secure channel between the IPv4and IPv6 protocols. You will need to invest a substantial amount of cash in third-party translation assistance, though. However, it might not be necessary at this point.
As enterprising network engineers become more familiar with the protocol, a standard set of best practices will emerge. There will then be a shift in the industry to prioritize IPv6 addresses once sites understand the advantages of streamlining the process per these best practices. Until this transmission occurs, it’s helpful to know about both listings when seeking your current IP address, but the expensive overhaul to bridge IPv4 and IPv6 might not be worth the investment.
Despite potential expenses and regardless of which operating system or router you have, it is quite easy to obtain a personal IP address After you find the IP address for your router, you might want to give it a unique network name, and you’ll want to create a password that will prevent strangers from trying to join.


