Mounting an ISO file is far from the most complex thing in the world, despite the intimidating terminology. An ISO file, often referred to as an ISO image, is an exact copy of all the data stored on an optical disc (e.g. a CD, DVD, etc.) that can be used in lieu of a physical disc using the proper software. The single files are incredibly handy when it comes to distributing large programs digitally and are great alternative if you don’t want constantly load and unload your favorite disc.
Having a hard time following? Well, ISO files essentially work like a box of Legos in a lot of ways. The box itself does nothing other than house all the bricks inside, or in this case the copied data. However, the file becomes something totally different if you have a way to open, assemble, and use the contents inside. Luckily, there are plenty of premium and no-cost methods for getting it done.
Here’s our how-to guide for mounting an ISO image on both Windows and Mac OS X. Time to ditch those old discs of yours in favor of something a little more portable and convenient.
Using Daemon Tools (Mac OS X/Windows)
Daemon Tools has been the go-to virtual drive option for some time now and is considered one of the flagship media emulators in the industry. There are four different editions of the software — Lite, Pro Standard, Pro Advanced and Net — but the free Lite edition will suffice for mounting an ISO image.
 Download, install, and launch Daemon Tools. The software is available for both Windows and Mac, but be wary while installing the software to avoid any unwanted toolbars, widgets, and other miscellaneous malware that may come bundled with the program. Download the file directly from the Daemon Tools’ website rather than a third party to ensure you don’t get a handful of unwanted bloatware with the software.
 Once launched, click the DT drive icon with the addition sign at the bottom to add a Daemon Tools Virtual Drive. The Lite edition will allow you to emulate up to four virtual drives at any given moment, while the premium packages will offer you even more. For casual users, four should be more than you’ll ever need.
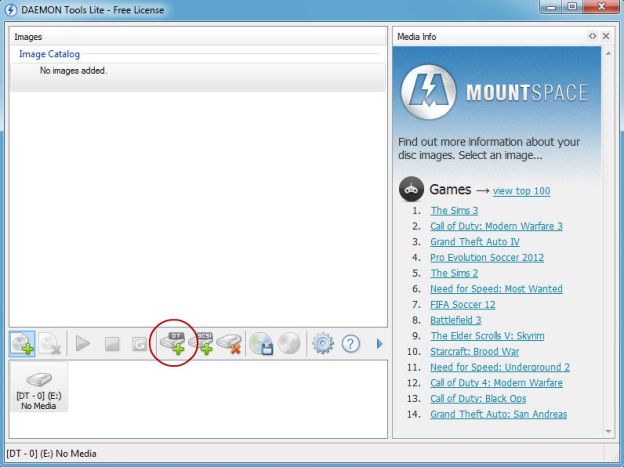
 Next, choose the ISO image you wish to mount by clicking the optical disc image icon with addition sign at the bottom. Then browse or search your computer for the appropriate ISO file, select it, and click the Open button in the bottom-right hand corner.

 That’s all there is to it! Your chosen ISO file should appear as an virtual disc loaded in the virtual drive you added it to. The image will now function in the same way as a normal optical disc, but without the physical disc part. Repeat the process as necessary.
Using Mac OS X Disk Utility (Mac OS X)
The Disk Utility is a handy little piece of software that comes pre-installed on almost all versions of Mac OS X. Not only can the utility erase, format, repair, and partition hard drives, it’s a wonderful tool for mounting ISO images without any additional software.
 Launch the Disk Utility – the software should already be installed on your Mac. You can access the application by going to your Mac’s main application folder, selecting Utilities, and clicking the icon featuring a hard drive and stethoscope.

 Once launched, go to the utility’s main file preferences and choose Open Disk Image from the drop-down menu. Then browse or search your computer for the appropriate ISO file, select it and click the Open button in the bottom-right hand corner.

 That’s all there is it to it! Your chosen ISO file should automatically appear as a virtual disc on your desktop. The image will now function in the same way as a normal optical disc, but without the physical disc part. Repeat the process as necessary.
Using Virtual Clone Drive (Windows)
Although Virtual Clone Drive isn’t as popular as Daemon Tools, the utility is one of the best alternatives on the market. The third-party software allows you mount many common files types, including .ISO and .BIN files, in a virtual drive that essentially functions in the same way as your computer’s empty DVD or CD-ROM drive. There are six different editions of the software – from a stripped-down version to a professional edition – but all of them except Virtual Clone Drive require you to purchase a license key after 21 days of use.
Download, install, and launch Virtual Clone Drive. The software is available for Windows 2000, Vista, XP, 7, and 8, but keep in mind you must be an administrator to install the software using Windows 2000 or XP. Like Daemon Tools, remain alert during the installation process to avoid installing any unwanted files that come bundled with the program. You may have to restart your computer for the changes to take effect.

Once launched, choose the number of drives you want to use – Virtual Clone Drive emulates up to eight at once – by choosing a number from the drop-down list next to Number of Drives. Afterward, you will see an individual BD-ROM drive on your computer corresponding to the number of drives you selected to use.

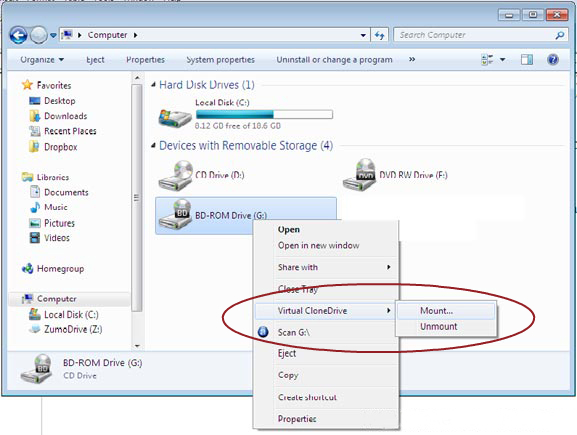
Next, search or browse your computer for the desired ISO image you want to mount. Double-click the file and it will automatically mount in the first available virtual drive on your computer. If you want to mount the ISO image in a different drive, right-click the desired virtual drive, click the Virtual Clone Drive option, and select Mount from the pop-up menu. You’ll then be prompted to choose a path to your ISO image.
 That’s all there is to it! Your chosen ISO file should appear as a virtual disc loaded in the virtual drive you added it to. The image will now function in the same way as a normal optical disc, but without the physical disc part. Repeat the process as necessary.
Using other alternatives
There are a number of other alternatives that will allow you to mount a variety of file formats in a virtual drive on your computer. Most of them are a bit more complex to use than Daemon Tools or Virtual Clone Drive, but they will do the trick if you’re having trouble with the recommended software. Make sure your computer is updated with antivirus software to help prevent any malware intrusion you may face during the installation process.
- Alcohol 52% (Windows)
- Magic Disc (Windows)
- Power ISO (Windows)
What did you think of our how-to guide for mounting ISO images on both Windows and Mac OS X? Do you have a better method for mounting the files? Let us know in the comments below.
[Top image via xmodulo/Flickr]
Editors' Recommendations
- How to change file associations in Windows 11
- How to download a Windows 10 ISO file legally and install Windows 10 from it