You probably already know how to password protect your computer, locking out other, but if you know how to password protect folders you can safely let others use your Windows 11 computer without having to worry about your personal files being accessed. Whether it's sensitive banking info, that batch of embarrassing poems you wrote after your last breakup, or images for that mildly edgy YouTube channel you intend to make one day, it's all okay. With the following techniques you can lock your files away from prying eyes.
If you ever need help remembering passwords, consider these picks on our list of the best password managers.
Windows 11 Pro folder encryption
If you’re running Windows 11 Pro (different to Windows 11 Home), there is a built-in protection system, though it’s not the most fully featured. Windows' standard encryption offers file obfuscation that locks a file to your account. That way, if someone on another account or someone who copied your files away to another PC tried to access your content, they’d need to know your account password (which better not be one of the most common passwords.
Anyone using your PC and account would still have access, however.
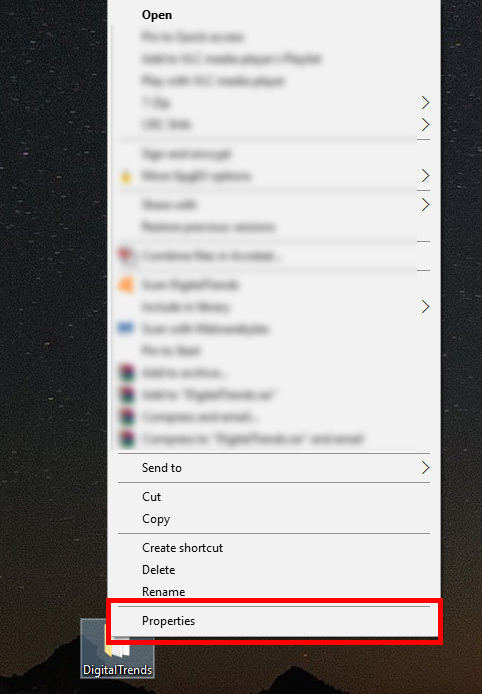
Step 1: Right-click on your chosen file and select Properties from the drop-down menu.
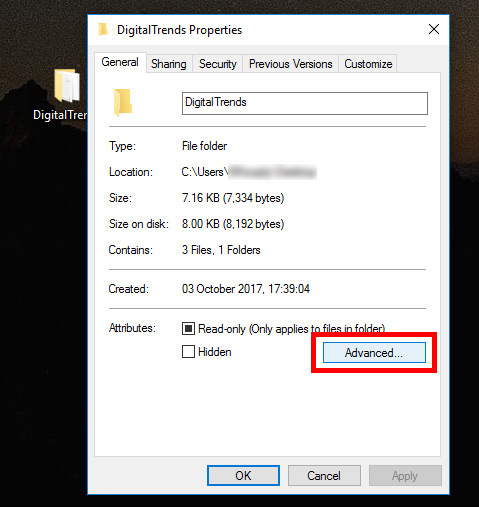
Step 2: Select Advanced.
Step 3: Tick the box next to Encrypt contents to secure data and select OK.
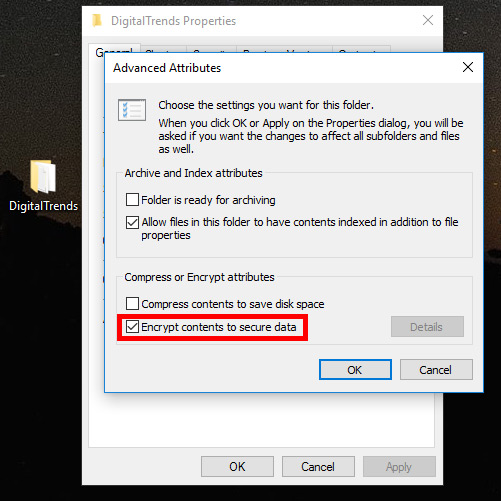
Step 4: Choose Apply, and when prompted, pick whether you want all folders within that directory to be encrypted or merely the top-level one. When you’ve decided, select OK.
Depending on the size and contents of the folder, it may take a while to complete. It’s certainly worth the wait, though, because you will have gained the highest level of security with encrypted data that is impenetrable to outside threats and for your eyes only. You can tell that it’s worked by the little padlock symbols now on each file within. Your folder and all of its data are now password-protected by your account.
Password protecting Windows folders with 7-Zip
Aside from Windows 10 Pro, older versions of Windows offer no protection for your folders. For most Windows users, adding a password to a folder requires a third-party archiving utility or some form of compression software.
Options include 7-Zip, an open-source zip compression utility that’s readily available for free courtesy of Russian developer Igor Pavlov. It does a great job of password-protecting your more critical data. The only catch to this tool is that you have to decompress the folder for the safety measures to activate.
Step 1: Navigate to the 7-Zip download page and select the right download for you. Most users should opt for the 64-bit x64 Windows build. Once downloaded, install it as you would any other software and run it.
Step 2: Locate the folder you wish to password-protect within the main 7-Zip interface and select the Green addition sign in the application’s upper-left corner. Alternatively, drag and drop the folder anywhere within the main 7-Zip interface.
Step 3: Ignoring the bulk of presets in the resulting pop-up window, select Zip from the drop-down menu directly beside the Archive format option to ensure the folder remains compatible with computers without 7-Zip installed. Then, enter and re-enter your desired password for the folder in the text fields located on the window’s right-hand side. Select the OK button when finished and allow the utility to create a compressed, encrypted duplicate of the folder you wish to password protect.
Step 4: Once the password-protected zipped file is created, test it to ensure that it’s working correctly by trying to access any of the content held within. Once you know it’s protected, delete the original folder so it can no longer be located. There’s no need to have two instances of the same data, especially since the original folder will remain unprotected.
Adding password protection to folders in macOS
Like most versions of Windows, Apple’s macOS lacks the native ability to add password protection to folders. Still, what you lose in convenience, you definitely gain in security — don’t forget an antivirus. Adding a rudimentary password will require you to create an encrypted disk image through the operating system’s native Disk Utility — an app that comes pre-installed on nearly all Mac devices.
Once it’s created, you’ll be able to access the folder as a mounted virtual disk, which will allow you to edit, add, and delete content after entering a designated password. Any changes you make while the disk is mounted will automatically become both encrypted and password-protected upon dragging the disk to the Trash.
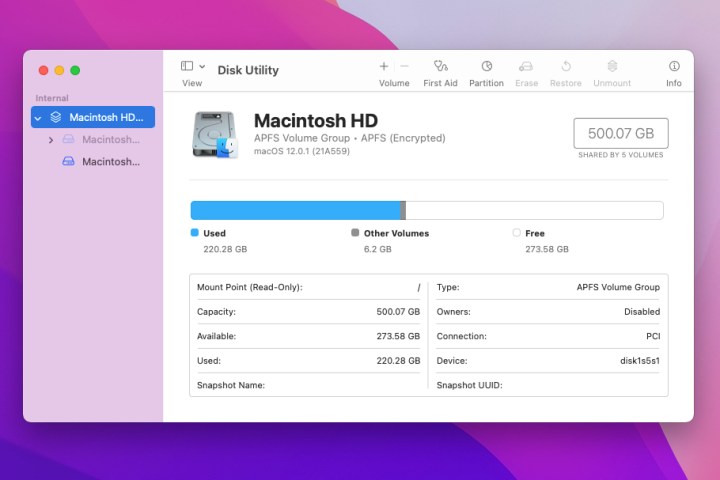
Step 1: Select Disk Utility from the Applications folder. You can also use Spotlight to search for it. Open the application.
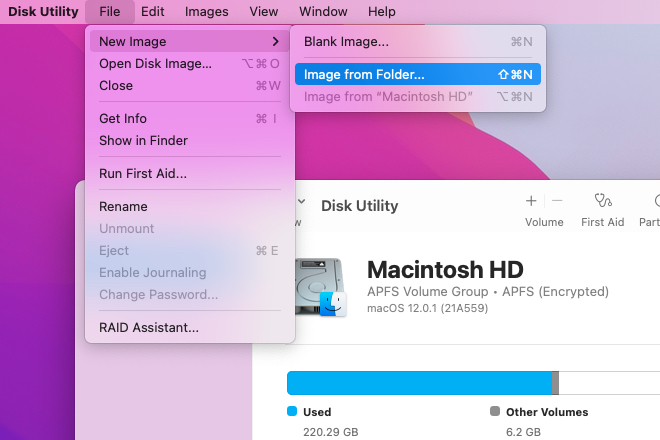
Step 2: After you’ve opened the app, select File. Then choose New image from the resulting menu, then select Image from folder. Now, you can find the file that needs password protection. Select it, then choose Open.
Step 3: Once you’ve tagged and named the folder that needs protection, click Read/Write from the drop-down menu under Image format. You’ll see another drop-down menu under Encryption. Choose 128-bit AES encryption.
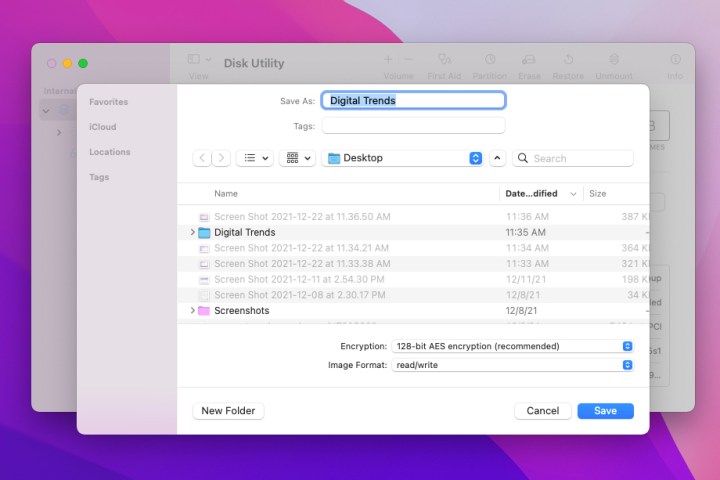
Step 4: Enter and verify your password in the open fields. Select Choose, then Save. Disk Utility will inform you when it has finished creating the image with password protection.

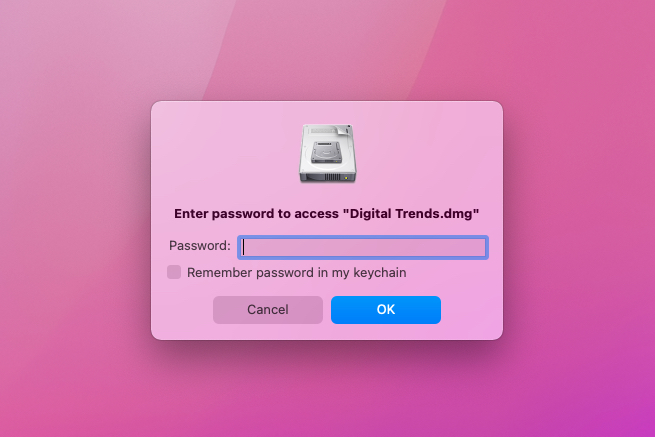
Step 5: You’ll want to ensure that you’ve adequately protected your image. First, try to open the image. You should get an instruction to put in a password. If you do, enter the password and select OK.
Step 6: You should then put the original folder in your Trash and then empty your Trash folder to prevent anyone from opening it.
More ways to protect folders
Beyond password protecting the folder on your computer, try one of the following techniques:
- Hiding the folder — Only you can see hidden folders (at least while the option to see them is turned off). To hide a folder in Windows, right click it and choose 'Properties', then under the General tab tick the 'Hidden' check. On a Mac, highlight the folder and press Shift + "." (period) + CMD. Remember, truly malicious people will be able to find the folders, but they will be out of sight, out of mind for most users of your computer.
- Cloud storage — Using cloud storage services, such as Google Drive, for your folders is another great way to password protect them. Only people able to login to your cloud storage service will be able to access the files.

