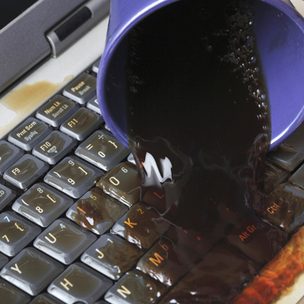
Spilled water on your new laptop? Time to act fast. Move your laptop away from the water, then turn it off immediately and unplug it. If you have a removable battery, remove it too.
OK, are you back with us? Here's a more in-depth guide on what to do if you spill water on your laptop, or worse yet, drop your laptop into water.
What to do when you spilled water on your laptop
When you spill liquid on your laptop, time is of the essence. If you haven't already, power down your laptop and remove the power cable and battery (if possible). Then follow the below steps to try to mitigate any damage caused by your spillage.
Step 1: Remove all easily detachable components. Unplug your mouse and any cables, and remove any flash drives and DVDs. Leave your laptop bare.
Step 2: Dry the outside of your machine. Open your laptop as far as it goes, hold it upside down to let any accumulated liquid drain out, and use an absorbent towel or a lint-free absorbent fabric to wipe wet surfaces until they're dry. Do not try to dry the computer with forced hot air from a heat gun or hair dryer.
Step 3: The type of liquid that was spilled matters. Water is the least acidic, while sugary and alcoholic fluids are more conductive and more corrosive. They can quickly cause permanent damage to your internal components. With that in mind, if you've spilled something more caustic than water, we recommend you take it to a repair shop, or ideally, utilize your warranty to get a replacement.
If you spilled water on your laptop, though, or you can't get it repaired, you can try to dry it out further yourself. Try placing the laptop somewhere warm (not hot) and dry, and leave it there for 24-48 hours. Ideally, open it up as best you can by opening the lid and removing any unnecessary panels. Ignore traditional ideas like bags of rice, as they can introduce more problems than they're worth, but running a dehumidifier in the space or room the laptop is in can help.
If you try to power on your PC before it’s ready, you’re asking for trouble. That can cause a massive short in your system and absolutely wreck your laptop, so make sure you leave it alone for at least a day.

Take your laptop apart
While opening up and removing components from earlier laptops was easy, that’s not the case with modern-day laptops. We don’t recommend trying to take anything apart unless you have an older laptop model that’s not mainly glued together. That said, here are some steps you can attempt if your laptop allows it. It's worth checking YouTube for a teardown guide for your specific laptop if you need assistance.
Please take note that neither Digital Trends nor the author is responsible for any damage caused to your PC by taking it apart.
Step 1: If you haven’t already, and your laptop allows it, remove the battery. Battery removal is typically accomplished by pressing a switch or button on the underside of your computer.
Step 2: If you’re concerned about liquid leaking through to the entire system — to components like your memory and storage drive — you can remove those, too. On some laptops, you’ll find panels that allow for their removal on the underside. However, in most cases, you must use a Phillips or Torx screwdriver to remove them. For the memory, press the side clips to eject each stick. With the solid-state drive or hard drive, you likely must undo more screws to free it from the frame. Be sure to detach it from the power and data connection ports or cables with care.
Step 3: Examine each component you’ve removed to check for any sign of wetness or corrosion. Any wet parts should be dried, but if the liquid is anything other than water, wipe it off using a clean toothbrush dipped in 99% isopropyl alcohol — this will dissolve gunk without causing liquid damage and evaporate without leaving a sticky residue.
While your laptop is disassembled, it is a good opportunity to clean the laptop fans to ensure maximum performance when the device is reassembled.
Step 4: Once everything is clean and examined, and you’re sure you’ve brushed away any signs of corrosion, leave everything alone to air-dry for two to three days in a warm, dry area. A fan will hasten the drying process. Do not use a hair dryer, as this could cause static problems. Once you’ve picked your machine apart and given the components time to dry, you can follow the instructions in reverse to put your laptop back together and see if it works.
Hopefully, all will be well, but if not, take it to a repair center.
Moisture on the laptop screen
In a considerably less serious issue, you may simply spill water or a liquid on your laptop screen, not hitting your hardware or components. Here, your laptop's functionality will likely not become impaired, but the inability to easily get a new screen means this can still be a critical issue. In some rare cases, your laptop's manufacturer may void your warranty if you do any unauthorized cleaning of your laptop's screen. In all other cases, here's what to do:
Step 1: Immediately: Turn off the monitor and quickly remove the bulk of the water so it is no longer pooling over the surface of the monitor. If you have excess liquid it may roll to the edges of the screen and get into your laptop's components or get into speaker/mic holes near the webcam. Unless you have a microfiber cloth handy (you probably won't) be sure to be gentle and simply dab up any liquids. Rubbing or aggressively cleaning at this stage could cause permanent damage to the monitor.
Step 2: Grab a microfiber cloth and dampen it with filtered or distilled water. If you spilled soda or other thick liquids on the monitor, follow the advice of our monitor cleaning guide, and simply add a dash of white vinegar to the water. It is also worth check our laptop display cleaning guide for more tips.
Whatever solution you use for cleaning, note that you should apply any cleaning liquids directly to the cloth and not the monitor.
Step 3: Gently rub the monitor with the dampened (but not soaked) microfiber cloth.
Step 4: Wait 24-48 hours to turn your laptop back on. Consider contacting customer support that came with your laptop at this time.
This is an emergency maintenance tip that hopefully you won't ever need. But there are plenty of maintenance tips you should follow, such as ensuring you keep your laptop keyboard clean.