Port forwarding is a solution to a problem that many gamers know all too well: You attempt to join a friend in an online match but can’t because your connection to the gaming network is limited, blocking specific multiplayer features. It can even fix issues you run into when you host files on a private server and remote users can’t connect.
The problem in both scenarios stems from how data flows to and from your local network. Your networking hardware manages traffic, preventing unfamiliar, possibly malicious connections. That sometimes means you can’t make out-of-the-ordinary direct connections without manually changing settings.
This guide shows you how to port forward and get the best connection possible to your favorite online services.
What is a port?
In networking, a port is a specific “dock” at a known address, which data can be funneled through to make a connection between two devices. Each port has a specific number ranging from 0 to 65535 so the data knows exactly where to go when it reaches its destination.
Here are a few common ports assigned by the Internet Assigned Numbers Authority standards organization:
- 20 = File Transfer Protocol (FTP)
- 21 = File Transfer Protocol (FTP)
- 22 = Secure Shell (SSH)
- 25 = Simple Mail Transfer Protocol (SMTP)
- 53 = Domain Name System (DNS)
- 80 = Hypertext Transfer Protocol (HTTP)
- 110 = Post Office Protocol v3 (POP3)
- 143 = Internet Message Access Port (IMAP)
- 443 = Hypertext Transfer Protocol over TLS/SSL (HTTPS)
For instance, an email you send leaves your modem on port 110, bounces across multiple hops as it darts through the internet, and arrives at its destination. It then goes through that network’s router and is directed through port 110 before being officially received by the email client.
For a guide on exactly what FTP is and how to use it, check out our in-depth tutorial.
What is port forwarding?
Your internet service provider (ISP) assigns a dynamic numeric address to your modem. The internet doesn’t see your local devices — only your modem. This address rarely changes, but it’s also not permanent (static).
ISPs typically provide hardware in two ways: A single hybrid unit combining a modem with a router, or two separate stand-alone units. With the latter setup, a physical Ethernet cable connects the modem to the router’s Wide Area Network (WAN) port.
Why do we even need a router? Because a modem only provides one physical internet connection. A router enables you to connect multiple wired and wireless devices.
In both scenarios, the router has a unique address separate from the modem, typically with 192.168.x.x. or 10.x.x.x address — these addresses differ from router to router. In turn, it assigns IP addresses to each locally connected device based on its address, not the modem. For instance, if the router’s address is 192.168.0.1, then the addressing for all connected devices start at 192.168.0.2. It then routes all traffic to the client devices using those assigned addresses.
Here’s a simplified look:
Internet server > modem > router > your PC
But the router doesn’t merely translate and route traffic. It also features a built-in firewall that monitors inbound and outbound communication. If the router doesn’t know where to send inbound or outbound traffic, it simply ignores the communication.
All local devices have identical ports that send and receive data packets, which can be problematic. For instance, port 80 is one of the commonly used ports under the Transmission Control Protocol (TCP) umbrella. This port routes web page requests, but it is also used by Xbox Live and the PlayStation Network.
When the router receives data, it checks its list of assigned addresses to determine the best match. Since you need Xbox Live’s packets sent via port 80 to reach your Xbox One console or Windows 10 PC, creating a direct line between the Xbox Live servers and your console is essential. That means creating a special rule within the router that allows a secure, direct connection.
That’s where port forwarding begins.
How to port forward
Unfortunately, router interfaces are not identical across all available models, so how you find the port forwarding section may be different than what we show here. For this example, we use a Linksys router, which crams port forwarding in the Security section.
Assign a “static” IP address
Before you can forward ports, you need to access the router’s backend interface. Simply type the router’s local address into a browser and sign in using your credentials. If you don’t know the address and/or credentials, the manual typically provides that information.
Once you gain access, create a “static” IP address for the device that will receive the forwarded traffic. Normally the router assigns dynamic IP addresses to each connected device, meaning these addresses will change. To forward a port, however, a device needs a permanent address so the router knows exactly where the inbound traffic must go.
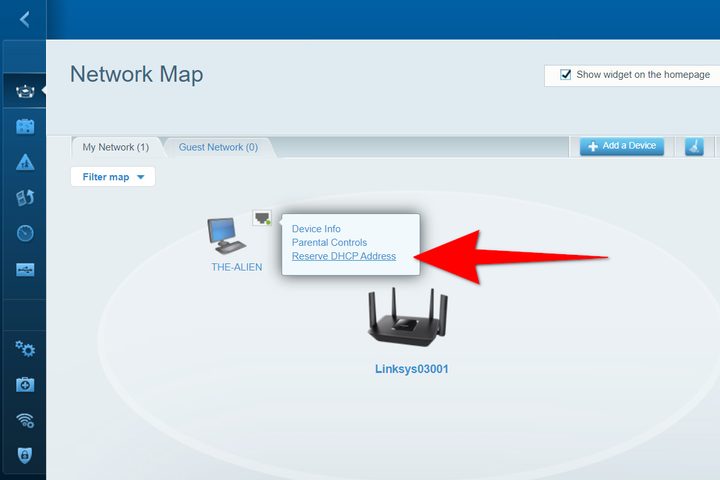
Modern routers typically provide a “network map” listing all connected devices. In our example, we can select a connected device and click Reserve DHCP Address in a pop-up menu. That action automatically reserves the current address, making it “static” for that specific device.
To manually edit the static address, we can select the device again and this time click Edit DHCP Reservation.

In the following window, we can alter the third and fourth fields and then click the Save link. We can also click the Cancel link followed by Delete to remove the static IP address assignment later.

Now that we have a static IP address, we can forward port traffic.
Meet the three forwards
On our Linksys router, port forwarding resides under the Apps and Gaming tab in the Security section. Here we see three options: Single Port Forwarding, Port Range Forwarding, and Port Range Triggering. Here is a brief explanation of each:
- Single Port Forwarding – Continuously forward traffic to one specific device through one specific port. These ports remain open.
- Port Range Forwarding – Continuously forward traffic to one specific device through a range of ports. These ports remain open.
- Port Range Forwarding – Forward traffic accessible by all network devices through a range of ports. These ports remain closed until access is requested.
Now let’s see how to use each version!
Single Port Forwarding
To start, we will add a single port range. Remember, the following steps may look different on your router, but the method should be similar.
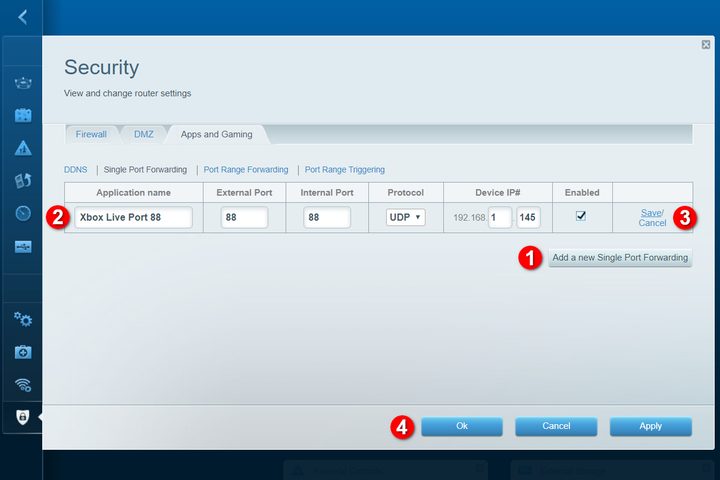
Step 1: Click the Add a new Single Port Forwarding button.
Step 2: Enter an application name. This doesn’t affect the port forwarding itself but is only used as a label. In this case, we call it Xbox Live Port 88.
Step 3: Enter the External Port and Internal Port numbers. In this case, we are forwarding port 88, so that’s the number we enter in both.
Step 4: Select the protocol: UDP, TCP, or Both. For Xbox Live, we must select UDP.
Knowing what these two protocols are is irrelevant, but you do need to know the correct protocol to successfully forward ports. Port forwarding won’t work if you have the rule set at TCP but the connection uses UDP.
However, for the curious, here is a brief explanation of each:
- Transmission Control Protocol (TCP) – Connection-based data transfer between client and server.
- User Datagram Protocol (UDP) – Data transfer between client and server that doesn’t use a direct connection.
Step 5: Enter the Device IP Address. This is the static address we assigned to the source device in the Network Map.
Step 6: Click the Save link followed by the OK button.
Unfortunately, to get the best possible connection, Xbox Live requires additional ports to be open. There are seven in all, requiring you to make six additional Single Port Forwarding entries. Here is the complete list:
- 53 (Both)
- 80 (TCP)
- 88 (UDP)
- 500 (UDP)
- 3074 (Both)
- 3544 (UDP)
- 4500 (UDP)
The list for port forwarding with the PlayStation Network is longer:
- 80 (TCP)
- 443 (TCP)
- 465 (TCP)
- 993 (TCP)
- 3478 (Both)
- 3479 (Both)
- 3480 (TCP)
- 5223 (TCP)
- 8080 (TCP)
Port Range Forwarding

In addition to single ports, many games require a range of ports for the best online experience, like Fortnite and Fallout 76. In this example, we will select the Port Range Forwarding option and add a port range required by Fortnite on Windows 10.
Step 1: Click the Add a new Port Range Forwarding button.
Step 2: Enter the application name. Here we call this rule Fortnite Range.
Step 3: Enter 5795 as the Start Port and 5847 as the End Port.
Step 4: Select Both as the required protocol.
Step 5: Enter the Device IP Address. This is the static address we assigned to the source device in the Network Map.
Step 6: Click the Save link followed by the OK button.
Unlike Xbox Live and the PlayStation Network, Fortnite for Windows requires both single port and port range entries, but the list is way shorter:
- 5222 (Both)
- 5795-5847 (Both)
Port Range Triggering

This is a more secure option than leaving ports open continuously. In this case, ports remain closed until a client device makes an outbound connection request. The router’s firewall then opens the related inbound connection ports temporarily. This method does not require static IP addresses, but only one client at a time can access an open port
Step 1: Click the Add a new Port Range Triggering button.
Step 2: Enter the application name. Here we call this Fortnite Range.
Step 3: Under Triggered Range, enter 5795 as the Start Port and 5847 as the End Port.
Step 4: Under Forwarded Range, enter 5795 as the Start Port and 5847 as the End Port.
Step 5: Enter the Device IP Address. This is the static address we assigned to the source device in the Network Map.
Step 6: Click the Save link followed by the OK button.