How to resize an image in Photoshop

Photoshop is not just an application for professionals who require a powerful image editor. It’s also a versatile program that an average user who doesn’t have a deep understanding of editing digital images can benefit from in many ways. One of the most commonly used components of Photoshop is its resize tool.

Here’s how to resize an image in Photoshop.

Difficulty

Easy

Duration

5 minutes

What You Need

  • Adobe Photoshop

  • PC

Using the Image Resize tool

Step 1: Once you’ve opened the image you want to change the size of, click the Image tab. From the drop-down menu, select the Image Size field.
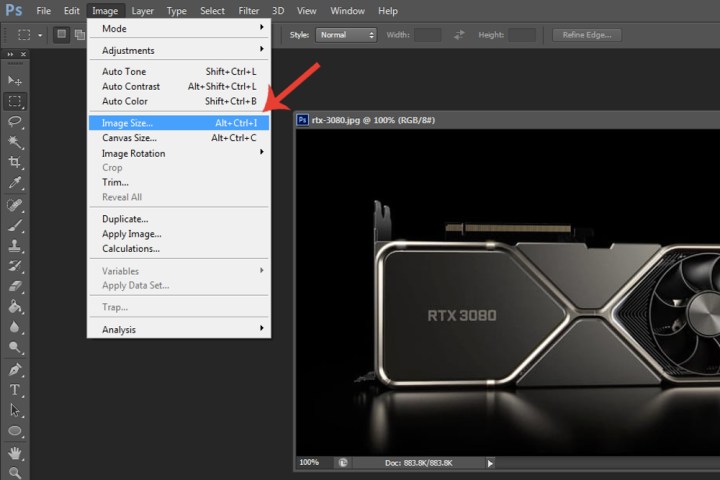
The Image Size option in Adobe Photoshop.
Image used with permission by copyright holder

Step 2: This will open a separate window where you can customize the image’s size via several configuration options. To modify the width or height, highlight the box where its current size is listed by double-clicking the number inside, then enter a new width or height. Depending on which field you selected, Photoshop will automatically enter a new height/width to preserve the aspect ratio.

However, if you want to enter both width and height manually, unselect the Constrain proportions box. Please keep in mind that not entering a suitable width/height can lead to the image becoming distorted.

If you want to resize an image in Photoshop without losing quality (unless you know what you're doing), ensure the Constrain proportions box is selected.

Click OK when you're done.

The Image Size window in Photoshop for changing the size of an image.
Image used with permission by copyright holder

How do I resize an image in Photoshop without losing quality?

In addition to Constrain proportions, another feature Photoshop offers for retaining image quality is its Bicubic smoother preset.

Step 1: Open the Image Size window via the Image tab.

Step 2: If you’re making an image larger, then adjust the image’s size as explained in the previous section. Once you’re done, click the drop-down menu at the bottom and select Bicubic smoother (best for enlargement).

If you’re making an image smaller, select the Bicubic bharper (best for reduction) option. Click OK.

The Bicubic Smoother option in Adobe Photoshop.
Image used with permission by copyright holder

Adjusting an image’s size with the Transform tool

The Transform tool is another way to modify an image’s size without changing the core dimensions of the file. It also serves as somewhat of a shortcut to resize an image in Photoshop.

Step 1: Make sure the image is selected. Use the Ctrl + A keyboard combination to do so. Now click the Edit tab > Transform > Scale.

The Scale option in Photoshop within the Transform section.
Image used with permission by copyright holder

Step 2: On the corner and sides of each part of your image, drag the small rectangle box to scale the image. Alternatively, use the Ctrl + T keyboard shortcut to enable the Scale tool.

Using the Scale tool in Photoshop to drag an image to scale it.
Image used with permission by copyright holder

Using preset templates to resize an image

Photoshop provides several default image size options that can help you in changing an image’s size without manually changing the width and height yourself. In newer versions of Photoshop, click the Fit to drop-down menu within the Image Size window to see what you can choose from.

Editors' Recommendations

Zak Islam
Computing Writer
Zak Islam was a freelance writer at Digital Trends covering the latest news in the technology world, particularly the…
How to resize an image
A bird's eye view of a person working on a laptop.

There is a seemingly endless number of tools to choose from when it comes to resizing pictures. Your Windows 10 desktop or Chromebook already has the vast majority of these handy tools, so you can edit your images quickly without paying for expensive editing software that hogs precious memory space.

Read more
PhotoShop Generative Fill is making me good at PhotoShop again
Composite image of generative fill and background in photoshop.

Adobe PhotoShop has hopped onto the artificial intelligence hype train with some new and exciting features that are making me feel like a PhotoShop wiz again. After decades of using this tool, I have fallen into habits and routines, and I rarely explore new features. Generative Fill is making me feel like I'm on the cutting edge again, and it's saving me a lot of time in the process.

It's like an AI image generator in PhotoShop. Here's how to use Generative Fill to do all sorts of fun things in PhotoShop more quickly and easily than ever before.

Read more
Best Adobe Photoshop deals: Get the photo-editing software for free
Close up of Adobe Photoshop app icon being chosen from among other Adobe apps on a laptop screen.

PhotoShop is the perfect photo editing tool for photographers, designers, professionals and amateurs. It's been the go-to software for over three decades now, and Adobe has been consistently innovating with it. While there are some powerful PhotoShop alternatives, like GIMP, and even some free options, like GNU, nothing is quite as comprehensive as PhotoShop. Besides, if you intend to share files with others designers, photographers and artists, you'll need to hop on the same boat to keep everything simple. Unfortunately PhotoShop can get expensive, and Adobe has switched to the subscription method, meaning you'll have to pay for it every year. Thankfully there are a few options that can save you some money. Below we've listed all the free trials, sales and student discounts we can find.
Adobe Photoshop free 7-day trial

If you've never used the tool before or you just need to do something quick and don't want permanent access, you can always utilize Adobe's free trial offer. You'll get access to Photoshop on desktop and iPad, including Adobe Express, and you can take advantage of free tutorials, fonts, templates, and much more. Plus, for the trial period you'll get up to 100GB of cloud storage. After the trial, it's $21 per month to retain access if you want it -- that's just Photoshop.

Read more