The Sudowrite Story Engine is a tool that's designed to help you finish, finalize, or actually generate an entire novel from scratch. It uses the power of OpenAI's natural language model aAI (the same one that power versions of ChatGPT) to generate text for a real novel. It's not perfect, and you will absolutely need to edit it — a lot. But it's a fantastic tool for creating the bones of a story, or building something more on top of that.
Here's how to use Sudowrite's Story Engine to write your own novel.
Note: Copywrite law for AI-generated content is still extremely murky and likely to change a lot in the coming years. You're probably better off not using Sudowrite to generate entire novels if you plan to commercialize them, but tweaks, story suggestions, and edits should be absolutely fine.
How to use Sudowrite Story Engine
Sudowrite has a number of tools to help writers with generated prompts and paragraphs, but the Story Engine works slightly differently. Here's how to get started with it.
Step 1: Navigate to Sudowrite's homepage, and select Login to log in with an existing account, or one you're about to make.
Step 2: Sudowrite is a paid service — starting at $10 a month for the entry-level tier. However, you can use a free trial for any of them to play around with the Story Engine. Select which tier you'd like a trial of to continue if you don't already have a subscribed account.
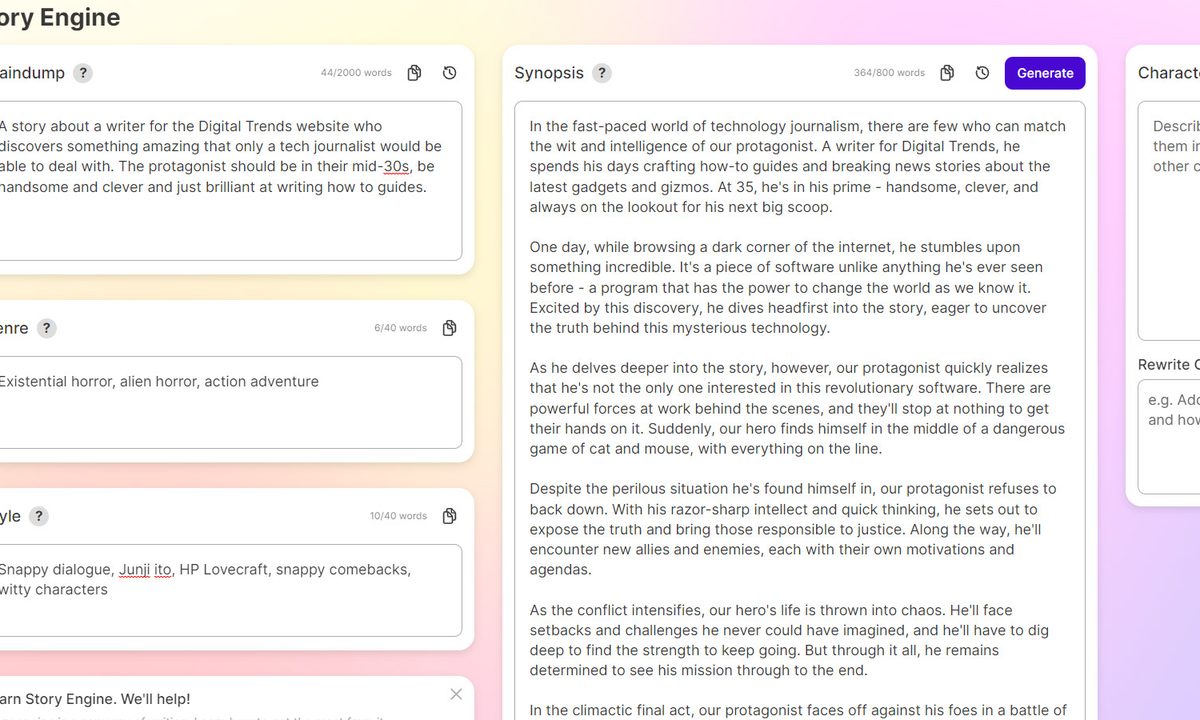
Step 3: From the main Sudowrite page, select the Story Engine from the left-hand pane.

Step 4: On the next page, you'll find a number of form fields to fill in. Each has a different purpose in informing the Story Engine of what you want the book to be about, its style, and to some extent, its substance.
Start with the field marked Braindump, and write everything you can think of about the novel. Don't hold back. If it relates to the novel, get it down. The more information the engine has to work with, the more accurate it can be in terms of what you want.
Step 5: When you're finished there, move on to the genre and style sections. Genre can be as specific or as vague as you like, leaving room for interpretation. Try to include a few different genres your book could cross into, if you feel it's appropriate.
As for style, you might want to look into different literary styles so you can more accurately instruct the AI on how to approach the novel. You might want to include things like "avoid cliché," or "heavy exposition," or "limit metaphors."
For more information, hover over the ? next to each section. It explains what aspect of the story that form field influences.
Step 6: When you've completed those fields as best you can, select Generate next to the Synopsis section, and the AI will write a synopsis of your story. If you want to make adjustments to it, you can add extra info in the Rewrite synopsis field, and the AI will take another stab at the synopsis.
Alternatively, if you've already written a synopsis, pop it in there.

Step 7: Scroll along to the next field and you'll be able to put in information about your characters -- who they are, what they look like, what they do, their tendencies, fears, etc. Alternatively, hit the Generate button again, and the Sudowrite Story Engine will craft some characters for you.

Step 8: Next, you have the option to add your story outline. If you have an act by act or chapter by chapter plan for how your story should go, then put it here. Again, you can also use the AI to generate an outline for you by selecting the Generate button.

Step 9: Finally in the Chapter 1 section, you can start actually writing your story. You can write it yourself with some AI help, or put clear instructions for the AI about how to write it. Alternatively, just hit Generate and it'll do its best based on the outline and other information you've provided.
Whether you write it yourself, have the AI do all the work, or put it together with some AI assistance is up to you, but you'll have immediate access to your outline and other elements that have been spat out by the Story Engine to help you.
The Beats section helps you look at the main elements of the first chapter -- what they should be like, what hooks you might use, where your characters will be introduced, and more.
In the Prose section underneath that, you'll find the actual story itself. As with all the other sections, input any information you want included — or write the chapter yourself if you like.
Here the Generate button has a few options. The Most Accurate will generate the best text, but at a slower speed. You also have options for Best Prose, and Fastest, which generate text faster, but with less accuracy, based on your prompts. The writing it produces is also unlikely to be as strong.

Step 10: Now comes the hard part: editing. Sudowrite Story Engine is far from perfect, and you'll find it makes errors. It's also not as strong a writer as most human writers. You'll want to read through everything it outputs and make your own adjustments and edits, especially if you're planning on publishing this novel in any way under your own name.
To help you with that, you can use the History tool at the top of the Prose field. It looks like a clock with an arrow running around it counter-clockwise. It'll show you any changes you or the AI made. You can also have the AI take another stab at the whole thing by adjusting any other fields and then hitting the Restart button.
Step 11: When you're happy with the final results, either copy and paste it using the Copy button next to the History button at the top of the field, or the Send to doc button at the bottom of the field. That will make it easier to export the content outside of Sudowrite if you wish, or send it back into the main Sudowrite tool so you can continue writing with AI assistance.
Step 12: When you're ready to move on to the next chapter, scroll to the top of the Story Engine page and select Chapter 2 from the drop-down menu. Alternatively, select the Create chapter button to move beyond the initial chapters.

You'll still need to do a lot refining of the AI's work and building of the chapters into a cohesive story, but the potential is there for Sudowrite Story Engine to help you write your next novel.
Want a second pair of AI eyes to look over your work? Check out ChatGPT's new plugins. They make it even more capable than it was already.