Guardians of the Galaxy hones in on team-focused combat and storytelling while providing a plethora of collectible items and outfits. Thankfully, the team at Square Enix decided not to go the microtransaction route and made every outfit in Guardians of the Galaxy available to all players. In this guide, we’ll go over where to find every outfit in Guardians of the Galaxy.
- Chapter 1: A Risky Gamble
- Chapter 2: Busted
- Chapter 3: The Cost of Freedom
- Chapter 4 The Monster Queen
- Chapter 5: Due or Die
- Chapter 6: Between a Rock and a Hard Place
- Chapter 7: Canine Confusion
- Chapter 8: The Matriarch
- Chapter 9: Desperate Times
- Chapter 10: Test of Faith
- Chapter 11: Mind over Matter
- Chapter 12: Knowhere to Run
- Chapter 13: Against All Odds
- Chapter 14: Into the Fire
- Chapter 15: Broken Promises
- Guardians of the Galaxy combat tips and tricks
- Guardians of the Galaxy’s full soundtrack is an ’80s meme dream
- Marvel’s Guardians of the Galaxy: Beginner tips and tricks
Chapter 1: A Risky Gamble
There are two outfits to find during Guardians of the Galaxy’s opening chapter. Star-Lord, Rocket, and Groot have split off from the team. They’re in charge of deploying Rocket’s monster-luring devices around their section of the quarantine zone while Gamora and Drax tackle a different area.
Rocket’s Guardians of the Galaxy (2014) outfit
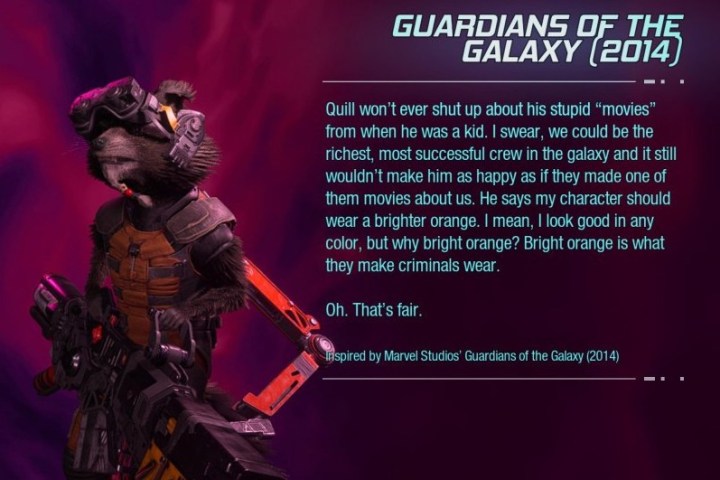
You’ll eventually slide down a ramp and arrive at a fork in the road. Rocket insists that the left path is the correct one (which it is). Head down the right path. You’ll know you’ve gone the right way when Rocket chastises you for it. Turn around once you reach the dead end and head back. You’ll see an area you can drop down to on the left. Inside will be a bundle of components and Rocket’s Guardians of the Galaxy (2014) outfit.
Groot’s Guardians of the Galaxy (2014 ) outfit

Once you’ve reunited with Groot, you’ll eventually enter an area with a series of tunnels. Don’t go any further. Instead, look to your right to find a hole in the wall large enough to crawl through. You’ll know you’re looking at the right spot if it’s covered in pink gunk. Crawl through to find Groot’s Guardians of the Galaxy (2014) outfit.
Chapter 2: Busted
The Guardians are in deep trouble with Ko-Rel and the rest of Nova Corps. There are technically two outfits in this area; however, you can only claim one of them in Chapter 2. Don’t worry; the Guardians will return to the Nova Corps station in Chapter 7 with some newfound abilities to unlock the second outfit.
Star-Lord’s Nova Lord outfit
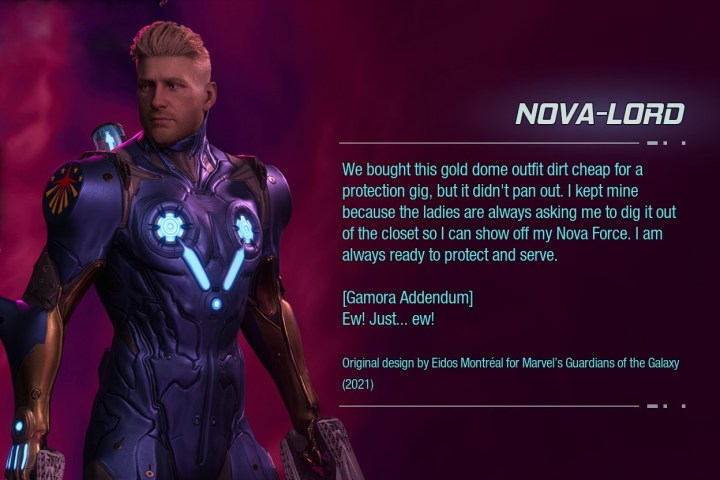
Star-Lord and Nikki will banter back and forth as they make their daring trek through the burning Nova ship. They’ll eventually push a box against a burst pipe to block some fire. This triggers a dialogue option to either encourage her or take control. Your choice doesn’t matter in terms of the outfit. This dialogue exchange lets you know you’re in the right place. Behind Nikki is a thick yellow pipe that you can duck under. Crawl through to find Star-Lord’s Nova Lord outfit. As far as the dialogue option is concerned, you should encourage Nikki and always side with her whenever given the opportunity. She’ll slip you her pass-key, which pans out for you in the future.
Chapter 3: The Cost of Freedom
Now thousands of credits in debt, the Guardians travel to Lady Hellbender’s home planet to sell Groot or Rocket to the monster queen. There are two outfits to find while exploring Seknarf 9. Who you choose to sell has no bearing on finding these outfits. However, you should always choose to sell Groot. Furthermore, you have to sell Groot if you want to find the outfits in the next chapter.
Gamora’s Guardians of the Galaxy (2014) outfit

After the Guardians fend off the jelly monsters for the first time, they’ll have to make their way out of the fighting pit. Have Drax and Rocket manipulate the area to climb out of the pit. Once you arrive in the thick forest, hug the right side. You’ll know you’re in the right area when you hear a loud roar. You’ll eventually find a path leading to a dark cave and will have to blast your way through a rapid-reload pile of scut. Explore the cave until you drop down into a smaller fighting pit. There are two jelly enemies to defeat, and you won’t have the other Guardians at your side. Vanquish the jelly monsters and press onward. You’ll find Gamora’s Guardians of the Galaxy (2014) outfit up ahead.
Groot’s Five Horsemen of the Apocalypse outfit

After the Guardians claim the monster cage, Groot will build a bridge up to a cliffside. You should see the outfit box from where you are, but you’ll have to find the hidden path. Cross the bridge and head left. You’ll find some shootable gray gunk blocking the entrance to a cave. Inside the cave, you’ll have to use your elemental guns to freeze the geysers. Jump between the ice platforms to climb out of the cave. You’ll find Groot’s Five Horsemen of the Apocalypse outfit on the ridge. You can jump back down to your fellow Guardians and don’t have to backtrack out of the cave.
Chapter 4 The Monster Queen
To find the outfits in Chapter 4, you must sell Groot to Lady Hellbender. Selling Rocket triggers a different scenario that’ll keep you from sneaking around her palace after dark. If you jump right into Chapter 4 from the main menu, you’ll automatically sell Groot.
Drax’s Guardians of the Galaxy (2014) outfit

After sneaking through the first wave of passed-out hellraisers, the Guardians arrive in Lady Hellbender’s throne room. Behind the throne is an elevated walkway. Head up there and go left to find Drax’s Guardians of the Galaxy (2014) outfit tucked in the corner.
Rocket’s Five Horsemen of the Apocalypse outfit
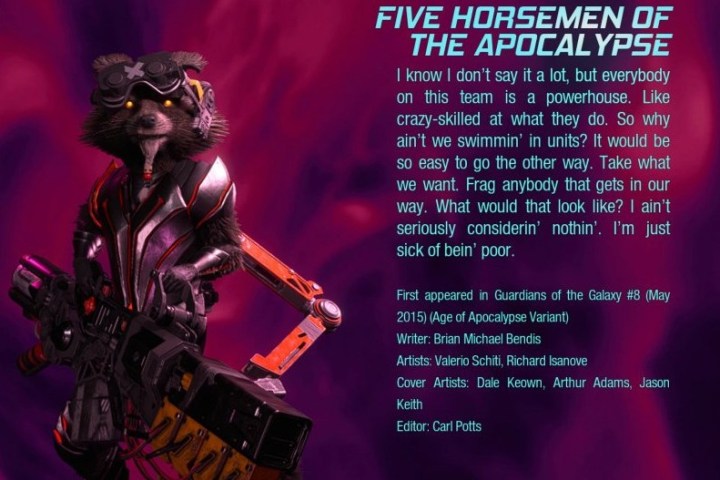
After riding the elevator down from Lady Hellbender’s throne room, the Guardians will have to sneak past more drunk Hellraisers. Before proceeding forward, turn right, and hop over the table. You’ll have to sneak by a few more Hellraisers before finding a wall you can crouch under. On the other side of that wall is Rocket’s Five Horsemen of the Apocalypse outfit.
Chapter 5: Due or Die
With enough money to pay their fine, the Guardians head back to the Nova Corps base to find it empty. There are two Nova Corps-related outfits to find on this mission — one of which involves helping Groot find a bathroom.
Drax’s Nova Corps outfit

Before they get off the Milano, Groot asks if there’s a bathroom in the Nova Corps station. He’s met with a unanimous, “hold it in.” You’ll eventually come to a room where Star-Lord has to use his visor to reroute power to open the door. Reroute the power to the locked door on the left, revealing what Groot’s been looking for … a bathroom! Head inside to find Drax’s Nova Corps outfit. You must unlock this door before opening the main door. Opening the main door triggers Rocket to leave the control room.
Groot’s Nova Corps outfit

Star-Lord will eventually pick up a helmet and overhear some people talking on the other end. The right decision here is to put the helmet down and say nothing. However, you’ll still have to fight your way out of the base. You’ll eventually come to a hallway full of corrupted Nova Corps soldiers. Once they’re defeated, you’ll enter an orange-glowing room. There’s a lift in the middle you’ll have to jump on to get out. Don’t leave just yet. Groot’s Nova Corps outfit is hidden behind a box on the opposite side of the room.
Chapter 6: Between a Rock and a Hard Place
Tensions are high when the Guardians arrive on Knowhere. Rocket and Groot head off on their own, and Drax and Gamora eventually abandon Star-Lord after talking to Mantis. Now on his own, Star-Lord can either gamble all their credits away or go to find Cosmo. There is only one outfit to find during their first trip to Knowhere.
Star-Lord’s Guardians of the Galaxy (2014) outfit

Head toward the objective until you find a small flight of stairs leading to a building covered in pink branches. This building is across from the colorful slot machine. On the left side of the building, you’ll see a trio of children pointing finger guns at each other. If you have a hard time seeing them, turn the subtitles on and watch for “Pew-pew, pew-pew.” Behind these children is a railing you can jump over, leading to a series of red pipes below. Walk left along the pipes to find Star-Lord’s Guardians of the Galaxy (2014) outfit.
Chapter 7: Canine Confusion
Cosmo, the Russian Space dog, transports the Guardians back to the Nova Corps ship to find out what happened. There are two outfits to find during this mission. You’ll be using your shock elemental ammo to grab the outfit left behind during Chapter 2.
Rocket’s Nova Corps outfit

The Guardians will find themselves on a circular elevator platform. As the elevator ascends, you’ll have to fend off waves of enemies. After the second wave, Rocket will open two doors, and you’ll have to reroute the power to keep the elevator moving. From Rocket’s perspective, enter the room on the left side to find his Nova Corps outfit. You’ll have to use Groot to raise a platform, eventually finding a shaft you can crouch through.
Gamora’s Nova Corps outfit

The Guardians will retrace Star-Lord’s steps from Chapter 2 to find Nikki’s secret hideout. You’ll descend a flight of stairs with a pool of electrified water at the bottom. Use Star-Lord’s shock ammo to reroute the power away from the water. You’ll then see a set of pipes that Gamora can chop down with her sword. Proceed through those pipes to find Gamora’s Nova Corps outfit.
Chapter 8: The Matriarch
If you’re outfit hunting, the first portion of the Matriarch is going to be a drag. Thankfully, if you’ve already played through this mission, you won’t have to redo Star-Lord’s entire promise sequence. There are two outfits to find after your initial encounter with The Matriarch (which we won’t spoil).
Star-Lord’s Bad Lord outfit

The Guardians dive head-first into what Rocket thought was toxic warp-drive fluid. They’ll sludge down a tunnel and emerge safely on the other side. There’s a tall box nearby that Drax can pick up and move. Have him place it by the mouth of the tunnel you just left. Climb up to find a hidden room containing Star-Lord’s Bad Lord outfit. We can’t believe the other Guardians allow him to dress like this!
Drax’s Cage Match outfit

After the skiff sequence, you’ll descend in an elevator. Once the elevator stops, walk around to the back to find Drax’s Cage Match outfit.
Chapter 9: Desperate Times
Since you’ll spend the entirety of this mission on the Milano, there are no outfits to find in Chapter 9 of Guardians of the Galaxy.
Chapter 10: Test of Faith
Drax needs help, and the Guardians are there to bring him back from the brink of the Promise. However, they’ll have to navigate the caves under Lamentis to find the source of Drax’s mind prison. There are three outfits to find during this mission.
Gamora’s Five Horsemen of the Apocalypse outfit

Mantis brings the Guardians into the cave system below Lamentis. Early on, they’ll cross a crystal bridge and arrive at a shallow river and waterfall. Behind the waterfall, you’ll see the pink hue of an outfit box. Enter the cave behind the waterfall to find Gamora’s Five Horsemen of the Apocalypse outfit.
Rocket’s Hero of Halfworld outfit

After fending off the Ogrode, you’ll come to another open area. In the back right, you’ll see a crack in the wall and a small opening Rocket can crawl through. He’ll blow a hole in the wall, allowing you to shimmy your way through. Use your freeze ammo to get rid of the poison gas blocking your path. Then, have Groot use the lift to bring you to the platform above. Exit the cave and keep climbing until you find a narrow path to shimmy across. On the other side is Rocket’s Hero of Halfworld outfit.
Groot’s Annihilation Conquest outfit

When Groot is guiding the Guardians through the dark cave, hug the right until you see a room lit with purple light. Shimmy through the crack to find Groot’s Annihilation Conquest outfit.
Chapter 11: Mind over Matter
As you’ll be spending the majority of this mission inside Drax’s head, there are no outfits to find in Chapter 11 of Guardians of the Galaxy.
Chapter 12: Knowhere to Run
The Guardians arrive back on Knowhere, but it’s not how they remember leaving it. Even poor Rocket’s favorite dive bar got destroyed in the invasion. There are five Outfits to find in this Chapter, a few of which are already available to you if you pre-ordered the game. If you already have these outfits, you’ll find components in their place instead.
Drax’s Thanos Imperative outfit

Those who pre-ordered the game will already have this outfit. If not, you’ll find it early on in this chapter. Defeat the first wave of enemies at the beginning of that chapter. There is a yellow crate that Drax can pull to create a jump point. Jump up to the above platform to find Drax’s Thanos Imperative outfit.
Rocket’s Smuggler outfit

After fighting through the Knowhere marketplace, you’ll find a tight area to squeeze through. Don’t go through just yet. Instead, turn right to see a glowing green piece of machinery that Star-Lord can manipulate with his wind ammo. Behind is a hallway leading to Rocket’s Smuggler outfit.
Groot’s Impaler outfit

Those who pre-ordered the game will already have this outfit in their inventory. If not, keep an eye out after Gamora cuts down the wires to move forward. After she cuts the wires and you find a wall for Drax to push aside, turn left. You’ll see another green bar that Star-Lord can use his wind ammo on. Doing so reveals an area that Groot can build a bridge across, and on the other side is a malfunctioning door that Star-Lord can use his shock ammo to stop.
Once through, you’ll find a room with an electrified floor. On your left is a shootable panel revealing a hole big enough for Rocket to crawl through. He’ll turn off the power, allowing you to cross safely. On the other side of this room is Groot’s Impaler outfit.
Gamora’s Casual Kill outfit

After battling your way across the rooftops, you’ll command Drax to punch a hole. After sliding down the ramp, turn around to find another hole to crawl through. Gamora’s Casual Kill outfit is on the other side.
Star-Lord’s Apocalypse Lord outfit
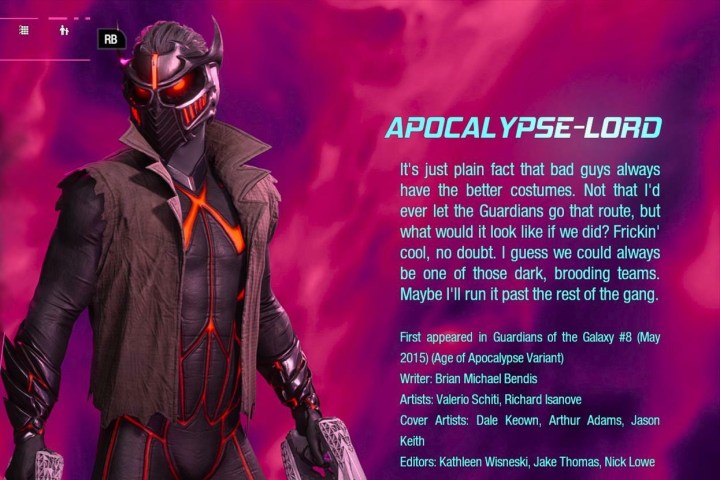
After fighting off all the enemies in the donut-shaped brain matter area, you’ll eventually find a pillar that Drax can pick up and move. Place it where you’re supposed to and climb up to the catwalk. Go right to find a spot for Gamora to anchor. Once she gives you a boost, jump right to another catwalk. Here, you’ll find Star-Lord’s Apocalypse Lord outfit.
Chapter 13: Against All Odds
After a long discussion on The Milano about dealing with the church, the Guardians finally come up with a sound plan … capture Fin Fang Foom. There are four outfits to find on this mission.
Gamora’s Black Vortex outfit

Those who pre-ordered the game will already have this outfit. If not, keep an eye out for an ice wall Gamora can cut through after defeating the Mushigers. Before cutting through the ice, have Gamora anchor in a wall to the right. Boost up to the next level and jump across the gap to find Gamora’s Black Vortex outfit.
Groot’s Five O’Clock Sprouts outfit
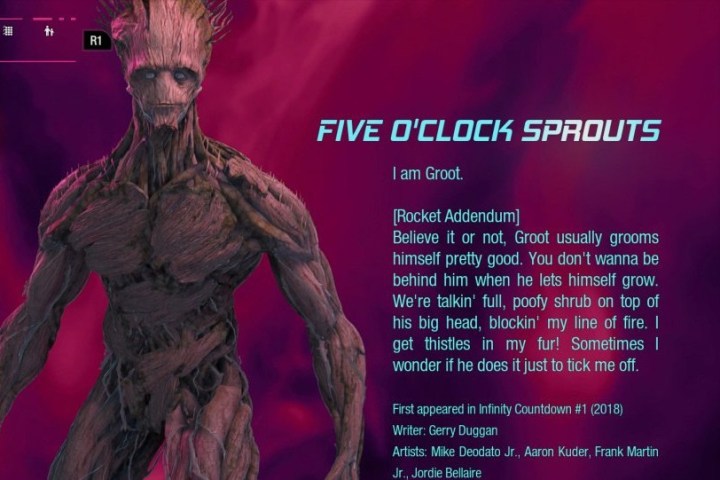
Defeat the ice worms and have Groot build a bridge across the gap. You’ll shimmy along a wall and find the entrance to a cave. Groot’s Five O’Clock Sprouts outfit is down a path to the right once you enter the cave.
Star-Lord’s War-Lord outfit

Those who link Guardians of the Galaxy with their Square Enix account will already have this outfit. If not, you’ll find it after unlocking the fire ammo for Star-Lord’s guns. You’ll use your fire ammo to melt some ice above, dropping a piece of the cave to fill the gap. Cross the gap and look up to the left. You’ll see more ice to melt, revealing a platform. Have Groot raise the platform to the next level. Here, you’ll find Star-Lord’s War-Lord outfit.
Rocket’s Stinger outfit

Those who pre-ordered the game will already have this outfit. If not, pay attention when you come across the poison plants. Hug the right until you find another area with four plants. They’re distinguishable when using Star-Lord’s visor (they’ll glow yellow). Shoot the plants to find Rocket’s Stinger outfit behind them.
Drax’s Katathian Monk outfit

You’ll slide down an ice tunnel after discovering a burning town. At the bottom of the tunnel, turn left to find a set of cliffs covered in poison plants. Shoot the plants to pass safely. You’ll discover Drax’s Katathian Monk outfit at the end of the cliffs.
Chapter 14: Into the Fire
There are eight outfits to find during this climax chapter. However, five of them (The Golden Guardians set) unlock at the beginning. While on the subject of collectibles, make sure to have all available collectibles conversations with your fellow Guardians. This is the last time you’ll be together on The Milano before starting New Game Plus.
The Golden Guardians set

Off the bat, you’ll unlock each Guardian’s Golden outfit. They’ll don them for this mission, apparently looking to die in style. They are Star-Lord’s Gold-Lord outfit and Drax, Gamora, Rocket, and Groot’s Golden Guardians outfits.
Star-Lord’s Team-Lord outfit
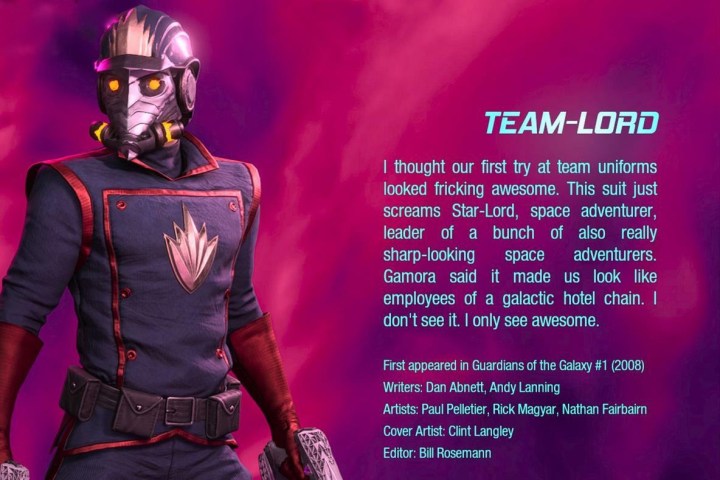
Those who pre-ordered the game will already have this outfit. If not, keep an eye out once you enter the hallway with the large fan. You’ll use your elemental guns to stop the wind from knocking you down into the pit.
You’ll eventually climb a series of platforms at the end of this area. Once you’re on the highest platform, look across the tunnel to see an outfit box. When the wind stops blowing, jump across the gap to claim Star-Lord’s Team-Lord outfit.
Drax’s Five Horsemen of the Apocalypse outfit

You’ll end up outside the ship and will have to fight through several waves of enemies to find this outfit. You’ll jump between a few platforms before Groot builds a bridge to the next area. Cross the bridge and look right. You’ll see the outfit box on an elevated platform. Use your firm ammo to melt a wall revealing a tight gap you can squeeze through. Head left, climb up the platforms, and claim Drax’s Five Horsemen of the Apocalypse Outfit, thus completing the set.
Gamora’s Chosen Daughter outfit

You’ll enter into a mining area where Star-Lord has to use his guns to freeze some geysers. After freezing the second geyser, look to your left to see three more geysers. Freeze all three of them and jump across. The final platform leads to a small crack in the wall you can squeeze through. Inside, you’ll find Gamora’s Chosen Daughter outfit.
Chapter 15: Broken Promises
There are no outfits to find during Chapter 15 of Guardians of the Galaxy. Just enjoy the epilogue. However, once the game ends and you begin New Game Plus, you’ll unlock two new outfits for Star-Lord. These are his Space-Lord and Sleek-Lord outfits. You’ll be able to dawn these outfits in your New Game Plus file.
Upon beating the game, you’ll also unlock the Sun-Lord and City-Lord outfits, which you may already have if you pre-ordered the deluxe version of the game.
Editors' Recommendations
- The best weapons in Fallout 4 and where to find them
- Where to find the Unmaking Arrow in Dragon’s Dogma 2
- Elden Ring: How to find and use Rune Arcs
- All Legendary Schematics in Palworld and where to find them
- Where to find the Black Marketeer in Palworld


