If you ever invaded Minecraft’s strongholds, temples, and dungeons, you’ve undoubtedly uncovered dusty books stuffed in chests and bookshelves. They can be an entertaining read or a useful enchantment tool. We show you how to make a book in Minecraft so you can author your own in-game tomes.
You can create a book with a special message authored by you up to 50 pages. You can also create books containing enchantments that can be used on weapons and armor. If you simply want decorative bookcases in your hideaway, you’ll still need a few books as ingredients.
What you need

Sugar cane – Used to craft paper. You can find this ingredient growing next to a body of water, as shown above. You can also find paper stored in chests.

Leather – You can get this ingredient as a dropped item from a slain cow, donkey, horse, llama, mooshroom, or mule. However, for this guide, we craft leather using hide dropped by slain rabbits.

Crafting Table – The foundation of most crating in Minecraft. To make this table, place one wood plank block into each of the four squares next to your avatar in the inventory. When completed, drag the Crafting Table down into your Hotbar for world placement. Remember, one wood block creates four wood plank blocks.

Enchanting Table – To craft this tool, open your Crafting Table and use one book, two diamonds, and four obsidian blocks (cooled, hardened lava), then drag the resulting table into your Hotbar for world placement. After that, you can turn blank books into enchanted books that store enchantments like Piercing, Protection, Aqua Affinity, and more.
Let’s move on to crafting a book!
Craft your paper

Step 1: Open your Crafting Table.
Step 2: Place one sugar cane each into the three blocks in the middle row.
Step 3: Drag the resulting three sheets of paper down into your inventory. You’ll need all three sheets for your book.
Craft your leather

Again, you can bypass this section altogether if you already gathered leather from a slain cow, donkey, horse, llama, mooshroom, or mule.
Step 1: Open your Crafting Table.
Step 2: Place one rabbit hide each into the top and middle squares in the first column.
Step 3: Place one rabbit hide each into the top and middle squares in the second column.
Step 4: Drag the resulting leather down into your inventory.
Craft your book

Step 1: Open your Crafting Table.
Step 2: Place one sheet of paper each in the top and middle square in the left column on the crafting grid.
Step 3: Place one sheet of paper in the top square of the middle column.
Step 4: Place one leather in the center square of the middle column.
Step 5: Drag the resulting book down into your inventory.
Make a bookshelf!

This requires two main steps: Create wood planks and then craft the bookcase.
Part 1: Craft wood planks

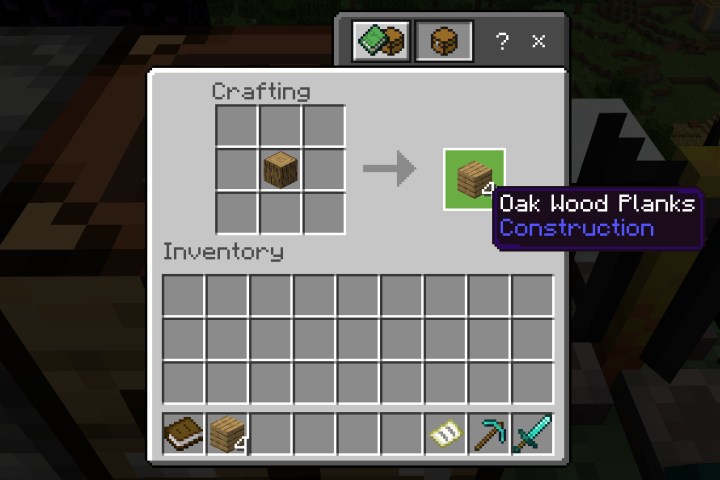
You need to create six wood plank blocks from any type of wood to create a bookshelf.
Step 1: Open your Crafting Table.
Step 2: Place one wood block (log, normal, or stripped) into any square on the crafting grid.
Step 3: Drag the resulting four wood plank blocks down into your inventory.
Step 4: Repeat steps 2 and 3 for another four wood plank blocks.
Part 2: Create your bookshelf

Step 1: Open your Crafting Table.
Step 2: Place one wood plank block into each square in the top row on the crafting grid.
Step 3: Place one book into each square in the middle row.
Step 4: Place one wood plank block into each square in the bottom row.
Step 5: Drag the resulting bookshelf down into your inventory.
Enchant a book!

This method requires an Enchanting Table, one crafted book, and three lapis lazuli. You can obtain the latter ingredient by mining lazuli ore — blocks speckled with blue flakes — found between 11 and 27 blocks below the surface.

Step 1: Open your Enchanting Table.
Step 2: Place one book in the left square.
Step 3: Place three lapis lazuli in the right square.
You’ll see three enchanting options just to the right, each with a number displayed on the far right. This number is the experience level you need to unlock and select the enchantment. If you don’t have enough experience, venture forth to kill mobs for XP and then return to the table.
Step 4: Select an enchantment. You’ll need to move the cursor over the enchantment to decipher the language.
Step 5: Drag the resulting enchanted book — still in the left square — down into your inventory.
Step 6: Repeat steps 2, 3, and 4 until you create the enchanted book you want.
The list of enchanted books is long, so refer to the entire library listed on the Official Minecraft Wiki.
Make a book and quill

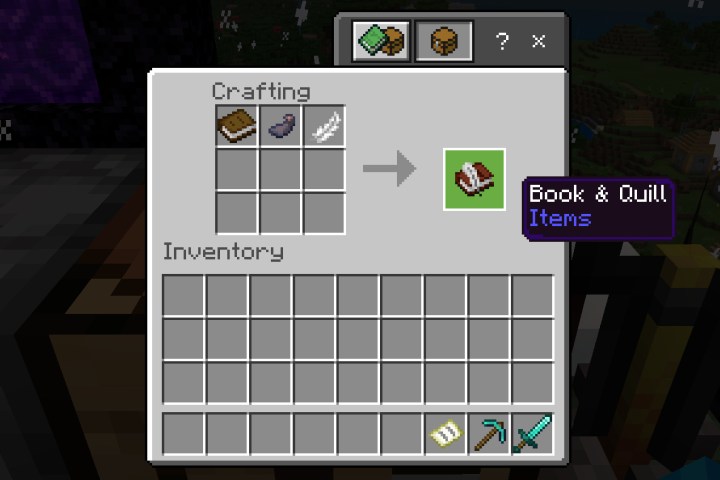
For this, you’ll need additional ingredients. First, grab an ink sac dropped by a fallen squid. You also need a feather dropped by fallen chickens and parrots. Tamed cats will deliver feathers too.
Step 1: Open your Crafting Table.
Step 2: Add one book to the left square in the top row on the crafting grid.
Step 3: Add one inc sac to the middle square in the top row.
Step 4: Add one feather to the right square in the top row.
Step 5: Drag the resulting book and quill down into your inventory.
Sign a book and quill

Having a book full of blank pages just isn’t any fun. Why not sign it?
Step 1: Make sure the book and quill are located in your Hotbar. Select and open the book (right-click, left trigger, or long-press).
Step 2: Type your message on any page. Each book has 50 pages, so be sure to leave lots to read.
Step 3: To finish writing, click/select/tap the Sign button — it turns green when highlighted.

Step 4: Enter a title and byline for your signed book.
Step 5: To “publish” your signed book, click/select/tap the Sign and Close button — it turns green when highlighted.
The resulting signed book now resembles an enchanted book, though the only “enchantment” here is your enchanting messages within.
Here are a few other guides for Minecraft:


