How to make a lead in Minecraft

You journey far beyond your typical stomping grounds in search of a swamp and slime. You dismount from your horse and slither into the marshes. Eventually, you emerge with slimeballs in hand, but your horse is nowhere to be found. We show you how to make a lead in Minecraft so your favorite mount doesn’t leave you stranded.

Technically, leads (or leashes) aren’t specific to horses. You can use a lead with any passive “mob,” or mobile creature, so you can keep sheep, cats, dogs, and more in check using a lead. Throw in a fencepost and you can tie up any mob wherever your Minecraft journey takes you.

To learn how to make a fence (and related post), check out our guide. For other horse-related guides, check out these articles:

Get your weekly teardown of the tech behind PC gaming
Check your inbox!

What you need

Minecraft Spider and String
Image used with permission by copyright holder

String – You need four of these to make two leads. They’re dropped by fallen spiders, found in chests, and crafted in the Crafting Table using one cobweb.

Minecraft Slimeball
Image used with permission by copyright holder

Slimeball – You need one of these to make a lead. They’re dropped by fallen slimes, which you can find bouncing around in the dark within Swampland biomes. Here we merely created a slime farm to watch them grow and dance across the water like bouncy pool floats.

Minecraft Brown Horse
Image used with permission by copyright holder

A horse (or some other passive mob) – Horses are typically found in herds of two to six eating grass in Plains and Savanna biomes. A horse doesn’t need to be tamed to use a lead. Again, you can leash any passive mob, but we chose to use a horse for this specific guide.

Craft a lead
Minecraft Make Lead
Image used with permission by copyright holder

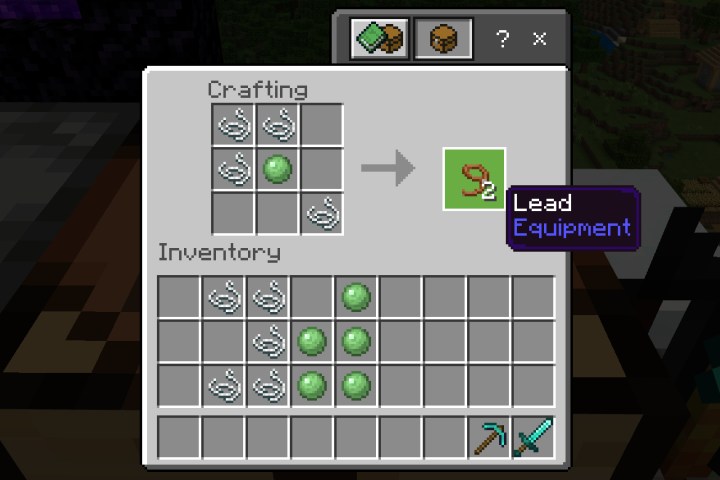
You’ll need to insert the ingredients into the crafting grid exactly as shown. Note that the pattern creates a weird arrow that points to the top left corner of your screen.

Step 1: Open your Crafting Table.

Step 2: Place one string each in the top and middle square in the left column.

Step 3: Place one string into the top square in the middle column.

Step 4: Place one slimeball into the middle square in the middle column.

Step 5: Place one string into the bottom square in the right column.

Step 6: Drag the resulting two leads down into your inventory.

Step 7: Repeat these steps for additional leads.

Use a lead

Minecraft Use Lead
Image used with permission by copyright holder

Tethering a mob is quick and easy.

Step 1: Drag the lead from your inventory down into the Hotbar and select it.

Step 3: To leash your mob, perform the following:

  • PC – Right-click on the mob.
  • Console – Target the mob and press the left trigger button.
  • Mobile – Tap on the mob.

Tie a lead to a fence

Minecraft Tie Lead to Fence
Image used with permission by copyright holder

With one end of the lead connected to the mob and the other end in your hand (selected), perform the following:

  • PC – Right-click on the fence.
  • Console – Target the fence and press the left trigger button.
  • Mobile – Tap on the fence.

Alternatively, if you’re far away from a bed and you don’t want your horse wandering around your current location, you can always plant a fencepost and tether your mount.

Minecraft Tie Lead to Fence Post
Image used with permission by copyright holder

Remove a lead

With one end of the lead connected to the mob and the other end in your hand (selected), perform the following:

  • PC – Right-click on the mob.
  • Console – Target the mob and press the left trigger button.
  • Mobile – Tap on the mob.

The lead falls to the ground like any other item drop.

Kevin Parrish
Former Digital Trends Contributor
Kevin started taking PCs apart in the 90s when Quake was on the way and his PC lacked the required components. Since then…
Is Stardew Valley cross-platform?
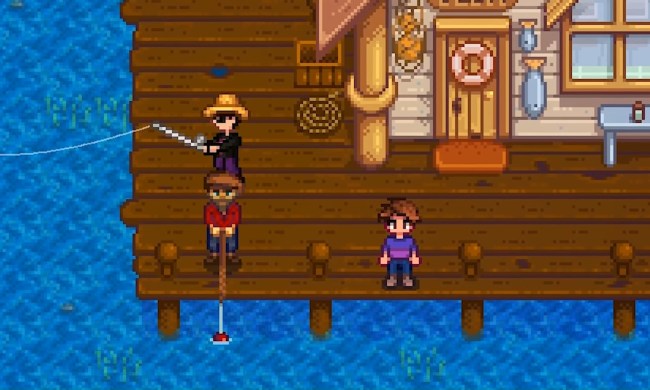
Stardew Valley Multiplayer Fishing

Stardew Valley is a game made by just one person, but it has seen more success than most games made by dozens, or even hundreds, of people. It's even one of Digital Trends' top 50 video games of all time. Since its release in 2016, the game has been updated regularly with new features and content to keep its avid fans coming back. This includes an online multiplayer component that allows you and up to three friends to hang out on each other's farms. And with the recent trend of games allowing players on different platforms to join together, you may wonder if Stardew Valley offers cross-platform functionality. Here's everything we know about cross-platform support in Stardew Valley.
Is Stardew Valley cross-platform?
Stardew Valley does not offer cross-platform support, meaning you can't play online multiplayer between any of the systems the game is on. So if you want to team up with some friends, make sure you all are playing on the same platform, such as the PlayStation 4, PlayStation 5, Xbox One, Xbox Series X, Nintendo Switch, or PC. Also be aware that whoever starts a multiplayer game is saving that shared world locally, meaning no one else can reenter that world without the host present.

The sad fact of the matter is there doesn't seem to be any indication that crossplay will come to Stardew Valley. The game's official Reddit still lists it as not being supported, and there was only one mention of it by the developer on Twitter back in 2018, when he responded to a question asking if crossplay would come to the game. He replied, "Unfortunately, there will not be crossplay. Apparently, the technical barriers are very high. It's still something I really want to add and I promise to look into it more closely, but first priority is getting the update out there." This was many years ago, and there has been no further information about cross-platform play since, so it seems very unlikely that we will see support for this functionality come to Stardew Valley.

Read more
How to hack in Fallout 4
A computer terminal in Fallout 4.

No matter what perks or skills your character has in Fallout 4, hacking will always come down to your ability as a player. There's no way to cheat the system here, and if you don't grasp what the game is asking you to do, you're mostly out of luck. Terminals will hide great loot behind their cryptic puzzles, as well as allow you to take over certain controls to turn your enemy's security against them. Some have very interesting logs about certain characters or events for all you lore junkies out there. Hacking has tons of uses, so let's brush up on your computer skills and give you a refresher on how to hack in Fallout 4.
How to hack in Fallout 4
When you first interact with a terminal to hack in Fallout 4, it will be a little overwhelming. As long as you have a high enough hacking skill to attempt a hack, you can go right into the minigame.

The basic idea of hacking is to find words hidden in that jumble of letters and symbols. Your goal is to find the correct word to crack the terminal before you run out of attempts. Once you find any word and select it, the terminal will tell you how close that word is to the correct one based on how many letters it has in the same space as the answer in the form of a likeness rating. The higher the rating, the more letters it has in common. It is somewhat similar to Wordle, only you don't type in the words yourself.

Read more
I’ve reviewed every AMD and Nvidia GPU this generation — here’s how the two companies stack up
Three graphics cards on a gray background.

Nvidia and AMD make the best graphics cards you can buy, but choosing between them isn't easy. Unlike previous generations, AMD and Nvidia trade blows point-for-point in 2024, and picking a brand to go with isn't as easy as counting the dollars in your wallet.

I've reviewed every graphics card AMD and Nvidia have released this generation, comparing not only raw performance, but also features like DLSS and FSR, ray tracing performance, and how VRAM works in modern games. After dozens of graphics card reviews, here's how AMD and Nvidia stack up against each other in 2024.
Nvidia vs. AMD in 2024

Read more