If you want to play like Tom Brady or Aaron Rodgers, you have to learn how to read and beat coverages in Madden 23. Long-time players should have a solid grasp on defensive formations already. Still, a few nuanced differences in this year’s game, especially with the new passing mechanics, warrant a refresher.
What’s the difference between Cover 2 and Cover 3? How can you tell when your opponent is in man or zone defense? What happens when they disguise the play, and how can you make quick post-snap reads? Madden players and pop-warner QBs have been asking these questions for years, so let’s dive into how to read coverages in Madden 23 and how to beat each one.
For the record, all of the following images and tips were developed while playing as the Tampa Bay Buccaneers against the Buffalo Bills on All-Pro difficulty, the standard for online play. Tom Brady’s Hot Route Master ability makes it significantly easier to beat any coverage in the game. Meanwhile, the Bills have one of the best secondaries in Madden 23.
We ran most offensive plays out of Gun Tight Y Off Weak, a popular formation found in most playbooks. On defense, we ran everything out of Nickel 3-3 Will.
- Madden 23: tips and tricks to dominate on the field
- The best teams in Madden 23
- Best sports games for PS5
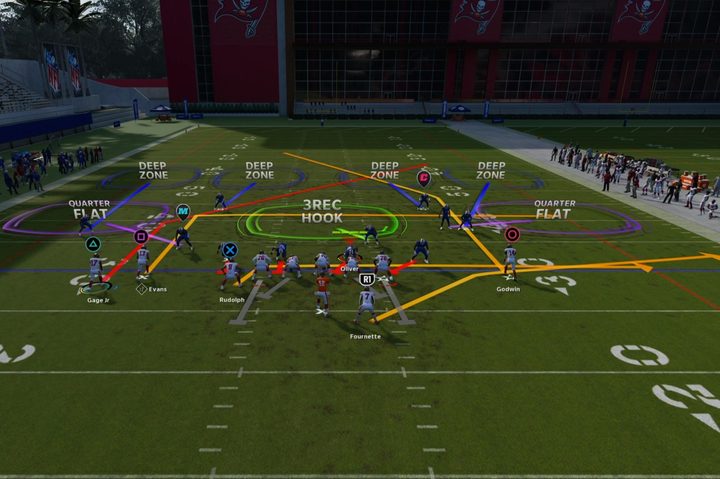
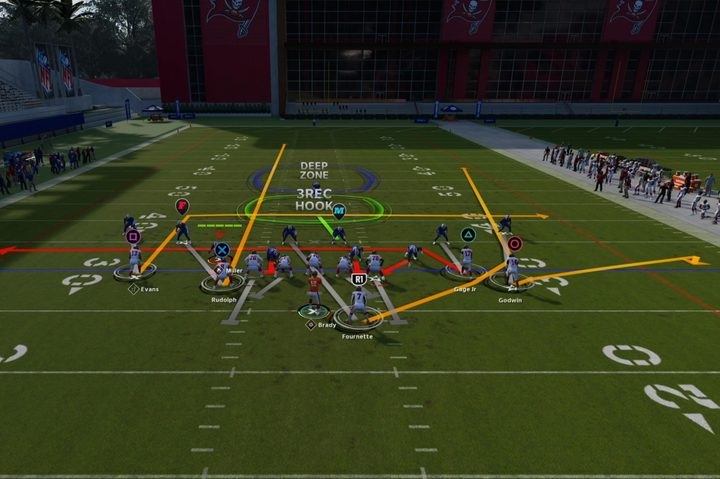
Cover 2 Zone
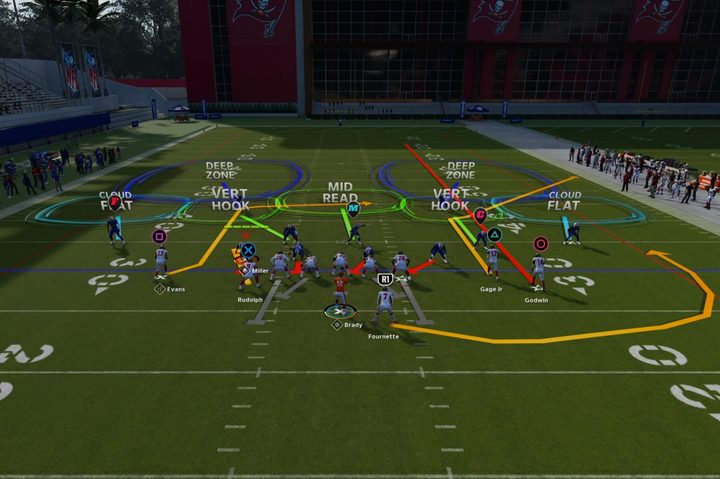
What is Cover 2 Zone
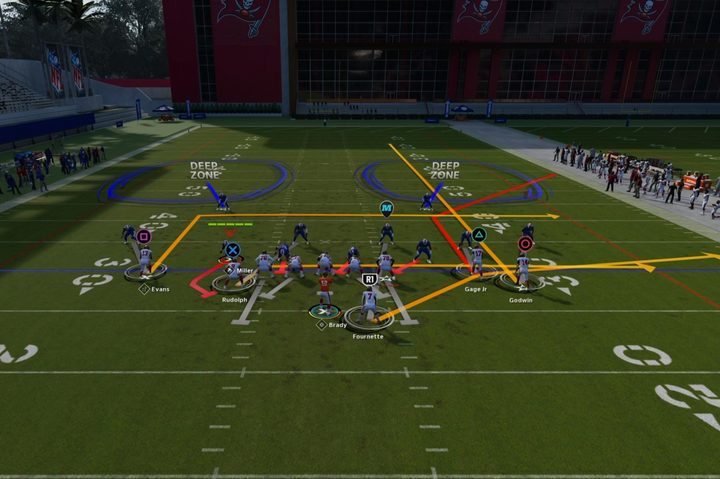
Tampa 2, Cover 2 Sink, and Cover 2 Hard Flat are all examples of a standard Cover 2 defense. Cover 2 (most of the time) features two deep Safeties (dark blue zones), three midfield defenders (yellow/green zones), and two flat defenders (light blue zones).
Cover 2 keeps your defensive corners closer to the line of scrimmage (LOS) while your linebackers hover over the middle, ready to pounce on any run plays. Cover 2 takes away the intermediate middle of the field, making it difficult to hit shallow crossers, in-breaking routes, and slants.
Cover 2 also takes away routes in the flat (five yards off the LOS on either side of the field). It depends on whether the light blue zones are set to cloud or hard flats.
Cloud Flat defenders backpedal, covering 5-10 yards off the line of scrimmage. Hard Flats play right on the line, taking away any swing routes from your RB or WR Smoke Screens (when your receiver doesn’t move off the line and waits for the ball).
How to read Cover 2 in Madden 23
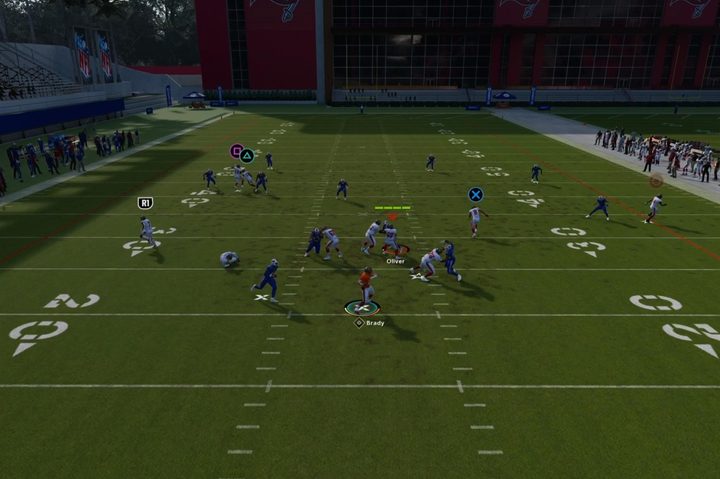
Cover 2 Zone has obvious tells in Madden 23. You need to look at two things: the Safeties and the corners.
If you see two Safeties deep in the middle of the field, you know you might be looking at a Cover 2 defense. Next, look at where the CBs are standing relative to the LOS. If they’re about 5 yards off the line, you know you’ve got Cover 2 Zone. The only thing you won’t know pre-snap is if they’re playing Hard Flats or Cloud Flats.
Snap the ball and see what the flat defenders do. If they backpedal, you know they’re playing Cloud Flats. If they hold their ground, you know they’re playing Hard Flats. You can also keep an eye on the deep Safeties and the MLB. If all three backpedal in a straight line, you know you’re throwing into a Cover 2 Zone defense. That’ll make more sense once we explain Cover 3 and Single-High Man.
How to beat Cover 2 in Madden 23
To beat a Cover 2 defense (and any defense for that matter), you need to know where the holes in coverage are. With Cover 2, you’ll have shallow drags open behind the line, corner routes on the sideline, and deep posts in the middle. However, you must make the right post-snap reads to hit any of these throws.
The best play to run against a Cover 2 defense is a flood concept play, which involves a streak, corner, and flat route to one side of the field — preferably the wider side of the field — for more breathing room (i.e., throwing to the right when the ball is on the left hashmark and vice versa).
Some plays will literally be called “Flood.” Otherwise, you might have to hot route into a flood concept from plays like Z Spot (out of any bunch formation).
Post-snap, if the CB backpedals towards your corner route, you’ll have the flat defender wide open. On the other hand, if they run up on the flat route, you’ll have your corner route wide open.
You can also hit a WR streaking up the sideline if they’re far enough outside, either on a fade or wheel route, getting them near the chalk. But you have to hit them between the shallow corner and the deep Safety, and this only works when the CB plays a Hard Flat.
Regardless of the coverage, always think about how you can occupy or hold defenders long enough to get someone open. For example, sending two deep routes up each sideline will occupy each Safety in Cover 2. Then, you can hit a deep post over the middle for a 30+ yard gain.
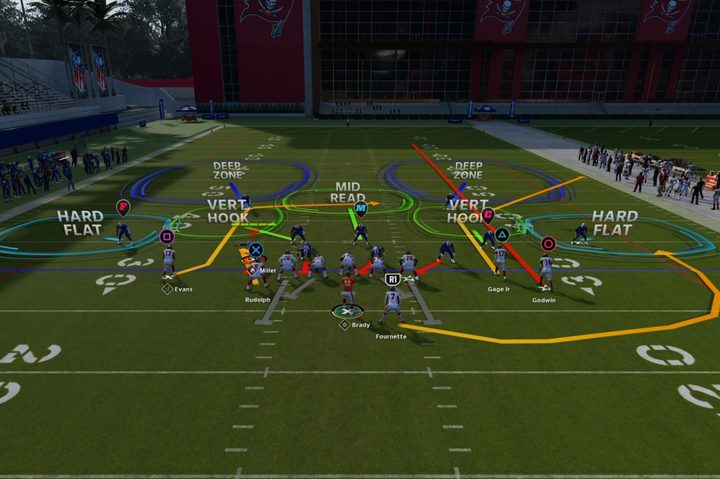
Cover 3 Zone

What is Cover 3 Zone
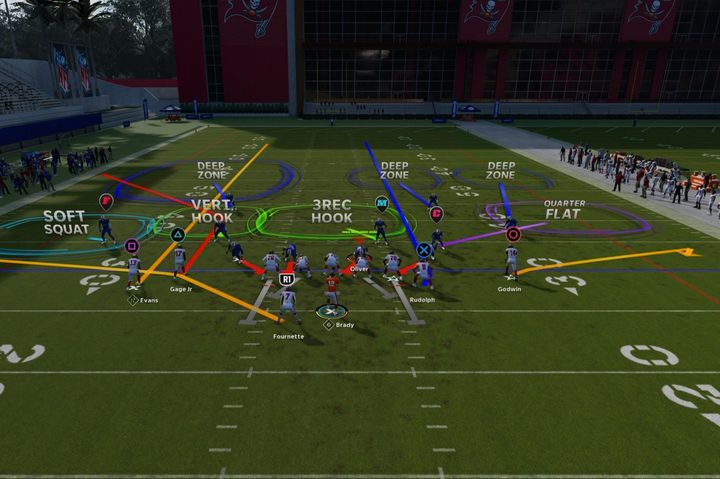
Plays like Cover 3 Sky, Cover 3 Seam, and most zone blitzes are examples of Cover 3 Zone. It’s the most common defensive scheme in online play, as it’s the easiest to hide. Cover 3 Zone puts three defenders (usually a Safety and two CBs) in deep zones. Two LBs will split the middle of the field, while a CB and Safety guard any intermediate sideline routes like corners, crossers, and out-routes.
Cover 3 Zone is meant to stop chunk plays and provide safety valves when you blitz an extra defender(s). Ideally, Cover 3 keeps everything in front of the defense — meaning you’re willing to give up short-yardage to protect against deep threats. Of course, you can’t let your opponent dink and dunk their way up the field, so you’ll have to come up eventually.
How to read Cover 3 in Madden 23
If you see one deep Safety at the line of scrimmage, you might be looking at a Cover 3 Zone. However, Cover 3 looks like Single-High Man, so your next read will come post-snap. This pre-snap read immediately tells you that your Cover 2 beater play might not work, at least not as intended.
Be careful in Bunch Formations. You’ll still see two deep Safeties even if they’re playing a Cover 3. But, if you motion someone from your bunch to the other side of the field, one of those Safeties should drop down, revealing a Cover 3.
After the snap, watch the defenders on either side of the field. If they backpedal, you know they’re in zone coverage. If they jam and chase a receiver, you know they’re in man coverage (Single-High Man). Basically, defenders with their backs or side profiles to the QB are in Man, and defenders looking at the QB are in Zone.
If your opponent Base Aligns their defense, you won’t be able to tell what kind of coverage they’re in pre-snap. Always watch the safties when you snap the ball. If one drops down towards the middle of the field, you know they’re running Cover 3 Zone or Single-High Man with a Robber.
How to beat Cover 3 in Madden 23
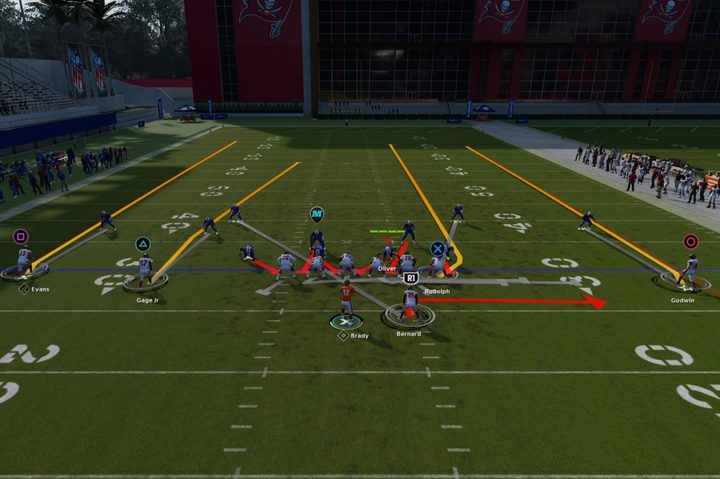
There are a few ways to beat Cover 3 in Madden 23. First, you can hot route a TE or WR to run a drag behind the LOS. Make sure your other receiver runs deep enough to occupy the other defenders. You can send your RB on a swing route or put one of your WRs on a smoke screen. Whatever you choose, short yardage plays will work against Cover 3.
Make sure you mix your routes up in case it’s Single-High Man. We’ll go over what beats Single-High later on.
Next, you can run a concept we call Flat-Go-Wheel. This concept works whenever your RB, TE, and WR line up on the right side of the field. Put your TE on a go-route, your WR on a flat route, and your RB on a wheel route, and then snap the ball. The right Safety should back into their deep zone, the CB should chase the flat route, and the LB should stay with your TE, leaving your RB wide open on the numbers.
When running Flat-Go-Wheel, your first read is the CB. Throw the ball as soon as they commit towards the flat. If they don’t commit, hit the flat route. If they’re in Single-High Man, either throw the ball away or make sure you’ve got someone on a Zig Route on the other side of the field.
Run Flat-Go-Wheel out of a bunch formation and motion your middle WR to the other side. If someone follows them, you know the defense is playing man, and you can change the play accordingly.
Cover 4 Zone
What is Cover 4
Cover 4 Palms, Drop, Quarters, and Press are all examples of Cover 4 Zone defense. These concepts feature four deep Safeties, an MLB defending the middle, and two CBs guarding the sidelines. In previous games, Cover 4 concepts played Match, which is like a Zone/Man Hybrid. In Madden 23, you can turn Match principals on and off for every defense via coaching adjustments.
Cover 4 gives you the most coverage deep downfield but leaves underneath routes pretty open. You also leave yourself vulnerable to run plays, especially Draws, as four of your defenders will backpedal once you snap the ball and the QB looks like they’re passing.
How to read Cover 4 in Madden 23
Cover 4 looks like Cover 2 since it’ll feature two deep Safeties in the middle of the field, but take a look at the CBs on the left and right. If they’re playing 8-10 yards off the LOS (like they’re playing Cover 3), you’ll know you’re looking at a Cover 4 concept.
Post-snap, most defenders will backpedal into their zones. However, if your opponent plays Match Defense, they’ll chase after receivers once they cross into those zones. This is why Cover 4 can be tricky sometimes, so it’s best to have a quick throw you can check to. There’s also no shame in running the football.
How to beat Cover 4 in Madden 23
Beat Cover 4 with underneath routes like drags and RB out routes, similar to how you’d be Cover 3. Cover 4 takes away those seam routes, though. You can also run Flood concepts against Cover 4 as you’ll only have 2 defenders watching the sides of the field. Just make sure you send a WR on a streak to clear out the deep-right zone and have someone in the flat to occupy the middle defender. Hold the ball for a second and wait for your corner route to get open.
You can also play with motion to get two receivers running routes over the middle. Since there’s only one middle defender, getting him to jump one receiver leaves the other one wide open. For example, a deep post and an intermediate in-route (running left to right) should open up the intermediate in-route. Just make sure your other routes are occupying the sideline defenders. No matter what, you should always have an RB in the flat as a checkdown throw.
Single-High Man
What is Single-High Man
Single-High is a man coverage concept that features one deep Safety and a middle-read LB or a blitzing LB. Cover 1 Robber, Cover 1 Contain, and Cover 1 Press are all examples of a Single-High Man defensive scheme. In man coverage, your CBs and LB will match up with a receiver across the LOS and follow them wherever they go on the field.
Man coverage relies heavily on speed, so if their receivers are faster than your defenders, you’re better off playing zones. If you’ve got plenty of speed in your defensive backfield, mixing man coverage into the game plan is worthwhile.
Man coverage also helps in the run game, as defenders always rush to their assignments. Therefore, whoever’s in charge of the RB will blitz him — no matter what.
How to read Single-High Man in Madden 23
Single-High Man looks exactly like Cover 3. You’ll see one Safety in the deep middle, and the CBs will play about 8-10 yards off the LOS. The only way to tell pre-snap is to motion one receiver across the field. If their defender follows them, you know you’re looking at Man Coverage. This doesn’t always work, as the defense might pass that receiver off to another defender.
Single-High can also look like Cover 4, with one of the deep safeties dropping down to play a yellow hook zone. If you’re unsure of what you’re looking at, the safest thing to do is put your TE on a drag and your RB on an out route. Both should beat Man Coverage and Cover 3/Cover 4.
Always look for mismatches on the LOS. If you see an LB hovering over a speedy TE like Travis Kelce, put your TE on a corner or out-route to create separation.
How to beat Single-High Man in Madden 23
Beat Single-High man with mesh concept plays, often featuring crisscrossing drag routes. Ideally, this puts defenders in each other’s way, thus getting your receivers open in the flats.
You can also beat Single-High Man with corner routes. Just ensure you occupy the deep Safety with a streak or post. If you’ve got a speed mismatch on the outside (a slow CB on Tyreek Hill), send that WR on a streak and then lob a pass over the top.
Cover 2 Man
What is Cover 2 Man?
Cover 2 Man keeps two Safeties in the defensive backfield to prevent anything from getting behind the CBs underneath. This allows the CBs to play under the receivers and break on corners, in-routes, out-routes, and curls. On Sunday, you’ll often hear announcers talking about “Safety help over the top.” That’s what they mean.
Cover 2 Man takes away the middle zone defender or blitzing LB, so you’re sacrificing a little pass rush to cover more field.
How to read Cover 2 Man in Madden 23
Cover 2 Man has a super easy tell. You’ll see two deep safeties in the defensive backfield (similar to Cover 2 or Cover 4); however, the CBs will press up on your receivers, usually playing inside. Sometimes this isn’t the case, especially when running a bunch formation or your receivers are tight together. Motion someone out of the bunch to see what the defense does. If they press down and follow, you know you’re looking at Cover 2 Man.
Post-snap, you’ll read Cover 2 Man like Single-High Man. If the defenders jam and chase your receivers, you know they’re in man coverage.
How to beat Cover 2 Man in Madden 23
Beat Cover 2 Man with drags, slants, ins, outs, and zigs. Anything that features a quick cut should create a window of separation. Timing and leverage are everything. Don’t throw the ball if you see a defender playing underneath an in or out-breaking route. If they’re outside and over the top, throw the ball as soon as the receiver makes their cut.
Mesh concepts also work against Cover 2 Man; just make sure you put your RB on a route. If you leave your RB to block, you put an LB in the middle of the field to double one of your receivers. Putting your RB on a wheel or out route should get him open, as he’ll be much faster than the LB covering him.
Cover 0
What is Cover 0
Cover 0 is a Man Blitz concept that doesn’t have any Safeties in the defensive backfield. Plays like Thunder Smoke, DBL Safety Blitz, and Free Fire 0 are all examples of Cover 0. These plays are meant to stop the run and sack the QB. Ideally, the pressure gets there before the receivers get open on their routes.
Cover 0 is a big risk/reward kind of play, as you leave yourself open for big plays if the pass rush doesn’t get home in time. You can also get burnt in the run game if your defenders get jammed at the LOS, as nobody is covering the second level.
How to read Cover 0 in Madden 23
Cover 0 is going to look, well, odd. There’ll be a Safety in the defensive backfield, but they’ll be closer to the LOS. An easy tell is if you see a few LBs crowding the LOS.
Sometimes the defense hides the blitz, making it look like Cover 2 Zone/Man. Use motion to move an inside receiver (like a TE on the LOS) outside. If the Safety follows and drops down, you know a blitz is coming.
The blitz is pretty obvious post-snap when you see several LBs or CBs rushing towards the QB. Don’t panic and roll out, especially if you don’t have a scrambling QB. If you think a blitz is coming, audible out of a Play Action Pass, as you’ll get sacked before you can even look downfield.
How to beat Cover 0 in Madden 23
Quick throws and screen passes are great against the Blitz. When setting your offensive audibles, ensure you always have an RB screen pass ready. WR screens don’t work well since there’ll be a CB near the receiver.
You can’t wait for a play to develop downfield, but you can assume there’s no help over the top, so CBs won’t play underneath their assignments. That means slants, drags, out, and in routes should get open right when they make their cuts.
Cover 6
What is Cover 6?
Cover 6 is a blend of Cover 2 Zone and Cover 4 Zone. One side of the field will play Cover 2 (flat, hook, deep half), while the other plays Cover 4 (purple, hook, and two deep quarters). Like Cover 4, Cover 6 defaulted to Match principles, but you can now turn those on and off.
How to read Cover 6 in Madden 23
You need to look at both sides of the field when reading Cover 6. No matter what, you’ll always have two deep safeties. One side of the field will read Cover 2 (shallow CB), and the other will read Cover 4 (CB 8-10 yards off LOS).
The same post-snap reads apply. Watch the CB on the Cover 2 side. If they take the flat, throw the corner.
How to beat Cover 6 in Madden 23
Beating Cover 6 is pretty simple. Run Cover 2 beaters (floods) to the Cover 2 side and Cover 3 beaters (flats, RB outs, and smokes) to the Cover 4 side. Cover 6 also spreads the defense, so don’t hesitate to run the ball up the middle, either. You can also run a delayed fade to the T. If your other receivers occupy the Curl flat and mid-read defender, the TE should get wide open up the seam.
How to practice reading coverage in Madden 23
The best way to practice reading coverages is to head into practice mode. Select your favorite team and play against a lethal secondary (like Buffalo) to get the best results. Next, set your audibles to have beaters for every coverage.
Have the defense run random Nickel plays to simulate passing situations in actual games. At the LOS, go through your reads and change the play based on what you see. Unfortunately, the game won’t tell you what play the defense ran (like it would in a real game).
You can work around this using a second controller. Once you think you know what play the defense is running, press R2 on the second controller to reveal the play art. Don’t get discouraged when you’re wrong. Even Tom Brady gets fooled sometimes.