Given the increasing difficulty of staying anonymous online and ever-more intrusive cookies and trackers to contend with, setting up a VPN to protect your Wi-Fi network, PC, and other devices is just good sense. Besides having all your internet traffic safe from prying eyes, you can access content that is restricted by geo-tagging and enjoy the benefits of a steady internet connection. However, did you know that you can set up a VPN on your PS4 and enjoy those very same advantages? By doing so, you can acquire DLC (downloadable content) that’s only available in other countries. When it comes to multi-player gaming, VPN internet speeds are far less likely to have issues with ping, lags, or latency, which can easily derail your gaming experience. Sounds appealing? Read on to learn more.
How to set up a VPN on your PS4 with your PC
There are several VPNs that you can use on your PS4, including CyberGhost, SurfShark, and Nord VPN. Both your computer and your PS4 must be turned on and physically connected to perform this procedure.
Step 1: Purchase and install your preferred VPN on your computer.
Step 2: Connect your computer and your PS4 with an ethernet cable.
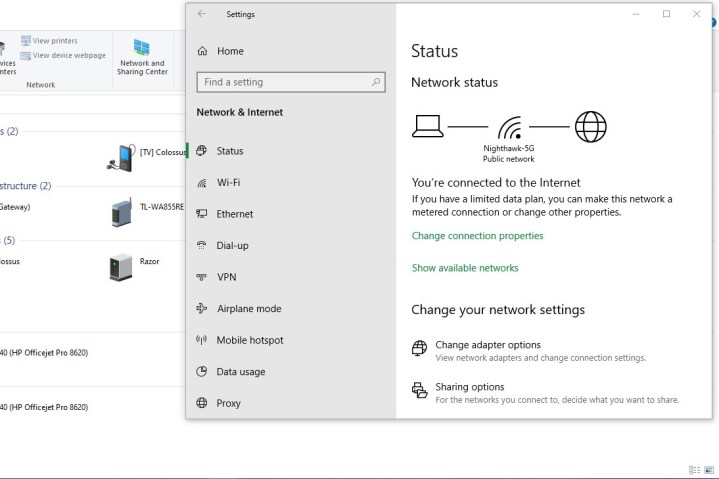
Step 3: PC users should select File Explorer > Network and Sharing Center > Change Adapter Options.
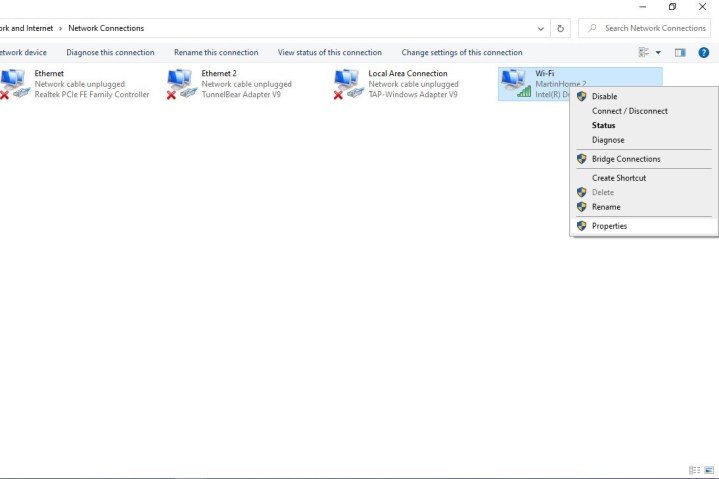
Step 4: Locate your VPN’s icon, right-click it, and select Properties from the drop-down menu.
Step 5: Select the Sharing tab and click the box next to Allow Other Network Users to Connect Through This Computer’s Internet Connection.

Step 6: Locate the Home Networking Connection bar and select the Home Internet Connection option from the drop-down menu.
Step 7: From your PS4, open Settings > Network Settings > Set Up Internet Connection > Use a LAN Cable. Select the Easy Connection Method, then check the box next to Do Not Use a Proxy Server.
How to set up a VPN on your PS4 with your Mac
Step 1: Purchase and install your preferred VPN on your computer.
Step 2: Connect your computer and your PS4 with an ethernet cable.
Step 3: Mac users select System Preferences > Sharing > Internet Sharing.
Step 4: From the Share Your Connection From drop-down menu, select WiFi, then check the Ethernet box next to “to computers using.”
Step 5: Click the box to the left of Internet Sharing to turn on Wi-Fi sharing between your Mac and your PS4. If a successful connection is made, a green icon will appear.
Step 6: Open your VPN and select a server from the provided list.
Step 7: From your PS4, open Settings > Network Settings > Set Up Internet Connection > Use a LAN Cable. Select the Easy Connection Method, then check the box next to Do Not Use a Proxy Server.
Editors' Recommendations
- PS4 vs. PS5: which console should you buy in 2024?
- The best PS4 games for 2023
- You can win cash with PlayStation’s new tournament feature. Here’s how to sign up
- The best PS4 controllers
- The best multiplayer games on PS4