
All Geoglyph Memory locations in Zelda: Tears of the Kingdom

A similar storytelling technique from Breath of the Wild returns in The Legend of Zelda: Tears of the Kingdom, which is using memories to fill in gaps in the narrative. These, like most activities in the game, are not required to actually complete the game but are essential if you want to fully understand the narrative and history of Hryule and its people. There are 11 to find and view on the main map — none are on a Sky Island or down in the Depths — with a final Geoglyph appearing only after you’ve collected all the others. These appear as giant pictures of figures when viewed from above (hence the name), with a Dragon Tear somewhere on the figure you need to interact with so we will refer to them based on their official numbering, but you are able to find the first 11 in any order you wish. If you’re ready to dive into some memories in Tears of the Kingdom, here’s where you can find all the Geoglyph Memories.

All Geoglyph Memory locations

Tear of the Dragon #1

A map showing a Tear of the Dragon location.
Nintendo

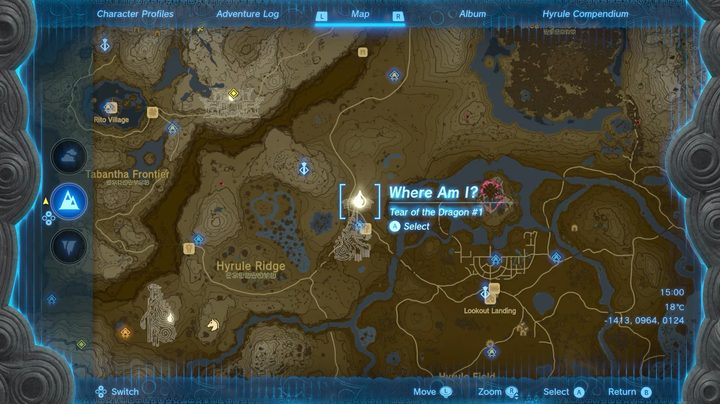
This Geoglyph is to the west of Hyrule Castle, with the actual Tear being on Rauru’s right eye.

Coordinates: -1412, 0966, 0123

Tear of the Dragon #2

A map showing a Tear of the Dragon location.
Nintendo

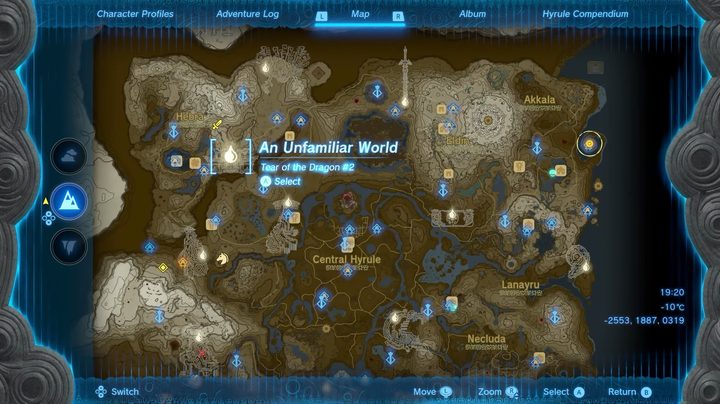
Just east of Rito village in the Tabantha HIlls, the Tear is in the center of the Geoglyph above the door.

Coordinates: -2551, 1888, 0319

Tear of the Dragon #3

A map showing a Tear of the Dragon location.
Nintendo

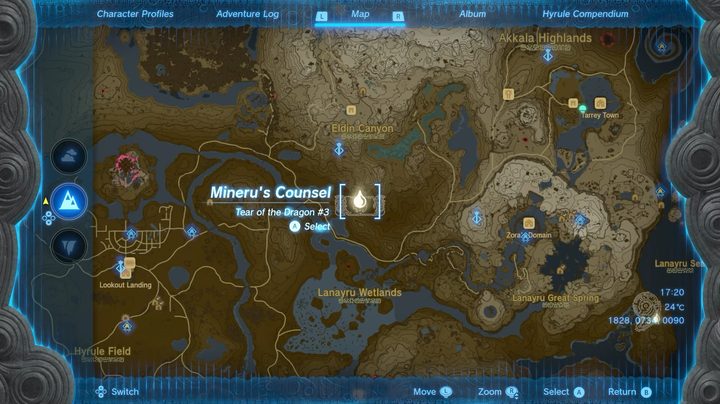
Straight south of Eldin Canyon, this image of a Switch, or Purah Pad, has the Tear directly in the middle.

Coordinates: 1828, 0737, 0089

Tear of the Dragon #4

A map showing a Tear of the Dragon location.
Nintendo

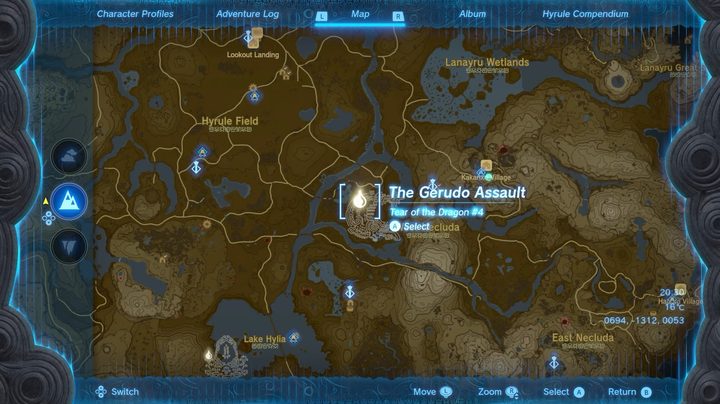
On the southeast side of Hyrule field, close to Batrea Lake, this curling dragon holds the Tear on the bottom left where its tail curls back.

Coordinates: 0694, -1309, 0053

Tear of the Dragon #5

A map showing a Tear of the Dragon location.
Nintendo

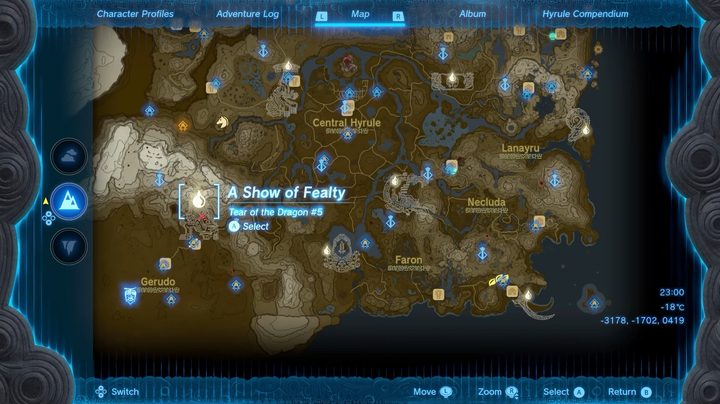
South of Gerudo Highlands, this one is tricky since it is carved onto a cliff wall. The Tear itself is on a ledge where Ganondorf’s shoulder lays.

Coordinates: -3178, -1699, 0418

Tear of the Dragon #6

A map showing a Tear of the Dragon location.
Nintendo

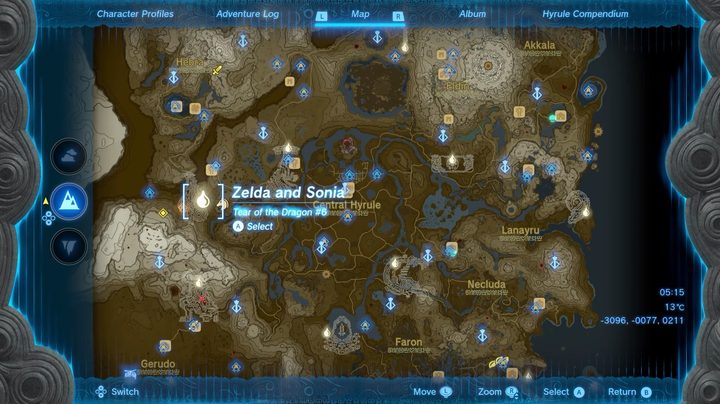
Between Hyrule Ridge and the Gerudo Highlands on the Illumeni Plateau, the Tear is on the right side of Sonia’s dress.

Coordinates: -3096, -0077, 0211

Tear of the Dragon #7

A map showing a Tear of the Dragon location.
Nintendo

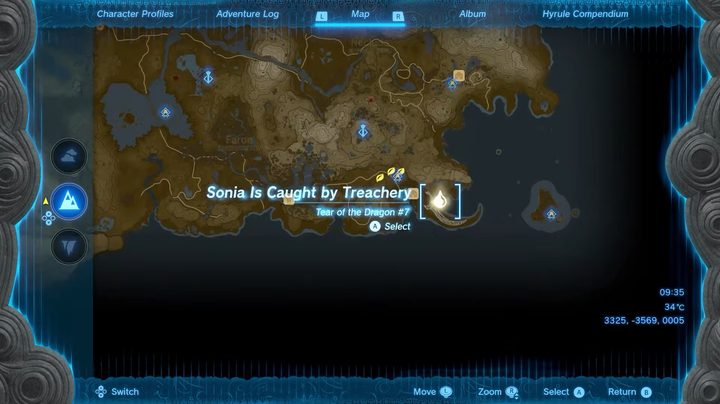
Way down in Cape Cresla, this massive sword has a Tear on the left side of the handguard when looking at it with the blade pointing away from you.

Coordinates: 3325, -3566, 0004

Tear of the Dragon #8

A map showing a Tear of the Dragon location.
Nintendo

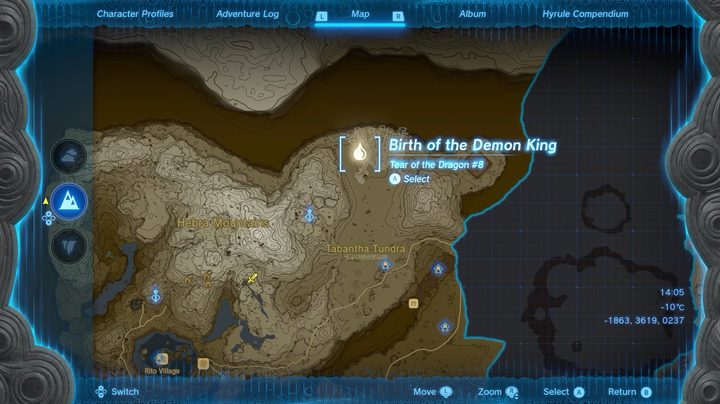
Up in the Tabatha Tundra, beyond the Snowfield stable, look hard through the snowy weather to find the Geoglyph of the Demon King. The Tear itself is on the western side of the image.

Coordinates: -1863, 3621, 0236

Tear of the Dragon #9

A map showing a Tear of the Dragon location.
Nintendo

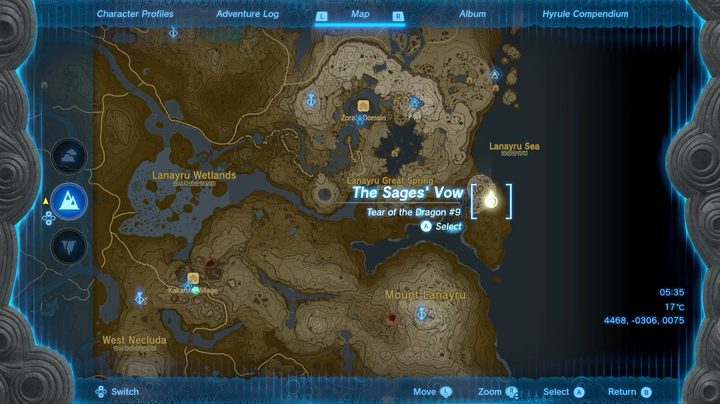
On the Talus Plateau, this small Geoglyph holds the Tear on the top left side.

Coordinates: 4467, -0304, 0074

Tear of the Dragon #10

A map showing a Tear of the Dragon location.
Nintendo

Right on the western edge of Lake Hylia, the Tear is on the top of the left flower of the Shrine.

Coordinates: -0649, -2683, 0068

Tear of the Dragon #11

A map showing a Tear of the Dragon location.
Nintendo

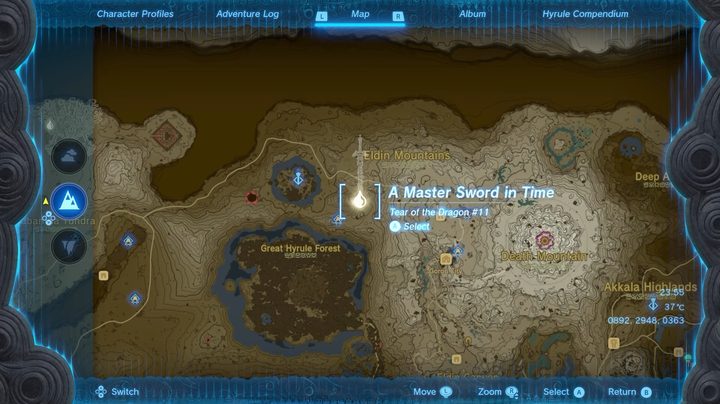
This is another tricky one but look for the cliff right on the edge of the Eldin Mountains coming from the east. The Tear is on the tip of the blade.

Coordinates: 0891, 2951, 0362

Final Geoglyph

The tricky part about finding the last Geoglyph is that, well, there isn’t a Geoglyph at all to help you spot it. Instead, head to the Rist Peninsula at the far northeast end of the map and enter the swirling section of land. Get to the center of the spiral to see the final Tear near the Gemimik Shrine.

Coordinates: 4534, 2144, 0000

Editors' Recommendations

Topics
Jesse Lennox
Jesse Lennox loves writing, games, and complaining about not having time to write and play games. He knows the names of more…
Final Fantasy 7 Rebirth: all piano sheet music locations and rewards
Cloud playing the piano in Final Fantasy 7 Rebirth.

While there's no shortage of ways to distract yourself while playing Final Fantasy 7 Rebirth, one of the most unexpected minigames is the surprisingly deep piano system. In most of the major hub towns you encounter across the expansive world, Cloud can find a piano to sit down at and tickle the keys. You're free to play any song you want in free play, but you can turn this system into a full-on rhythm game, almost like Guitar Hero, by collecting sheet music of some of the game's most iconic tracks. There's even an NPC near each piano who will reward you if you get a high enough rank on each song. Cloud may not be the most expressive in his words, but he can sure play the piano with heart. Here is where you can find all the sheet music and what rewards await if you can master them.
Where to find all sheet music

Sheet music, thankfully, isn't hidden away in chests or has to be purchased for crazy amounts of Gil, but a few do have some hidden requirements. Each new composition is found on a piano in the world and is free to snag once you sit down. Even if you don't feel like playing right then and there, make sure you always at least grab the music to add to your collection so you don't have to backtrack later and get it. There are eight in total to find, and some will only come later in the story, but none are missable once you open up fast travel back to previous areas. This is the natural order you can collect them.
On Our Way
Our first piece of music can be picked up once you hit Chapter 4. During this section, go to the Crow's Nest town in the Junon region, which you can only enter by doing the "When Words Won't Do" side quest. Once you complete this quest and can freely enter the town, hit up the bar and grab this tune.
Tifa's Theme
After a rather exciting cruise to Costa del Sol in Chapter 6, you can add this piece to your collection by making a quick stop at the fancy Royal Crown Hotel.
Barret's Theme
Not much further into the game in Chapter 7 you will visit Barret's old hometown of Corel. The Rock Bottom Bar is waiting with his song.
Cinco de Chocobo
Chapter 9 takes you through the town of Gongaga. Even a town way out in the forest has a piano, which means yet another song to snag.
Two Legs? Nothin' to it
One chapter later, in Chapter 10, you need to do a little exploring in Cosmo Canyon to find your way to the piano, but the icon on your map won't lead you astray.
Aerith's Theme
Perhaps the most iconic song in the entire game, if not the franchise, is hidden behind a completely optional side quest. Once you reach Chapter 11, return to Nibelheim and do the "White-Haired Angel" side quest. It may seem totally irrelevant, but the quest ends with you playing and collecting this song.
Let the Battles Begin!
Once you prove your skills and get an A rank or better on all prior songs, you will get this new one as a reward from the NPC Dorian next to all pianos.
One-Winged Angel
We're not sure if fighting Sephiroth or getting this song is harder. If you want to play this terrifying arrangement, you need to donate all 88 Treasure Trove items to Johnny. This more or less requires you to 100% the entire game
All song rewards
For every song you A rank, Dorian will give you a prize when you talk to him. Here's everything you can get:

Read more
All Legendary Schematics in Palworld and where to find them
A giant pal uses a minigun in Palworld.

Despite featuring all the various types of Pals in Palworld so heavily, they are not actually the most effective way to fight. Sure, they will help you out, and a Legendary can certainly pull its weight in a battle, but you will mostly be relying on your own character to do the work. This is what makes crafting new weapons and armor so important. Most of these you can access simply by leveling up and getting the required materials to make them, but the best of the best can only be made after finding their schematics. If you want only the top-tier gear in Palworld, then you will be hunting for the Legendary Schematics. These will give you access to a range of otherwise unobtainable weapons and armor that can make you all but invincible. Here is how you can get these blueprints for yourself in Palworld.
All Legendary Schematics

There are only nine Legendary Schematics in Palworld, with six dedicated to weapons and the remaining three for armor. Each one is a drop from a specific Alpha Pal in the open world. Note that you are not guaranteed a Legendary Schematic drop. These are rare, probably below 10%, so you will almost certainly have to repeat these battles to get the schematics. Here is a list of your targets and where to find them.
Crossbow Legendary Schematic
The crossbow upgrade boosts your attack to 490 and can be picked up by defeating the level 23 Bushi. It is located at coordinates 1116, 491.
Handgun Legendary Schematic
The Legendary handgun completely transforms the nearly useless base model by upping its attack to 625. Get it by defeating the level 29 Beakon at coordinates 345, -253.
Assault Rifle Legendary Schematic
Who doesn't love the Assault Rifle? Make it deal 560 damage after taking down a level 49 Blazmut waiting at coordinates 434, 532.
Old Bow Legendary Schematic
If you want a bow that smacks enemies with 247 damage arrows, you need to grind out Kingpaca at coordinates 50, -460.
Pump-Action Shotgun Legendary Schematic
If you're a fan of CQC, the shotgun schematic will buff your damage to 385. Suzaku will hold it and is a level 45 Pal found at coordinates 404, 255.
Rocket Launcher Legendary Schematic
Look, sometimes you just need a problem-solver. A Rocket Launcher dealing 14,000 damage can't be argued with in that regard. You'll have to take on the level 50 Jetragon at coordinates 788, 320.
Cloth Armor Legendary Schematic
Not quite on the level as the following two, this schematic is great for the mid game with 112 HP, 24 Defense, and 250 Durability. You only need to beat a level 11 Chillete at coordinates 175, -420.
Pal Metal Helmet Legendary Schematic
This shiny new helmet offers 560 HP, 1,200 Durability, and 240 Defense. Grab it early to make getting the rest of the schematics easier, but you will have to overcome level 50 Frostallion at coordinates -355, 55.
Heat and Cold Resistant Pal Metal Armor Legendary Schematic
Both the Legendary Heat and Cold Resistant Pal Metal Armor drop from the same target. Both have equal stats and give 1,200 HP, 11,000 Durability, and 400 Defense. And, of course, they resist hot and cold weather respectively. You will need to take down the level 50 Paladius up north at coordinates 445, 680.

Read more
All safe locations in Like a Dragon: Infinite Wealth
Honolulu city beach in Like a Dragon: Infinite Wealth.

It's hard to walk a single block in Like a Dragon: Infinite Wealth without some sparkly object or briefcase on the side of the road catching your eye. Usually, these are just simple recovery items or crafting materials, but the real thing to keep your eye out for is the safes. These are bigger, usually more hidden containers that hold much better loot, such as gear or stat buffs. Unlike the random loot littering the ground, there are a set number of safes in each zone (excluding the generated dungeons). Split between Silver and Gold safes, we've found a total of 45 you can crack open to get at the goodies inside. Tracking them down alone would be a full-time job, so let us help you by showing you every safe location in Like a Dragon: Infinite Wealth.
All safe locations
There are 45 safes in Like a Dragon: Infinite Wealth, so we will be breaking them up based on the three locations in the game in which they appear. Each Silver safe only takes one key to open, while Gold ones require three. Safe keys can be earned from major fights and enemies in the world with the crown icon, or purchased from special shops like a pawn shop. Make sure you always have at least three on you so you're ready if you happen upon one by chance.

We will also not be including safes in story-related dungeons since they are quite hard to miss and could be considered spoilers.
Honolulu City

Read more