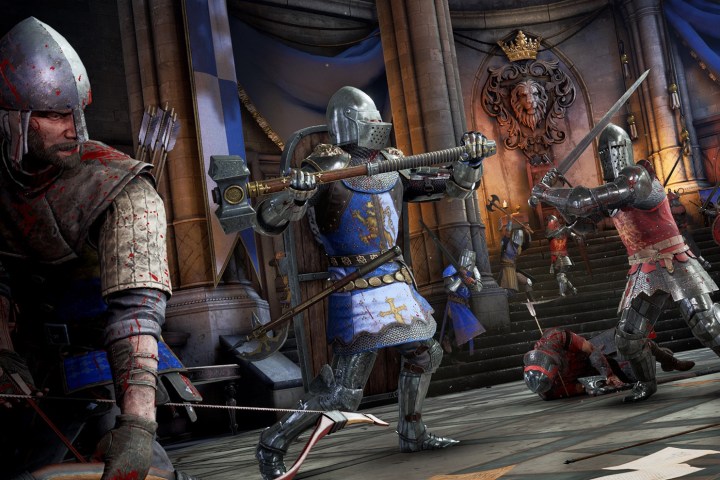
If you ever wanted to play Monty Python and the Holy Grail the video game, now’s your chance! Chivalry 2 is a massive multiplayer sword and shield game featuring 40- and 64-player lobbies. On par with the scale of modern Battlefield titles, Chivalry 2 is a nuanced game with a low-skill floor and a high-skill ceiling.
New players will be able to jump in, current players can continue to hone their skills, and soon-to-be veteran players can show off their flashy cosmetics and abilities on the battlefield. We’ve put together a list of 10 tips and tricks to getting better at Chivalry 2.
Play the tutorial
First and foremost, players must play through the tutorial. Thankfully, it comes equipped with some funny voice lines and animations to keep you entertained as you learn the base mechanics of Chivalry 2. The tutorial gives you the option to skip sections after a few failed attempts, but it’s best to keep trying until you can master it.
The most crucial tutorial stages to master are dragging and defending. We’ll touch on the different ways to protect yourself later on. Dragging, however, is the best way to defend yourself offensively when another player is swinging at you.
Hitboxes in Chivalry 2 take some getting used to. As soon as you start swinging your weapon, it will damage anybody or anything it comes in contact with. That’s why dragging left or right is imperative to hit your opponent before they hit you. It’ll interrupt their attack and open them up to a follow-up strike.
How does Initiative work in Chivalry 2?

Speaking of follow-up strikes, let’s talk about the most important mechanic in Chivalry 2, Initiative. When two players attack each other, whoever lands their attack first will interrupt their opponent’s attack and deal damage. They’ve now gained the upper hand and can launch a follow-up attack. Their opponent only has two options, dodge or block. Trying to attack back after being hit will only get you hit again.
Blocking an incoming attack will give you Initiative, so follow up a block with an attack of your own. This is where ripostes come into play. In short, if you get hit, defend yourself. If you land a hit, swing again.
There are some exceptions to this rule when it comes to weapon speed. Let’s say you hit your opponent with the Messer, a high DPS weapon with a slow wind-up. They happen to be using a Short Sword, a low DPS weapon with quick attacks. Even though you have Initiative after landing your first attack, they can still hit you with proper dragging techniques. While they won’t deal much damage, they’ll gain Initiative back by interrupting your second attack. You may need to eat an attack when going up against quick weapons, but blocking and riposting will put the ball back in your court.
Damage vs. Speed

So which weapons are better? Fast ones or high-damage ones? It depends on the situation, class, and player. For 1v1s, whoever has the quicker weapon is most likely going to win. However, they still have to defend themselves and use Initiative to their advantage. A bad player with a fast weapon will still get one-shotted by a half-decent player with a battle axe.
You will want a larger weapon when taking on two enemies at once, even if one of them is an A.I.-controlled bot. These bigger weapons will allow you to keep your distance, attack while backpedaling, and launch wide sweeping attacks to hit anything within range.
Of course, some classes are limited when it comes to weapon choice. Their quick weapons, like the short sword and cudgel, don’t put out enough damage to compete with battle axes and longswords, even if they’re faster.
So which weapons come with decent speed and good overall stats? The falchion, mace, morningstar, and Dane axe all fall into that category. Use them wisely, though. The only weapon getting you out of a tight situation in that bunch is the Dane axe, and that’s still with a little bit of luck.
Basic combat tips

Chivalry 2 is a nuanced game when it comes to honing your combat techniques. Master these basic pointers and use them to master your playstyle.
Don’t get surrounded
First and foremost, you should always avoid being outnumbered. It’s possible to survive a 2v1 with the right weapon and skills, but getting surrounded in Chivalry 2 will mean certain death. However, if you find yourself surrounded, working toward the left or right can turn a 3v1 or 4v1 into a brief 1v1. The window to take one of your opponents out is small but doable.
Aim to kill A.I.-controlled bots first in these group settings. They’re easy to spot by their base cosmetics and poor playstyle.
Find the 1v1s
Seek out the 1v1s when possible to sharpen your timing and combat skills. Make sure to pick those 1v1s wisely, though. Don’t bring a knife to a battle axe fight. That being said, knowing each weapon’s advantages and disadvantages can aid you in a fight. An enemy with a halberd is more likely to use stab attacks rather than slash. This makes for more accurate and predictable counters.
Take advantage of 2v1s
For easy kills, seek out enemies currently deadlocked with one of your teammates. Charging an attack and hitting them in the back will make for an easy kill. Your teammates will still be credited with the takedown as long as they dealt some damage.
Change attack direction
There is a way to change the direction of your attack in Chivalry 2. Doing so will prevent team damage, especially when trying to attack an enemy already fighting another teammate. To change the direction of your attack, hold the block button and launch an attack. Instead of swinging from the right, you’ll swing from the left.
Combo, combo, combo
If the tutorial didn’t hammer it into your head enough, combos are essential to winning fights in Chivalry 2. Because opponents have to aim their blocks, changing up your attack will force them to focus more on defending your different attacks than countering or attacking themselves. Combos are the best way to launch rapid attacks even with the heaviest weapons, as long as you get the timing down. Furthermore, it’s the best way to not get countered. Button mashing is a big no-no in Chivalry 2. You’ll wind up whiffing more attacks than you land, leaving you open to incoming damage.
How to handle Archers
When staring down an Archer, don’t be afraid to throw your primary weapon at them before they have a chance to shoot you. Charge in with your secondary and finish them off. On the flip side, be prepared to pull out your Archer’s secondary weapon when an opponent comes charging in.
Archers can’t penetrate your shield. So if you have one equipped, charge at them full force and punish them for even trying to shoot you.
Parry, riposte, or counter?

A good defense makes for a better offense. It’s true in sport, and it’s true in Chivalry 2. Learning and understanding the defensive mechanics of the game are arguably more important than understanding offensive mechanics like dragging and throwing your weapon. Defense is broken down into three categories, parries, ripostes, and counters. But which is best for any given situation?
Parrying in Chivalry 2 means blocking. However, you can’t just hold the block button and expect to defend against every attack thrown your way. Instead, you have to aim your block as if you were fighting in real life. Your block has to line up with the opponent’s swing. So, if you block while looking at their feet, and they launch an overhead attack, you’re not going to be holding onto your helmet much longer.
The riposte is the most versatile means of defending yourself in Chivalry 2, and here’s why. A successful riposte, in a nutshell, will grant you I-frames. This auto-blocks incoming attacks in a very short window and is crucial for surviving when fighting two or three people at once.
To riposte, launch an attack of your own immediately after parrying an attack. Doing so launches a quicker attack than usual and can hit your opponent if they don’t immediately block themselves. Be aware of the counter-riposte and switch up your attack timing to keep your opponent on their toes. Holding a charged attack might get them to let their guard down if they’ve gotten into an attack-block rhythm.
Counters are ideal in 1v1s. To counter, you need to launch the same attack as your opponent before you block their incoming attack. If successful, you’ll block their attack and hit them for damage. You’ll also gain Initiative and can go on the offensive.
This is where feinting comes into play as well. It’s easy to tell what sort of attacks are coming at you for most weapons in Chivalry 2. Some weapons, like spears and javelins, are a little harder to tell as the slash animation looks an awful lot like a stab. Feinting can confuse a counter-happy enemy. Remember, you can feint-counter if you make a mistake, but such moves are reserved for the high-skill ceiling.
Trying to counter outside of a 1v1 is going to get you killed more times than not. The riposte is still your best friend in those situations. Be careful when blocking, though. Blocking too many attacks, and holding blocks in general, will drain your stamina. Run out of stamina, and your weapon will break in your hands.
Man the Ballista

Find Ballistas atop the walls of Team Objective modes like Escape from Falmire or the Slaughter of Coxwell. They’re giant mounted crossbows that will fire insta-kill bolts at unlucky enemies trying to lay siege. Manning these is crucial to taking out multiple incoming enemies.
The best way to use the Ballista is to fire it into a group of three to four enemies. It’s tough to hit solo players, but you’re bound to get someone when aiming at the group. Doing so also has the chance for multi-kills. Of course, this only makes Ballistas useful to the defending team. When attacking, make sure to destroy them if you can get in close enough.
Some Ballistas can be turned on the defenders, so don’t be afraid to mount one while on the attacking side and spin it around.
Other ways to heal

There are several ways to heal in Chivalry 2 other than using bandages. Of course, bandages are the best way to heal on the fly. If you’ve got one, you should use it. If you find yourself without a Band-Aid, here are some alternative methods of healing.
Eat food
If you come across a well or garden patch, you can grab food to either eat or throw at enemies. Of course, hitting an enemy with a flopping fish is more comical than practical. Eat food by pressing the battle cry input (double-tapping the square on PlayStation). This is a helpful way to heal if you find yourself damaged and alone near a well or garden.
Resupply
During team objective games, there will be plenty of areas in each section to resupply ammo. Resupplying also gives you another bandage if you’ve already used yours. If you find yourself in need of healing, head to a supply cart, apply your bandage, and immediately pick up another. Don’t ever head into battle without a bandage if you can help it.
Trumpets and Banners
Several subclasses in Chivalry 2 will feature the Trumpet or Banner as their signature ability. The Trumpet will heal allies in range and line of sight of the person blowing it. It’ll also heal the Trumpeter themself. Banners act like healing beacons placed in the middle of combat. Standing near one will slowly heal you and is better than wasting your bandage on a flesh wound. Place Banners where enemies won’t easily destroy them. Banners are best behind the front line, so your allies can retreat to heal.
Team Deathmatch vs. Team Objective

There are only three maps that will trigger the Team Deathmatch game mode. They are Tournament Grounds, the Fighting Pit, and the Battle of Darkforest. Team Deathmatch works similarly to games like Star Wars: Battlefront. Two teams face off to see who can whittle the other down to zero reinforcements. There are few chances to heal or resupply in Team Deathmatch, and games are over fairly quickly.
On the other hand, Team Objective can last as long as 15-20 minutes if the attackers can push to the end. Players will have to work together to succeed in Team Objective; this means attacking the necessary points, operating catapults and Ballistas, and pushing Siege Towers to their final destinations. Racking up the most kills doesn’t mean anything if your team ultimately loses in the end.
How to build ladders

While on the subject of Team Objective, let’s talk about building ladders. When attacking, especially during the Siege of Rudhelm, you’ll find ladders lying on the ground. However, you can’t pick them up until you find the missing piece. You’ll find those pieces in the carts nearby.
Approach the cart and pick up the ladder piece like you would any other intractable object. Walking up to the rest of the ladder will attach it automatically, and the ladder will rise to the top of the wall. You can then climb it to flank your enemies as they focus on the brunt of your team coming up the Siege Tower.
On the defensive side, it’s equally important to knock those ladders down like you’re defending Helm’s Deep. The same can be said for ramps; however, ramps don’t have to be built by attackers.
Using catapults

Catapults are fun if you know how to use them properly. Next to each catapult is a wagon full of rocks. First, you must cock the catapult back like you would the Ballista. This takes much longer but is well worth the wait. Release once it’s charged, and the catapult will hold in place. Then, grab a rock from the cart and place it on the catapult. Re-man the catapult, aim it, and launch the rock. It’s tough to predict where the rock will land. Make sure to aim the catapult where you believe a large group of enemies might be.
When defending on The Fall of Lionspire, let a few rocks rip right at the start to take out the approaching Mason army. Unfortunately, there’s no way to compensate for collateral damage. Use catapults when attacking to take down large doors.
Editors' Recommendations
- Do you need a PSN account to play Helldivers 2?
- Helldivers 2 PC players are furious over this controversial change
- PlayStation Portal 2: 8 features we want in Sony’s next-gen handheld
- PlayStation VR2 production reportedly paused by Sony
- The best Wordle starting words, tips, and tricks for beginners