
When it comes to selling all manner of new and used goods on an international scale, eBay is the go-to service. Whether they be newfangled next-gen consoles, an autographed baseball card, or handmade scale-mail guinea pig armor, eBay seemingly knows no bounds. It allows users to post and edit listings for everything from fashion accessories to foreign cars, all within an easy-to-navigate web interface and accompanying mobile app.
However, selling is a little more complicated than just posting an ad on a service like Craigslist. We’ll take you through the key steps in getting started, and everything you should know about making efficient eBay sales.
Want a more direct selling experience? Try one of these classified ad sites.
Getting up and running on eBay
While you may be able to peruse eBay listings without an eBay account, there are a few necessities and certain actions you may want to take prior to selling your goods. Tasks such as creating an account and adding payment information are an absolute must, but even simple touches such as tailoring your profile page and boosting your rep with a hodgepodge of low-cost purchases can make you seem more eBay diligent than daft.
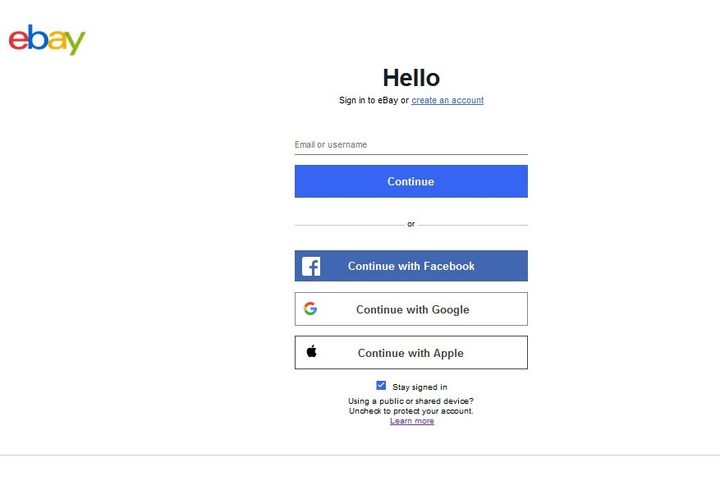
Step 1: Create an account
Sign into an eBay homepage or link your account from another service like Facebook or Google. If you need to create an account, think carefully about what it is called. Since your username is always visible when you bid, buy, and sell, choose something that is both professional and possibly speaks on behalf of what you intend to use your account for.
Review the User Agreement and Privacy Policy to examine the details of selling on eBay
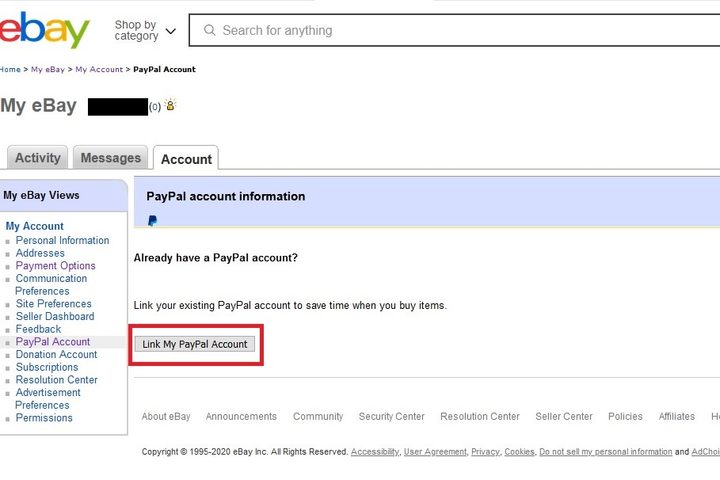
Step 2: Link your PayPal account
If you haven’t already linked your eBay account to PayPal, you will be encouraged to do so when signing up. If you already have an account without a PayPal link, hover over your name in the top-left corner when viewing any page and click your blue Account Settings link from the resulting drop-down menu. Once there, select the PayPal Account option in the middle of your screen and click the gray Link My PayPal Account button on the left-hand side of the page, fill in your contact information if prompted, and then enter your PayPal login information on the resulting page. You can also sign up for a PayPal account on this page by clicking on the Sign Up button.
Step 3: Spruce up your profile
Love it or hate it, but eBay is a game of faith. When you bid or purchase an item on the site, you’re making the assumption the seller is a legitimate person, not one attempting to scam you. That being the case, it’s often best to bolster your account profile with a photo and a bit of copy to make your profile appear more genuine and reassure potential buyers that you’re a serious seller. It doesn’t need to be lengthy or overly complex, but it should provide users with a little bit about yourself and your background — especially if you’re selling within a niche field such as comics or taxidermied bear pelts.
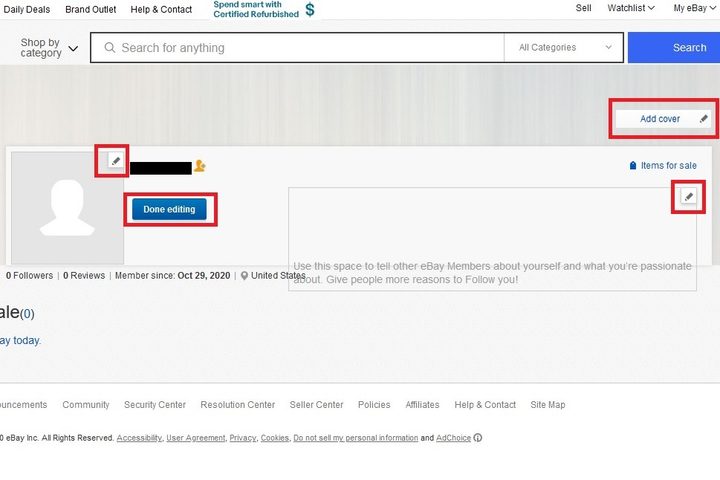
To edit your profile, hover over your name in the top-left corner when viewing any page and click your eBay user ID from the resulting drop-down menu. Afterward, click the Edit Profile button and add an image and additional copy by clicking the pencil icons in the upper-right corner of the portrait and text fields. You can also add a cover image by clicking on the Add Cover button. Click the blue Done Editing button when finished.
Step 4: Boost your reputation
You get 250 free sales per month without a subscription or having to pay insertion fees — and you can make as many purchases as you want. Use this freedom to start creating good stats for yourself. Buyers are typically hesitant of purchasing items from sellers with no rating, so purchase a few items to build your credibility within the community and prove trustworthiness — no matter how small a transaction it may be. Check out the ratings breakdown below to see how the different star icons stack up against their respective rating numbers.
| Star Color | Number of ratings |
| Yellow | 10 to 49 |
| Blue | 50 to 99 |
| Turquoise | 100 to 499 |
| Purple | 500 to 999 |
| Red | 1,000 to 4,999 |
| Green | 5,000 to 9,999 |
| Yellow shooting star | 10,000 to 24,999 |
| Turquoise shooting star | 25,000 to 49,999 |
| Purple shooting star | 50,000 to 99,999 |
| Red shooting star | 100,000 to 499,999 |
| Green shooting star | 500,000 to 999,999 |
| Silver shooting star | 1,000,000 or more |
Crafting the perfect eBay listing
To create an eBay listing, click the Sell link in the top-left corner when viewing any page and then click List an Item. Then enter the name of the item you’re trying to sell in the text field provided and click Go. You don’t need to be overly specific — the title can be tweaked in the following listing editor — but being somewhat detailed will help produce matching categories for your item. If you know the UPC or ISBN number for your item, typically found on the barcode, entering said code in the title box will pre-fill many of the specifications required down the line. On the next page, select your item’s characteristics from a series of drop-down menus (Brand, Effect, Features, etc.) and then click the Next button. Then choose the item’s current condition: new, new with box, etc.
You should be taken to your listing’s main page now.
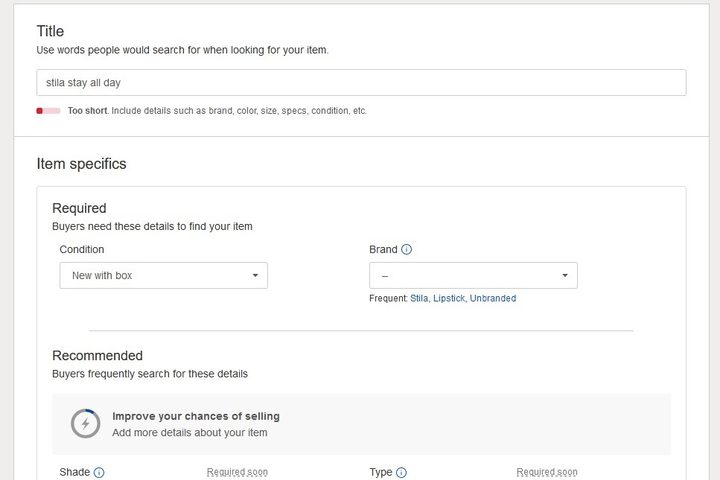
Step 1: Writing the listing title
Eighty characters may not sound like ample space to describe an item, but it’s more than you might think. The listing title is one of the first things potential buyers see when perusing eBay listings, so it needs to be compelling and clear enough for users to understand the item you’re trying to sell immediately. Be descriptive when crafting the title, noting the item’s brand or designer, and include additional words highlighting the color, size, and condition when appropriate (although you will have fields for these descriptions later on as well).
Step 2: Attaching photos
Your listing on eBay requires a photo — preferably more than one. It’s best to capture images from a variety of angles, potentially highlighting different key components or flaws noted in the item’s description. Photos should be captured in a well-lit area, using natural light when possible, and be devoid of distracting or cluttered backdrops that might deter users from buying the product. It’s also best to avoid stock images found on the web and those supplied directly from the manufacturer as using your own personal, original photos helps convince prospective buyers you actually possess the item in question.
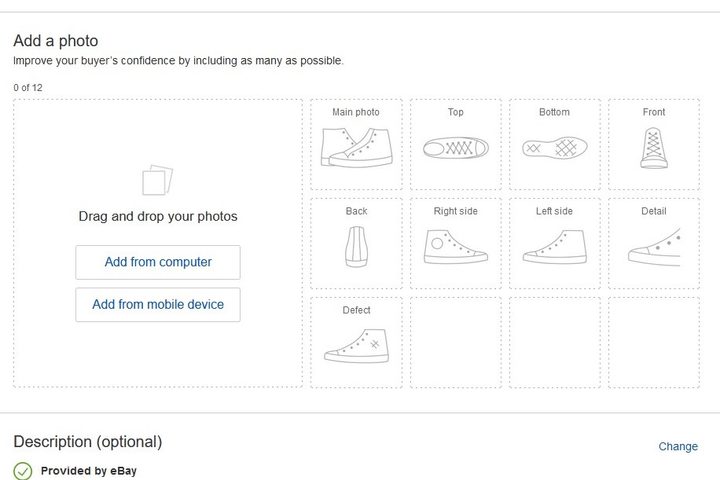
You can upload up to 12 photos without borders or text, or even choose Gallery Plus, which charges you a fee for uploading larger photos. Choose your photos carefully. Simpler listings may only require one or two photos, which is fine in the right circumstances.
Try using Ebay’s new computer vision feature to really make your products pop, too.
Step 3: Writing the listing description
Postings live and breathe in the minute details, such as cosmetic damage and bundled items, each of which should provide the buyer with an accurate sense of what they will be receiving. Keep your item description as neat and concise as possible, using proper spelling and grammar, while offering text that is both easy to digest and relatively quick to read.
Step 4: Choosing the right asking price
When it comes to eBay, there are two forms of listing prices: Fixed-price and auction-style. Fixed-priced listings, otherwise known as those offering a Buy It Now price, are strict listings that do not fluctuate in price, offering the item at a set amount, which you determine in conjunction with the minimum amount outlined by eBay. Auction-style listings can offer a Buy It Now price as well, but they also allow buyers to bid on items, with the sale typically going to the highest bidder. Additionally, some eBay categories allow users to add a Best Offer feature to fixed-priced listings, urging buyers and sellers to negotiate the sale price through a series of initial offers and counteroffers.
This is also where you set the duration of your listing, which is automatically set at seven days but can be adjusted or scheduled for a specific time.
Do your research before listing your item, and consult similar listings for similar products to get an idea of supply and demand on the eBay market.
Step 5: Choosing the shipping cost and other listing preferences
In the next two sections of the new listing editor, you’ll be able to choose your shipping and other listing preferences for your product. When it comes to getting your product to your customer, you have two main delivery options: Ship Your Item or Local Pickup, the latter of which lets your buyers retrieve the item from you either at “your home or another location of your choice.” If you select Ship Your Item, you’ll be given the option to enter your package’s weight and dimensions to calculate its shipping costs, or you can select I Don’t Know the Package Details and then either choose You Pay to provide free shipping to your buyer, with the cost to you calculated based on their location, or Buyer Pays – Flat Shipping, where you can decide how much the buyer should pay in shipping costs.
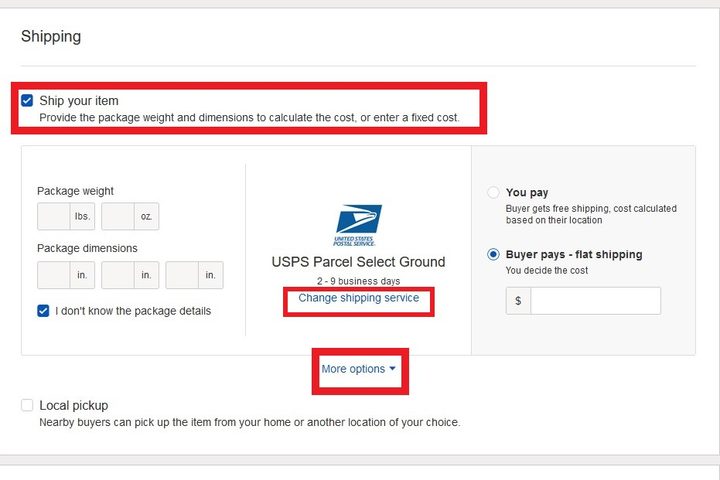
If you do enter in your package details, you’ll have three options: You Pay [Calculated Amount], Buyer Pays – Calculated Shipping, or Buyer Pays – Flat Shipping. In either case, the Shipping section will still let you choose which shipping company you want to use. To do so, click on the Change Shipping Service link to pick a shipping company. You can also click on More Options to access other features such as Add a Second Shipping Service or Add International Shipping. If you choose Local Pickup, you’ll need to enter the zip code of the item’s location.
Some sellers offer free shipping as an incentive to buy, while other sellers set shipping costs. This is entirely up to you and the product you are selling, but always try to be reasonable and avoid cheap tactics in favor of honest shipping policies like buyers would encounter on Amazon or other common platforms.
The last section of the new listing editor allows you to set a few more preferences for your listing. In the Listing Preferences section, you’ll be allowed to adjust things like payment method, handling time, and whether or not you’ll accept returns. To make these changes, click on the Change link in the top right corner of the Listing Preferences section.
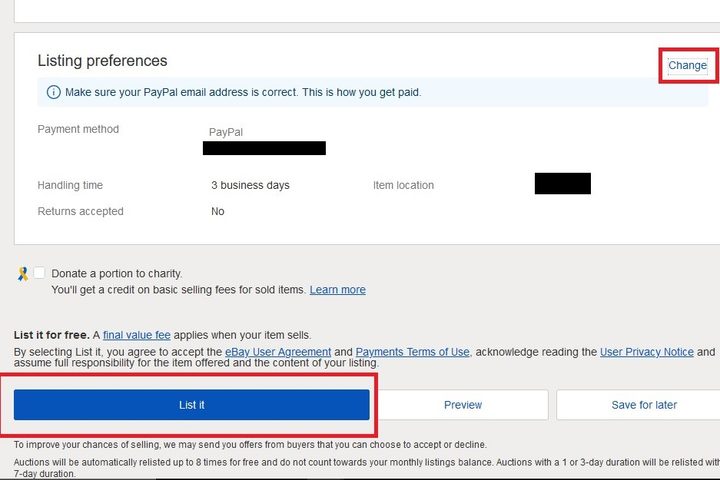
When you’re done setting up your listing the way you want it, click on the big blue List It button at the end of the editor.
Finalizing the transaction
Step 1: Deliver item
Once the listing has concluded and the buyer has paid their dues, it comes time for the hard work. You should have already outlined all details, shipping terms and conditions, and any associated expenses. All you need to do now is make your delivery. Put your item into a box that’s just a bit bigger than the item and package it in an organized fashion while securing it with packing paper, bubble wrap, or other packaging products. Make sure you apply an appropriate label, including the customer’s address and a return address. Keep in mind that strangely shaped or fragile items may need to be shipped differently and require other fees. Nonetheless, these types of items should still ship within the same time as previously specified. If you experience any issues during shipping, contact the customer with the information and discuss other shipping methods if necessary.
Step 2: Leave feedback
eBay sellers can offer feedback, but only positive comments are allowed. In contrast, customers can give positive, neutral, or negative feedback. Your first impression may cause you to think positive seller feedback is a waste of your time, but it’s truly a wonderful habit to start. Not only does it show that you are a trustworthy seller, but it also helps you understand and get used to the feedback process. To leave your comments, navigate to Orders in the Seller Hub.
A few bonus tips and tricks for selling
eBay is a bustling sales community, so it’s really not possible to cover every single aspect of selling in just one article. Even so, we believe it’s worth pointing out the other neat features and methods that we didn’t already discuss in our concise tutorial for sellers. You may not need to incorporate these in your day-to-day eBay interactions, but we certainly think they can assist you as you continue to sell online.
- Download the mobile app: Being tethered to a desktop computer is no longer an issue with the free mobile eBay app for Android and iOS. The app is streamlined and fully featured, loaded with tools for buying and selling while offering additional notification tools and bid alerts to keep you perpetually informed regarding any auction you’re involved with. Note you have to turn on notifications in your phone settings to get quick alerts.
- Accept returns: Buyers tend to feel more secure about their purchases if there’s a bit of security offered by the company. If you accept returns, buyers who are on the fence may be convinced by your policy.
- Build a good reputation: eBay has a “Top Rated Seller” title that can help convince buyers of your trusted sales practices. Your rating is built every time a transaction occurs. If you can avoid any order issues, communicate thoroughly with customers, settle complaints quickly, and make at least 100 transactions, your rating will grow.
- Keep sales within eBay: eBay sticks to several strict payment policies that explicitly advise sellers not to accept payments like cash, checks, or money orders because those are processed outside of the eBay platform. Those payment policies keep you safe as a seller by providing a secure method of transaction. Outside of the platform, there’s no guarantee the payment will process as effectively.
- Open an eBay Store: Sellers who choose to purchase an eBay subscription have the option to open a virtual store with several beneficial accessories, depending on your specific subscription level. Under this plan, you would have a unique Store address and broader selling capabilities, additional web-page design options, sale tracking, and more. This subscription option is an excellent choice for any sellers who have complicated or extensive inventories.


