PDF is a user-friendly, printable, downloadable file format that works across all systems. In our digital age, PDF has replaced many paper documents, making security all the more important. Thankfully, PDFs have password-protected encryption built directly into the format, whether you’re running Windows or MacOS. There are several methods to password protect a PDF. In this guide, we will walk you through each of the methods.
More PDF guides
Password protecting a PDF with Adobe Acrobat

Step 1: Navigate to the main Adobe Acrobat Pro DC free trial page and click the blue Get Started button. You’ll need to sign up for an Adobe Creative Cloud account, which involves providing your name and email address, as well as creating a new password. (If you’re already a subscriber of Adobe Acrobat Pro DC and have the software installed on your system, skip ahead to step 4.) You’ll also have to input a payment method so that Adobe can charge you after the trial period — be sure to cancel before the indicated date if you don’t want to keep up the subscription.
Once you’ve entered and submitted your information, you’ll be taken to a confirmation page. On this page, click on the Get Started button to start your trial. Then, follow the on-screen prompts to download and install Adobe Acrobat Pro DC.
Step 2: If you don’t already have Adobe Acrobat Reader installed, then you’ll need to install the DC Pro version. Otherwise, it will only upgrade what you already have installed to the fancier version. If asked whether you want to buy or continue your trial, pick the option to continue.
Step 3: Once Adobe Acrobat Pro DC is launched, make sure you’re signed in using the Sign In link in the top-right corner. Then, click the File menu in the upper-left corner, and select Open. Choose the PDF file you want to password protect from its respective save location, and click the Open button.
Step 4: Select File, and then choose Protect Using Password.

Step 5: In the dialog box that pops up, choose your password requirements (whether or not users will need a password to edit or view your document), set your password, and select any Advanced Options if desired. Once you have everything the way you want it, click Apply.

If you’re sending this password to others, it’s probably best to choose one that you don’t use for other services — which is good advice in general. Recent versions of Adobe will even rate how difficult your password will be to guess, so try to pick a password that gets a strong rating. Preferably, the password will be one that includes a combination of lowercase letters, capitalization, and numbers.
If you’re worried about forgetting your password, you can always use a password manager.
Restricting edits and printing with Adobe Acrobat
Password protecting a PDF document isn’t necessarily a catch-all security measure. Adobe Acrobat DC, for instance, will also allow you to password protect specific tasks such as editing and printing. Here’s how to do just that.
Step 1: Open the PDF document.
Step 2: Select the Tools tab, and then scroll down to select Protect.

Step 3: Select Advanced Options. From the drop-down menu that appears, choose Encrypt With Password. You’ll be asked if you want to change the security of the document. Click Yes.
Step 4: In the Password Security window that appears, tick the box next to the phrase Restrict Editing and Printing of the Document.

Step 5: Under the Permissions section, choose the types of printing and editing that will be allowed for the document by clicking on the drop-down menus next to the phrases Printing Allowed and Changes Allowed, respectively. Select any other appropriate options for this document by ticking their respective boxes in this section. Set your Change Permissions Password by typing it in the text box next to that phrase.
Step 6: In the Options section, select your compatibility and encryption options. Once you’re done, click OK. You’ll then be prompted to confirm your Change Permissions Password. When you’re ready to save your new security settings, hit Save on your document one last time. You have to save your document in order to save your security settings for it.
If you need a full explanation of each security option offered by Adobe, check out their detailed help guide on the matter.
Password protecting a PDF with PDFMate
You don’t need to spend a lot of money on a secure PDF platform. Fortunately, there are alternatives that cost little to no money if you don’t mind missing a few Adobe Acrobat DC features and design aesthetics.
PDFMate Free PDF Merger lets you combine pages and encrypt them all for free. Like Adobe Acrobat DC’s program, PDFMate can set passwords to documents and allow you to input passcodes for editing, printing, and copying.
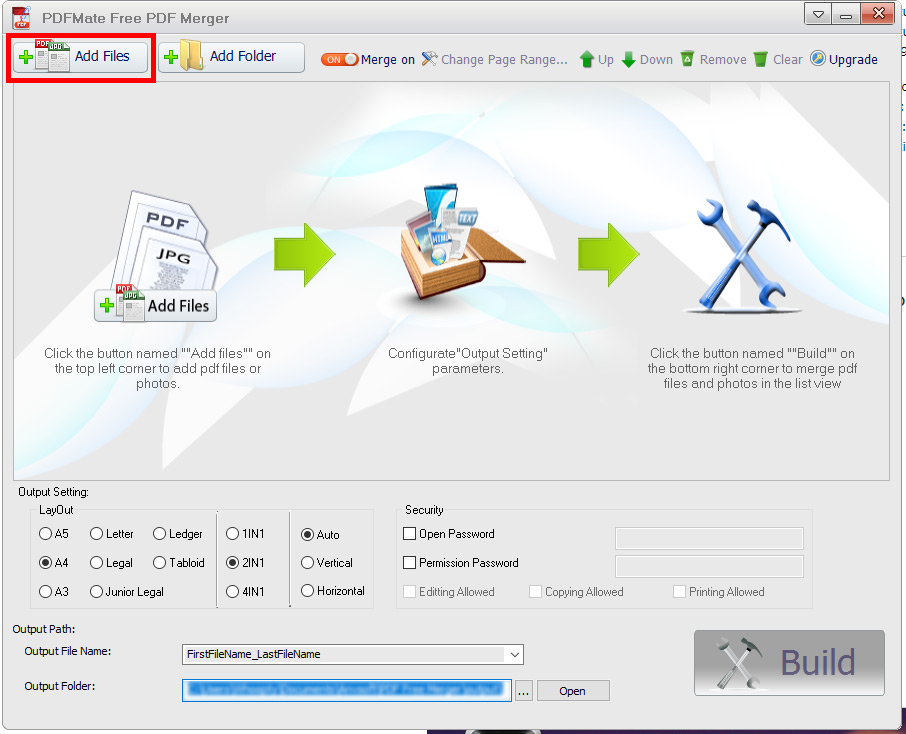
Step 1: Head over to the PDFMate Free PDF Merger website, click the Free Download button near the bottom of the page and then follow the on-screen installation instructions. When complete, launch the application.
Step 2: Click the Add Files button in the upper-left corner, and double-click the PDF document you want to password protect.
Step 3: Your PDF should automatically show up in the list of available files. Check the box beside Open Password, and enter your password into the corresponding text field. To turn on password protection while editing, printing, and copying, be sure to check the box next to Permission Password, enter the password you want to use for editing, printing, and copying into its corresponding text box field, and then tick the boxes next to the permissions you want to grant.
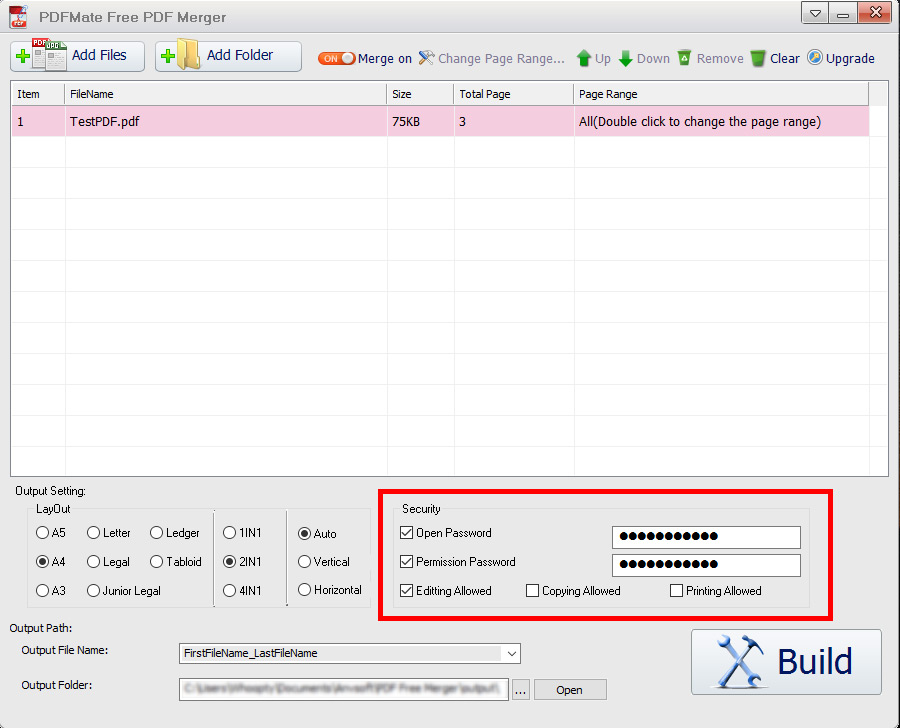
Step 4: After you’ve finished adding your password, click on Build in the bottom right-hand corner of the application window. Afterward, a folder will automatically open with your new password-protected PDF. Presto!
Note: Be sure to choose the appropriate Output Settings for your document before you click on the Build button. PDFMate’s default layout settings may mess up the formatting of your document otherwise.
How to password protect a PDF in MacOS
Most image formats and documents are openable with the built-in Preview app in MacOS. It also offers basic but necessary editing capabilities, which is why we call it the “hidden” Paint app on every Mac. As it turns out, this same app can encrypt any PDF in just a few steps.

Step 1: You’ll want to use Finder to locate and click on the target PDF file. Right-click on this file, select Open With, and then select Preview on the resulting pop-up menu. If Preview is your default app, you can just select open here. Alternatively, you can open the Launchpad, locate and open Preview, and then locate and open the target PDF.
Step 2: Once the PDF is open, click File before selecting Export from the drop-down menu.

Step 3: Soon, the Export pop-up window should appear. Enter a name, select a destination, and then check the box directly left of Encrypt.
Step 4: The Export pop-up window will get bigger. You’ll be provided with a space where you should enter your new password. Enter it again in the Verify field.
Step 5: Click the Save button to complete. To ensure that it’s encrypted, open the modified PDF. If the encryption was successful, a password prompt will appear. Re-enter the correct password to ensure that it works properly.
Editors' Recommendations
- How to take a screenshot on a Mac
- How to change the default apps on a Mac
- How to clean a laptop screen without scratching it
- How much RAM do you need for a laptop, gaming PC, or tablet?
- Here’s how to choose the right printer to buy in 2024