Spring Break 2022. It was my first real opportunity to travel in exactly two years, after a little thing called a global pandemic scuttled a family trip to (of all places) China. You lose a lot of road warrior muscle memory in that time. What to pack, and how to pack it. Dealing with airports and other travelers.
But it also was a chance to reassess and take stock of how I travel. And one fix this year was going to be including a travel router.
Why? I’m growing more conservative in my old age, and that means worrying more about my (and my family’s) online security not just at home, but also on the road. And that means no more connecting to an Airbnb host’s network, at least not directly. Same goes for hotels.
So it was time to finally figure out a travel router. Here’s how I did it.
The background

While there’s no reason that I couldn’t have just bought some sort of travel router and called it a day, I didn’t want to spend a couple hundred dollars (or more!) on what ultimately would be going to a company’s marketing budget more than anything. This is the sort of thing that a Raspberry Pi is perfect for.
Only one problem: As of mid-April 2022, due to supply chain issues, it’s still pretty impossible to buy a new Raspberry Pi. At least not without paying a pretty stupid premium online.
For the uninitiated, a Raspberry Pi is a tiny little Linux computer that fits in the palm of your hand. It’s powered by USB-C, which almost everyone should have on hand already, and it uses a microSD card for onboard storage. And the operating system is open source, which means you can do all sort of fun things with it. And you don’t have to have a neckbeard to rock Linux. You just have to be able to search for things on the internet, and copy and paste commands — and have a little patience and the willingness to screw up once or thrice.
I already have a couple Raspberries Pi (that’s the non-official plural that I’m still trying to make happen) in use in my home. One is attached to an antenna that helps track airplanes. It’s also running an ad-blocker across my entire home network. The other was being used as a bridge between all our smart devices. So things like Nest cameras and thermostats — which don’t play nice with Apple HomeKit — can work just fine with Apple’s built-in smart home hub. But that’s the less important of my Pi. I don’t really care that much about HomeKit.
And so after a couple weeks of hunting and waiting, I gave up and decided to do what any self-respecting nerd would do. I cannibalized gear I already own and gave up the luxury of being able to see when my front door unlocks as an Apple notification and instead will have to put up with seeing it as a Nest notification. The horror.
But first, we move the Pi-hole
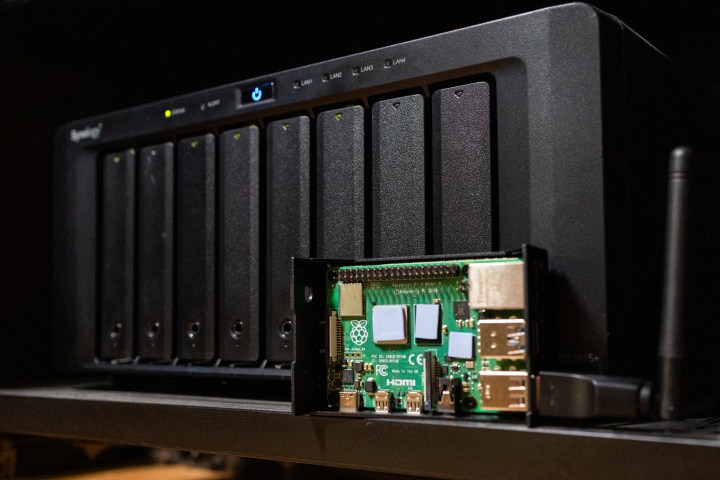
Actually, this is the part where I have to admit that I forgot which Raspberry Pi was doing what, and actually unhooked the wrong one to turn into a travel router. I thought I was sacrificing the Pi-hole ad-blocking box, and decided it was time to move it over to the network-attached storage that also resides in my living room and is woefully underused.
Most of the time it’s doing just what its name implies — serving as storage. But it can do so much more than that, including acting as a server. After a couple minutes of searching and a few more of actually setting things up, I fired up Docker on the Synology NAS, installed Pi-hole there, and pointed my router to it.
It’s like nothing changed at all. And because I got really smart and backed up the ad-blocking lists from the other Pi-hole instance, which is now doing precisely nothing, it literally is the exact same thing, just in a different network location. The ads are still blocked across my network, it’s just that they’re blocked form a different CPU. And my family is none the wiser. (I told them what I did, and got the blank faces that denote a job well done.)
Building a travel router
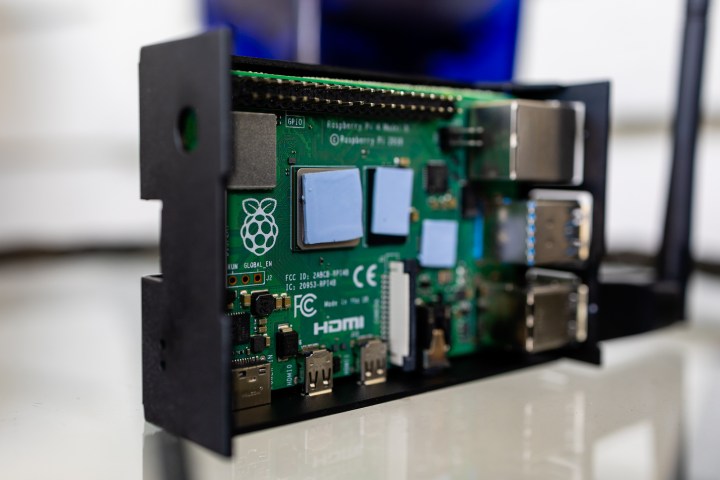
Confession: I did spend a little money on this project, just because I wanted the Raspberry Pi in a more robust case than what I had buried in my entertainment center. The sky is the limit when it comes to Raspberry Pi cases — you can even 3D print your own if you want — and I ultimately went with a $20 case that looked sturdy enough to live in a gear bag. I also shelled out another $12 for a Wi-Fi antenna , which really was the only necessity I didn’t already own.
So $12 (or $32) for the full project — that’s far better than buying some company’s router.
I’m not going to go step-by-step through the full project. But I will link you to the broad strokes.
I’m a nerd, but I’m one who still needs a good bit of handholding when it comes to Linux.
The operating system itself is OpenWRT. Open, as in free, as in beer (which isn’t really what “open” means, but whatever), and WRT, as in Wireless RouTer. It’s a free, open-source operating system that turns whatever you’ve installed in on into a customizable router. Very cool.
OpenWRT also plays nicely with any number of VPNs, via OpenVPN. So I made sure to install that, too, given that being able to securely connect to the internet while on the road was the point of this whole little project. You’ll need a VPN provider, of course. ExpressVPN and NordVPN are two of the more popular ones out there — I pay for ProtonVPN for my personal use. The process is pretty much the same either way.
I’m a nerd, but I’m one who still needs a good bit of handholding when it comes to Linux. So the free Network Chuck tutorial is what got me through this whole process. I don’t mind admitting that it took a few tries to get it right — but that’s on me. It’s an excellent tutorial on a not-uncomplicated process.
And while we’re at it, might as well throw in some ad-blocking again. (There’s nothing more jarring than leaving your house and being reminded just how awful the internet is these days.) Only instead of Pi-hole, this time I went with AdGuard. Same price (free!) and the same basic premise: The network requests of any device connected to the travel will go through AdGuard first, and it’ll squelch anything it deems bad. Like ads. Or other things.
So, was any of this worth it?

The whole build took a couple hours, mostly because I actually went through it twice, to make sure I got things right and dialed in just how I wanted them to be. It took about $32 in new parts, but that could be less if all you need is the Wi-Fi antenna.
The important part is that when I’m on the road, I can now control the route all my devices take to the internet. I don’t have to worry about connecting my phone and my laptop and my tablet individually to a VPN — I can just connect them all to my fancy new travel router. Same for my family. I don’t have to worry about what else some landlord may have on that same network. Or what a hotel’s network might be up to. (I honestly can’t decide which is worse.)
And I’ll once again have the added bonus of blocking ads and other trackers while I’m on the road. It’s not as fast or powerful as my full mesh system at home, that’s for sure. But it’s far less expensive, and much more secure than nothing.
Not bad for a little Linux computer that you can’t even buy right now.
Editors' Recommendations
- This custom hoverboard is entirely powered by Raspberry Pi
- You can now cram your Raspberry Pi 4 with 8GB of RAM for $75
- Powerful upgrades turn 4th-gen Raspberry Pi into a more capable $35 desktop