Fighting spam is an uphill battle. Each time you unsubscribe yourself from a junk email list, your inbox gets hit with double the amount the next day. What’s worse is not knowing how you got on that list in the first place.
While spam seems inevitable, you don’t have to put up with it anymore. We’re going to tell you everything you need to know about creating a disposable email address, which can help reduce junk mail flow.
Use the Gmail customized emails trick
Although Google doesn’t have its own disposable email service, Gmail offers the ability to create customized emails that you can then throw away when you don’t need them anymore. If Google’s own ad features aren’t taking care of the problem, here’s how to use this tool.
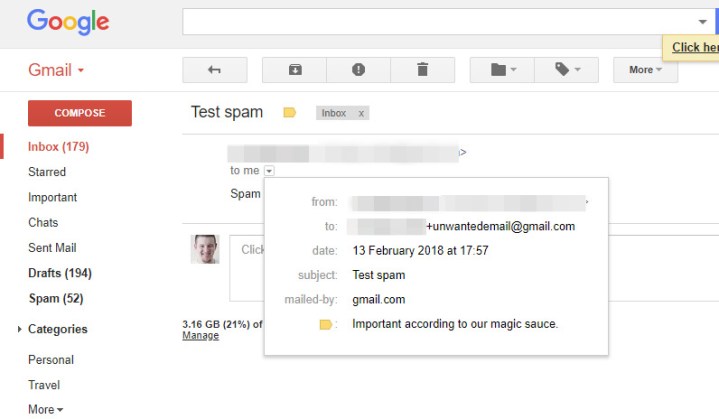
Step 1: When asked to input your email on a service you’d rather not give your proper address to, type it in as normal, but end your email address with a specific tag — in this example, we used “+unwantedemail.gmail.com” (the plus sign is helpful for visibility, but it’s not necessary). That way, when you receive an email from that service or company, it will have that additional moniker attached to it.
Emails sent to that address will appear in your inbox alongside all others, but with that specific tag on the end of the address, they are straightforward to eliminate or block entirely.
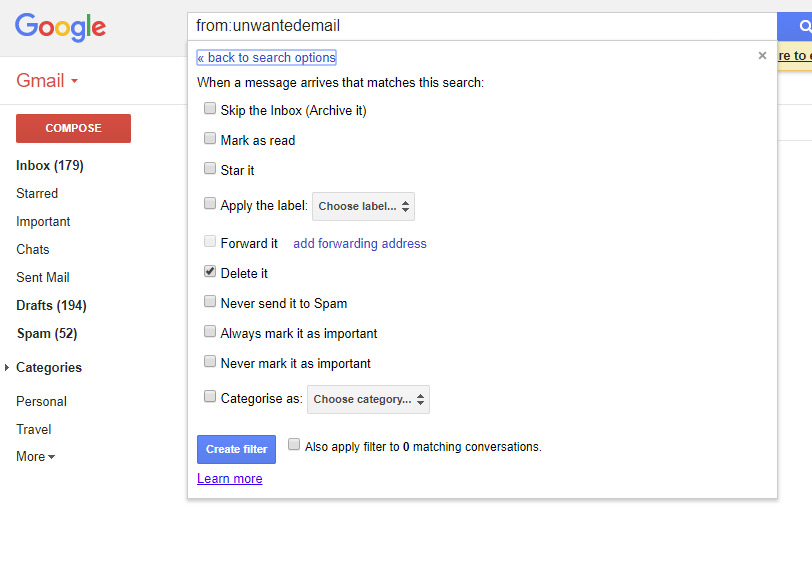
Step 2: Once you’re done receiving emails to that specific address, you can set up a Gmail filter to make sure that it automatically deletes any emails coming through to that address. To do so, type your particular tag in the search box at the top of your inbox and click the arrow on the right-hand side. Then put that tag into the From section of the filter form and click Create Filter.

Create a speedy extension with Burner Mail
Are you planning on signing up for a lot of different services, possibly as a tester or reviewer? Then you may prefer to install an extension that makes creating temporary email addresses much faster and easier. In this case, we recommend the well-crafted Burner Emails extension. There are also options to create an account on the site and use disposable emails from there, but the extension is where the real value is.
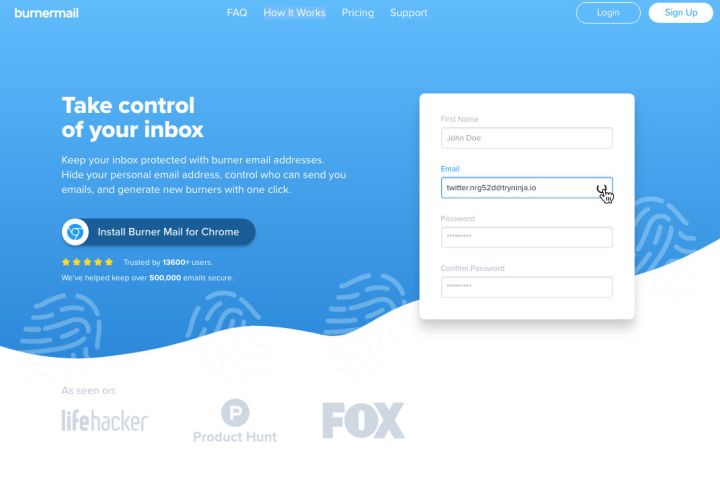
Step 1: Navigate to the Burner Mail site and select Install Burner Mail for Chrome (there’s also a download in the Chrome Store and a Firefox version if you prefer). This will add the Burner Emails icon to the top right corner of your browser window and enable the service as you explore the web. You may need to sign in to your Google Account during this process.
Step 2: When you come across an email field you have to fill out, hover over it, and you should see the Burner Emails icon — a little flame on a letter — and a disposable email that has automatically been generated for you. Select it, and the email will be created and inserted into the field. This email will forward emails to your Gmail account as long as you want but will keep all your own email information secure.
Step 3: If you are getting emails you don’t want or no longer need the disposable email you’re using, select the Burner Emails icon and view all the email addresses you have created. You will see an on/off toggle that shows the Block Sender option when you hover over it. Turn off the email address in question, and it will be disabled, blocking all emails. You can enable it again if you need to. However, if you are clearly getting spam or the email is useless, select the X option to the right of Block Sender, and you can delete the address entirely. You can have up to five addresses at a time with a free account and up to 30 addresses per day with a premium account, which costs $1.50 per month.
Step 4: If you want to avoid revealing the initial email you used, you can respond to all emails using an automatically assigned address using the same process.
Additional alternatives
Not everyone will find Burner Mail to be ideal. There are plenty of other options if you’re looking for a service with a different design and fewer extras. You can create a new email address with Mailinator, and it will automatically delete itself a few hours later. The downside to this free service is that it makes the address public during that time. Mailsac has the same caveat unless you sign up for an account. Another option is 10-Minute Mail, which, as its name suggests, only lasts for 10 minutes. You have the option to manually refresh the timer to start it again, which helps when you’re testing out a new service with a spare email.
Maildrop allows you to send anonymous emails as long as they’re under 500k and don’t include files or other attachments. Each inbox has a capacity of 10 emails and will delete itself if it’s empty for over 24 hours.
Editors' Recommendations
- I tested the most popular free antivirus apps for Mac. Here are the very best
- The best free antivirus software for 2024
- The best business laptops from Apple, Lenovo, Dell, and more
- 11 best graphics cards of 2024: the GPUs I’d recommend to any PC gamer
- 10 best desktop computers of 2024: tested and reviewed