
We live in a world where we want every movie and TV show to be available at our fingertips on every electronic device in our arsenal. Shelves chock-full of movies now seem overly cumbersome, and they’re also an unnecessary waste of space that can be better used for something else. On top of that, we all know how boring a flight or train ride can be without access to a robust library of entertainment. There’s more than one way to convert your spinning movie discs to a format that’s compatible with a range of devices, and here to help out is our guide on how to convert a DVD to MP4.
The process is easy whether you’re using the latest version of Windows or MacOS Mojave. Keep in mind, though, that reproducing copyrighted material is illegal.
Movavi Video Converter
Step 1: Head over to the main Movavi conversion page and click the blue Download for Free button for your operating system, making sure to select the correct OS. Then, open the installer and follow the on-screen instructions. (Depending on your system, you may see a prompt telling you to download the 64-bit version of the installer instead. Go ahead and do that if you have a 64-bit system.) A new installer will download, and you’ll follow the on-screen instructions. Launch the application once installed.
Note: This software is only for the seven-day free trial version.
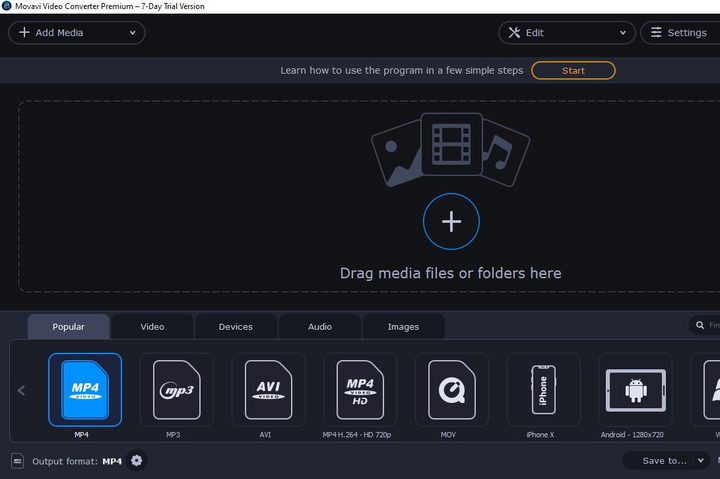
Step 2: Once open, click on the + Add Media button at the top of the window. Then, select Add DVD > Open DVD. Select your disc drive, navigate to the VIDEO_TS folder, and choose Select Folder.
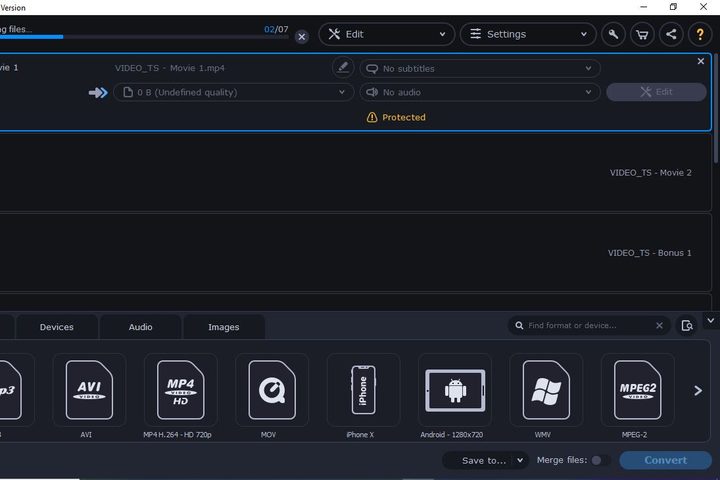
Step 3: Click on the cog next to Output Format at the bottom of the window for a list of customizable presets. Select MP4 (*.mp4) from the list of available formats. You can also click on the Video tab at the bottom of your screen and then choose your desired MP4 preset. Then, click Save To: and navigate to your desired save location for the resulting file. Click the Convert button in the lower-right corner to start the conversion process.
Note: The Movavi converter method does not work on copy-protected DVDs.
DVDVideoSoft Free Video Converter
Step 1: Head over to the DVDVideoSoft website and select Download to download the free software. Once the download is complete, launch the converter. It’s very easy to use — everything you need is in a single window. Start with the top bar that says Input DVD, and choose your DVD file by selecting the right drive to search and hitting Browse.

Step 2: This software has the ability to identify any title that’s associated with the DVD file. Select Choose beneath the Title # heading to view the available languages and titles.
When you’ve made your selection on the desired title, you can click OK to finalize and save the information. Click Browse beneath Output Folder to select the location where you want to save your converted file once finished.
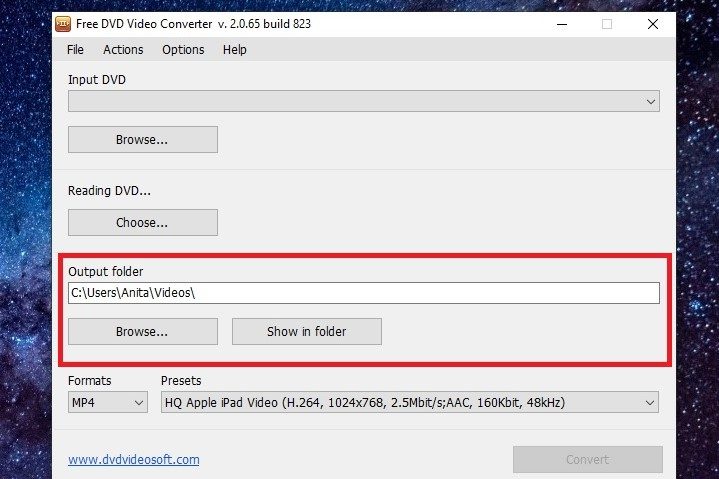
Step 3: Next, take a look at the section for Formats and Presets. This section allows you to pick the format (MP4) and then choose a preset if you want, optimizing the MP4 file for specific devices. This option is especially advantageous if you have a set device for playing the file in question.
The app is ideal for Mac or Apple device users. It’s as if the DVDVideoSoft converter designed the app for iOS and macOS because video conversion on these systems is especially high-quality.
All that is left to do is to click on the Convert button, and the app will take care of the rest.
Note: If a DVD is labeled as copy-protected, the DVDVideoSoft converter will not be able to convert it.


