
How to disable push notifications in your browser

Sometimes it’s annoying to see a website’s push notifications pop up in your browser, even if they are trying to keep you informed. And so, if you’re tired of them, here’s a quick guide to disabling push notifications from websites in some of your favorite browsers. To opt-out of these notifications, simply follow the instructions below.

Disabling push notifications in Google Chrome

disable notifications in Chrome screenshot
screenshot

Step 1: Hit the More button — the three vertical dots in the upper-right corner — and select Settings.

Step 2: Select Privacy and Security on the left side of your screen. Click on Site Settings.

Step 3: Scroll down and choose Notifications.

Step 4: To block notifications from all sites, select the toggle button next to Sites Can Ask to Send Notifications so that the button turns gray (off position).

Step 5: To just block a specific website: Click the Add button next to Block. In the text box that pops up, enter the URL of the website you want to block. Then click Add.

Disabling push notifications in Firefox

disabling notifications in Firefox screenshot
screenshot

Step 1: Click the Menu button — the three vertical lines — and select Options.

Step 2: Next, go to Privacy and Security, scroll to Permissions, and click the Settings button to the right of Notifications.

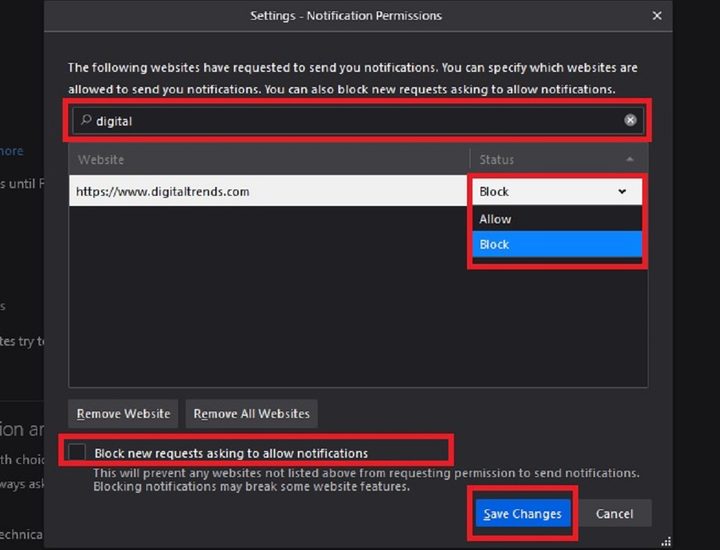
Step 3: On the Notification Permissions screen, you’ll see a list of websites that have already requested to send notifications. If you have a specific website in mind with notifications you want to block, scroll through the list or use the search box to search the list for your desired website, and then click on the drop-down menu to the right of the website.

Step 4: Choose Block from the drop-down menu. Then click Save Changes.

Step 5: If you want to block a website that wasn’t listed or just want to block all new requests going forward, just tick the box next to Block New Requests Asking to Allow Notifications. Then click Save Changes.

Disabling push notifications in Microsoft Edge

disabling notifications in Edge screenshot
screenshot

Step 1: Open Edge and click on the Settings and More icon in the top-right corner of your screen. It looks like three horizontal dots. Then, choose Settings from the menu that pops up.

Step 2: Select Cookies and Site Permissions from the left side of your screen. Then choose Notifications.

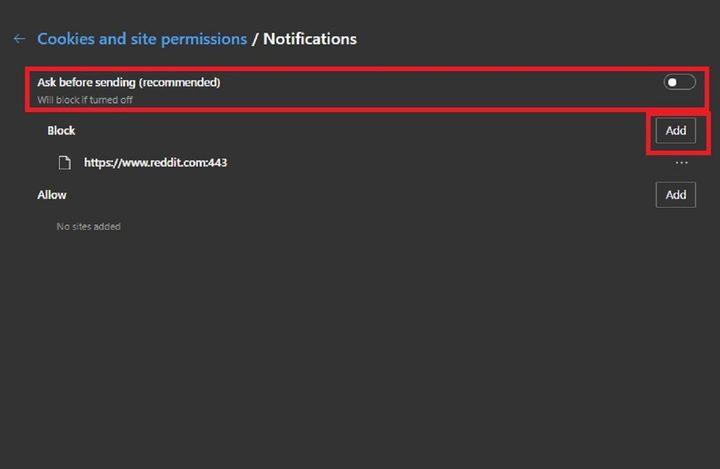
Step 3: To block all notifications, tap on the toggle button next to Ask Before Sending until the button is black (off position).

Step 4: To only block notifications from a specific website: Click on the Add button next to Block.

Step 5: In the text box that pops up, enter the URL of the website you want to block. Then click Add.

Disabling push notifications in Safari

Image used with permission by copyright holder

Step 1: With Safari open, head to the Safari tab at the top, then select Preferences.

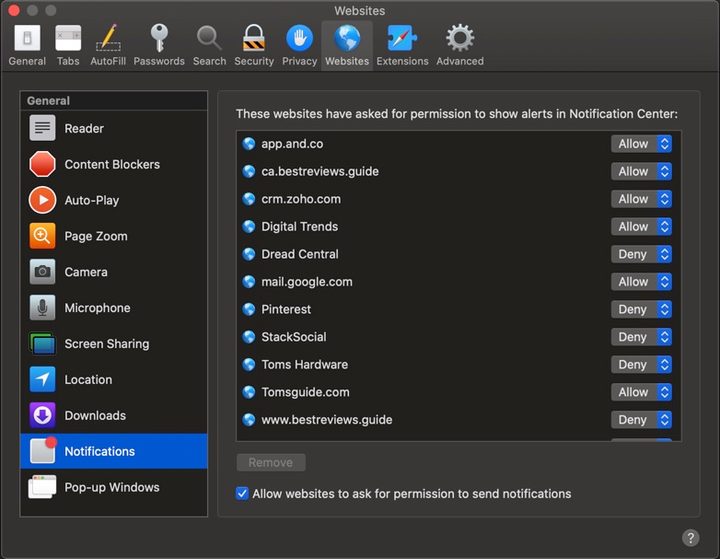
Step 2: When the Preferences tab opens up, head over to the Websites icon and click the Notifications tab toward the bottom.

Step 3: From here, you can toggle which websites can and cannot send you notifications, or you can uncheck the Allow Websites to Ask for Permission to Send Notifications box to stop notifications completely.

Editors' Recommendations

Kailla Coomes
Former Digital Trends Contributor
Kailla is a staff writer from Portland, Ore. She studied Journalism at the University of Oregon and graduated in 2014. In her…
How to change the default apps on a Mac
Change your Mac’s default apps in three easy steps
MacOS Catalina Hands-on | Macbook Pro

Apple products come loaded with software designed to work seamlessly with the macOS operating system. For example, Safari is the default software used to load websites, Preview is used to view pictures, and Pages will open documents. But if you're not a fan of the built-in software, Apple doesn't lock you into using it. However, you'll need to know exactly where to look if you want to change the default apps on a Mac.

Thankfully, the process is largely the same whether you're running macOS Sonoma 14, Ventura 13, or other macOS versions. It's also easy to reverse the process and go back to using default apps.

Read more
How to change your Zoom background on Mac and Windows
A man working from home.

Not everyone builds their home office around video calls. And if your home office also doubles as your bedroom, kitchen, or is tucked away in a cluttered corner of your basement, you'll be glad to know that Zoom lets you hide your surroundings from your co-workers. One way the software does this is by letting you change your Zoom background, allowing others in the chat to see you while swapping out your environment for something more professional.

Want to make use of the cool feature? In this guide, we'll go over how to change your Zoom background using both built-in images and custom images uploaded by the user. We also cover how to blur your Zoom background, in case you want something a bit more low-key, along with how to add filters for something more fun.
Step 1: Access your Zoom settings

Read more
How to clean a laptop screen without scratching it
How to clean a laptop screen

Laptop screens will attract dirt, dust, and grime -- that's just a fact of life. Whether you're using one of the best 2-in-1 laptops and want to clean off your fingerprints from the touchscreen or you use a notebook laptop and have somehow gotten food or dirt on it, the cleaning process isn't necessarily intuitive. You'll likely have lots of questions about it. Do you need a special cleaning fluid? How hard should you rub? What do you rub the screen with? Even using water to clean a laptop screen isn't necessarily completely safe, due to minerals. So join us as we list our favorite tools for each type of yuck removal and teach you how to clean a laptop screen without inflicting damage.
For dust: Microfiber cloth

People who wear glasses or own a camera know about this little tool all too well. After all, it's the best way to clean a camera lens or eyeglasses.

Read more