How to do hanging indent on Google Docs

Google Docs in Firefox on a MacBook.
Google

The hanging indent is a classic staple of word processing software. One such platform is Google Docs, which is completely free to start using. Google Docs is packed with all kinds of features and settings, to the point where some of its more basic capabilities are overlooked.

Sure, there are plenty of interface elements you may never use, but something as useful as the hanging indent option should receive some kind of limelight.

Recommended Videos

Difficulty

Easy

Duration

5 minutes

What You Need

  • Access to Google Docs

And we’re just the publication to power on the neon bulbs of discovery! We’ve written up a guide to get you adding hanging indents in Google Docs in no time.

How to create a hanging indent in Google Docs

Step 1: Open Google Docs to start. Log in if necessary, and find the document in Google Drive that you want to apply hanging indents to.

Navigate to the left part of your document, and place the cursor at the beginning of the paragraph you want to indent.
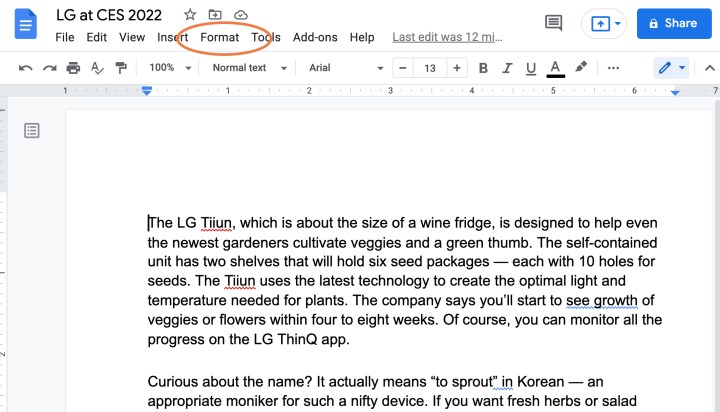
A document in Google Docs with the Format menu circled in red.
screenshot / Digital Trends

Step 2: Navigate to the Google Docs menu at the top and click on the Format drop-down menu.
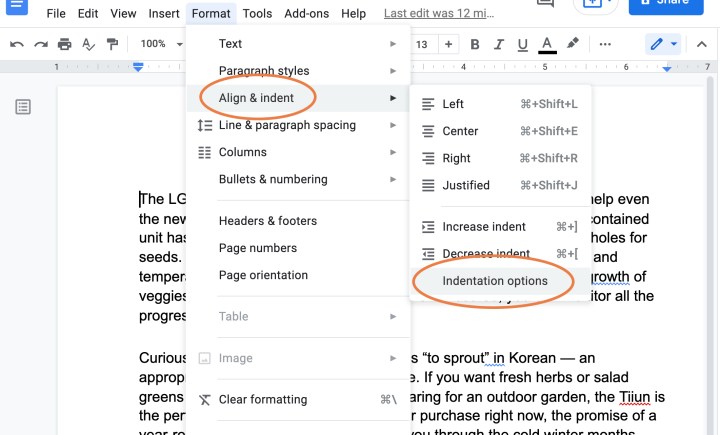
The Indentation Options are shown in Google Docs.
screenshot / Digital Trends

Step 3: In the Format menu, go to Align & Indent. When this menu pops open, choose Indentation Options.
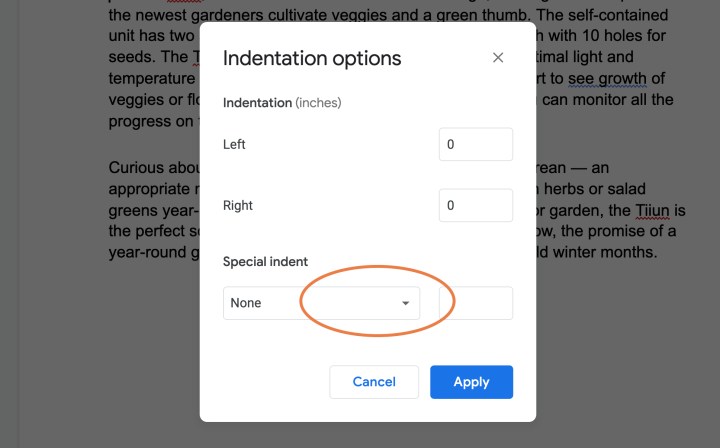
The Special Indent drop-down menu is circled in Google Docs.
screenshot / Digital Trends

Step 4: Indentation Options will open a new window where you can customize an indentation. Go to the Special indent section, which should currently say None.
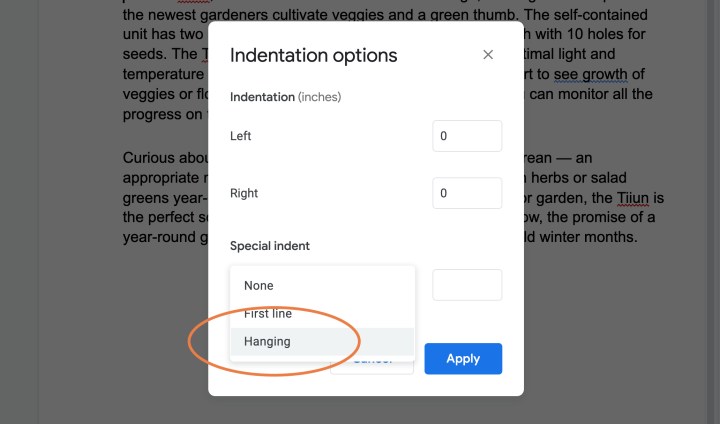
The Hanging option is selected in the Indentation Options menu in Google Docs.
screenshot / Digital Trends

Step 5: Select the menu and choose Hanging.

The Hanging Indent Length field is circled in Google Docs.
screenshot / Digital Trends

Step 6: Now you will see a number on the right, noting how long the hanging indent will be. It should be set to the traditional 0.5 inch, but you can adjust this if you want to.
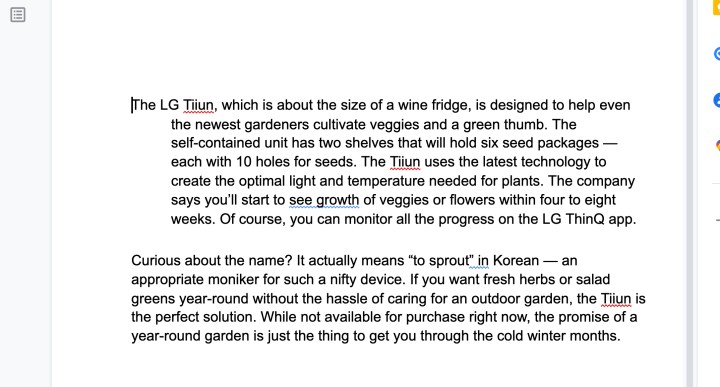
Hanging Indent is applied to a paragraph of text in Google Docs.
screenshot / Digital Trends

Step 7: When finished, select Apply. The paragraph you were on should now have a hanging indent.

You can also change the margins of your Google Docs document.

Step 8: If you have multiple paragraphs or sections to indent all at once, it’s no problem. Just highlight them all before using the steps above. Then the hanging indent will automatically apply to the entire highlighted section.

Make sure you're making the most of this free software -- learn these Google Docs tricks.

Tyler Lacoma
If it can be streamed, voice-activated, made better with an app, or beaten by mashing buttons, Tyler's into it. When he's not…
This new Google Docs feature is exactly what I’ve always wanted
Text box in Google Docs on a laptop.

As a writer of a certain age, I've lived a lot of life in Google Docs. It's where my first drafts go, but it's also where my crazy ideas, unhinged brainstorming, and research dumps go. 
There’s so many conveniences about Google Docs that make it my go-to for word processing, but let’s be honest: It’s still fairly barebones, especially when it comes to organizing and managing different files within Google Drive. But this new feature makes all of that much easier, keeping it all contained all within Docs itself.
It’s called Document Tabs, which you may have already noticed floating just to the left of your document.

The idea is simple: It lets you create multiple documents within a single Docs file. Create as many “tabs” or separate documents as a single project might need, and switch between them extremely fast. That accessibility to them is really where the gold is. No more switching between different browser tabs.
It’s even more handy on mobile, of course, where switching applications or tabs is even more cumbersome. Here, you’ll find Document Tabs hovering just at the bottom of the screen with some simple arrows to flip between your different tabs. All we need now is a simple gesture to be added to flip between them even more seamlessly.
Document Tabs takes the place of the old outlining system, which would grab headers and automatically create a table of contents around them. I used this frequently, but it was pretty finicky. More than that, it resulted in overly long documents that I still found myself scrolling through. 
Document Tabs is a really elegant solution to that problem. Whether it’s segmenting chapters in a book, multiple aspects of a project, or even just different parts of an article, it’s already become an extremely useful outlining and productivity tool for me.
It even had a pretty clean way of converting the tabs when you need to export. All the tabs do is combine down into one document, but they’re sectioned off with titles and some basic formatting. That’s not going to be ideal in every situation, of course, so it’s something to keep in mind if you need to export and share it with someone outside of Docs.
At the very least, though, it’s worth trying out. And if you’re a Google Docs fiend like I am, I have a feeling you’ll get quite a lot out of it.

Read more
What is Gemini Advanced? Here’s how to use Google’s premium AI
Google Gemini on smartphone.

Google Gemini is already revolutionizing the way we interact with AI, but there is so much more it can do with a $20/month subscription. In this comprehensive guide, we'll walk you through everything you need to know about Gemini Advanced, from what sets it apart from other AI subscriptions to the simple steps for signing up and getting started.

You'll learn how to craft effective prompts that yield impressive results and stunning images with Gemini's built-in generative capabilities. Whether you're a seasoned AI enthusiast or a curious beginner, we will equip you with the knowledge and techniques to harness the power of Gemini Advanced and take your AI-generated content to the next level.
What is Google Gemini Advanced?

Read more
How to convert Excel files to Google Sheets
A MacBook on a table using Google Sheets.

If you use Google Sheets, then you'll know that it is a versatile tool that can pick up and run with any existing spreadsheets from applications like Microsoft Excel. You can even convert existing Excel spreadsheets to Google Sheet documents. Whether you're looking to using Microsoft Excel or want the improved ease of collaboration and sharing that Sheets offers for that particular spreadsheet, here's how to convert Excel files to Google Sheets in just a few steps.

Read more