Adding a signature to your Apple Pages doc is one of the best ways to solidify your authorship. It’s also a nice calling card if you plan on sharing your Pages file with others, or if you decide to export it to PDF. Fortunately, creating and inserting a signature in Pages for macOS, iOS, and iPadOS isn’t very difficult. To help speed things along, we’ve put together our own step-by-step guide to teach you how to start adding Pages signatures pronto!
Add an image of your signature
One of the simplest ways to add your signature to Pages is by using an image. If you have a photo of your signature, you can insert it in your document in just a few steps.
Step 1: Open your document in Pages and place your cursor where you want the image.
Step 2: Select Media in the toolbar.
Step 3: Choose one of the following options:
- Pick Photos if the image is in the Photos app. Then, select the picture to place it in your document.
- Pick Choose if the image is elsewhere on your computer. Locate the picture, select it, and choose Insert.
- If the image is on your desktop or in an open folder, you can drag it right into Pages.

Step 4: You’ll then see the picture of your signature in your document.
You can drag a corner to resize it while maintaining the aspect ratio. Or, select the image and use the Format button in the toolbar to open the sidebar. Then, go to the Arrange tab and use the Size section in the side panel to adjust the dimensions.

Insert a screenshot from Preview
If you don’t have an image of your signature but have a signature saved in Preview or are willing to create one, you can screenshot it and pop it into Pages.
Step 1: Open an image or PDF in Preview. Make sure that the file you open has a white background and enough space to insert your signature.
Step 2: Select Markup in the toolbar and open the Sign drop-down list.
Step 3: Pick your signature. You can also select Create signature and follow the prompts to make a new one.

Step 4: When the signature appears in the document, you can drag a corner of it to make it larger if needed.
Step 5: Select File > Take screenshot and pick From selection in the pop-out window. Alternatively, press Command + Shift + 4.

Step 6: When your cursor changes to a crosshair symbol, drag around the signature to capture it.

Step 7: You’ll then have an image of your signature. By default, the image is saved to your desktop, unless you’ve changed it.
Then, drag the image from your desktop into the Pages document or use the alternate steps above to insert the picture.
Again, you can resize the image or use the Format sidebar to adjust it.

Sign and add your signature from iPhone or iPad
If you have your connected iPhone or iPad nearby, you can sign your name on that device and insert it into Pages.
Step 1: Place your cursor in the document where you want the signature.
Step 2: Select either Media in the toolbar or Insert > Insert from iPhone or iPad in the menu bar.
Step 3: Choose Add sketch below the device you want to use.

Step 4: When you see the sketch screen appear on your chosen device, select the Pen tool, sign your name, and pick Done when you finish.

Step 5: You’ll then see the sketch appear immediately in your Pages document.
From there, you can drag a corner to resize it or open the Format sidebar to adjust the dimensions or rotate the image as needed.
Be sure to take a look at how to convert Pages to PDF if you need to share your document in that format.

Add a signature to Pages on iPhone or iPad
Maybe you’re working on the Pages document on your iPhone or iPad. You can insert an image of your signature, capture it with your camera, or using the drawing tool to create the signature.
Step 1: Open your Pages document and place your cursor where you want the signature.
Step 2: On iPhone, tap the Plus sign at the top and choose the Media tab. On iPad, tap the Media button at the top.
Step 3: Do one of the following:
- Pick Photo or video if the image is in the Photos app. Then, select it to add it to the document.
- Pick Camera if you want to snap a photo of your signature from a physical location. Tap the Shutter button to take the picture, and select Use photo to insert it.
- Pick Drawing to sign your name right on your device. Select the Pen tool, sign your name, and tap Done to use the sketch.

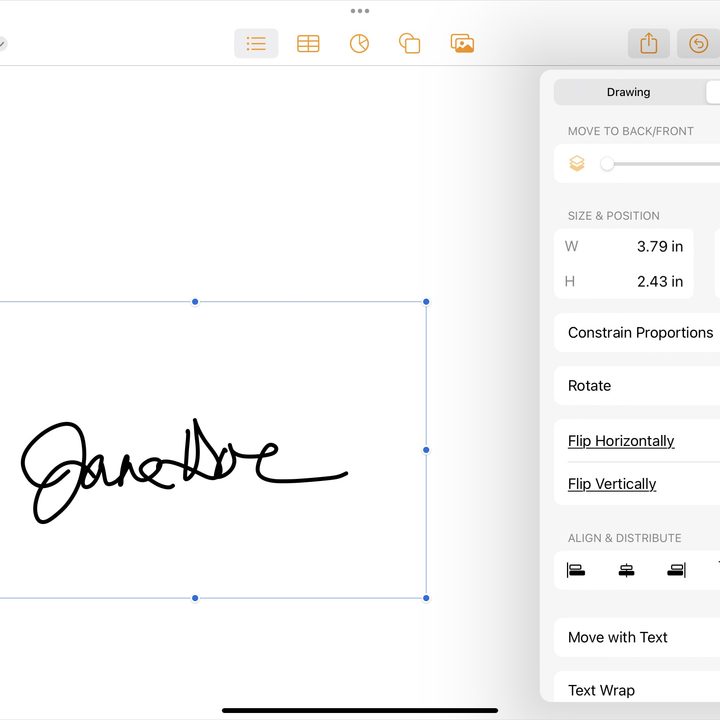
Step 4: Once your signature appears in the document, you can drag a corner to resize it.
You can also select the image, tap the Format icon, and use the settings on the Arrange tab to adjust the size, position, or rotation.

Using the Apple Pencil
Another great way to add signatures, body text, illustrations, and other elements to your Pages doc is with an Apple Pencil. One especially convenient feature called Scribble is enabled by default if you’re using Pages on an iPad. This tool turns your handwriting into text that is automatically added to your Pages doc.
The Apple Pencil is also fantastic for adding and editing drawings and annotations to your Pages docs.
Can I use my Mail app signature in Pages?
Apple will also let you create a custom signature for use in the Mail app on Mac, iPhones, and iPads. Unfortunately, this specific signature can only be used in the Mail app, unless your signature is an image file.
Adding a signature to your Pages document on Mac, iPhone, or iPad is easy with the media features.
For more, look at how to get the word count or how to add bullets in Apple Pages.