There are a lot of useful ways you can use and manage tabs in the Safari web browser on MacOS. With a few settings hidden in preference panes and right-click menus, you can make your web browser much more effective and efficient in day-to-day use.
Things get interesting when you start using Safari’s Tab Groups, which were introduced with MacOS Monterey. These let you organize your tabs into related groups and then switch between them. For instance, you might have one group containing a few tabs for work, then a second group for news sites that you read during your lunch break. Switch from your news group to your work group, and all the news tabs are hidden. It’s like moving between two different Safari windows, but with less hassle. And even better, all your Tab Groups sync between your other Apple devices that are using the same Apple ID.
Of course, there is far more to Safari tabs than just Tab Groups and plenty more useful tips and tricks to learn along the way. We will cover these as well in this guide, helping you get much more from the humble web browser tab.
Step 1: Change tab appearance
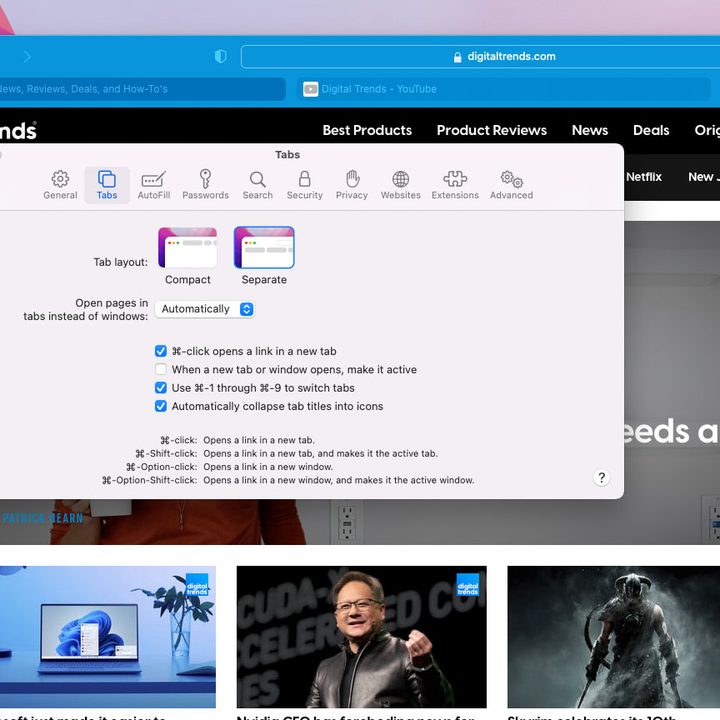
By default, Safari keeps the URL bar above the row of tabs you have open. However, you can merge the two so that clicking the active tab lets you enter a new web address directly into the tab.
To do so, click Safari > Preferences in your Mac menu bar. In the Preferences pane, click Tabs, then click Compact next to Tab Layout.
Don’t forget to check the other settings while you’re there. You can change how tabs behave, including whether new pages open in tabs or windows and whether the focus switches to a new tab as soon as you open it.
Step 2: Create a new Tab Group
In most browsers, all your tabs are grouped together into one long stream. In situations like that, it can be easy to lose track of the different things you were working on in different tabs. Safari does things a little differently with its Tab Groups feature, which lets you create named groups of tabs and switch between them with ease.
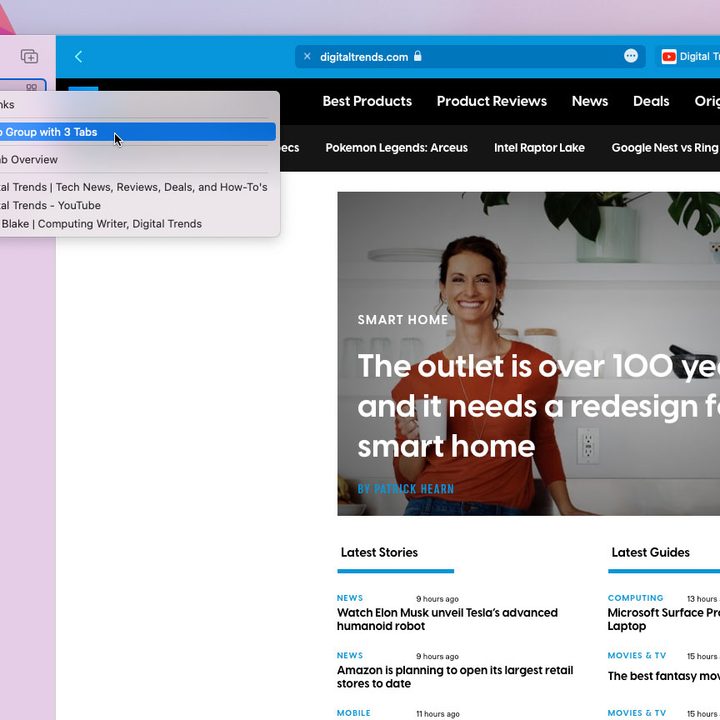
To create a Tab Group, click the sidebar button in the top-left corner, then click the New Tab Group button on the right of the sidebar. Next, choose whether you want the Tab Group to comprise your currently open tabs or to create a new, blank group. Give it a name, and you’re done.
Alternatively, you can create a Tab Group by right-clicking on any tab and clicking Move to Tab Group > New Tab Group. Or open the sidebar, right-click the X Tabs button (where X is the number of tabs you have open), then click New Tab Group with X Tabs.
Step 3: Manage your Tab Groups

When you switch between Tab Groups, the tabs in your previous group will be replaced by those in the new group. Don’t worry, they still exist, they’re just hidden. To move between Tab Groups, click the downward arrow next to the name of the group in the top-left corner, then click the name of a different Tab Group. Or simply click a different Tab Group in the sidebar.
You can add a tab to an existing Tab Group at any time by right-clicking it and clicking Move to Tab Group, then clicking the name of the destination group. Alternatively, open the sidebar, then drag and drop a tab from the main window into your desired Tab Group.
To remove a tab from a Tab Group (but still keep it open), right-click it and click Move to Tab Group > X Tabs, where X is the number of tabs this group contains. This will put the tab in an unnamed group of tabs located at the top of the sidebar.
You can rename a Tab Group by double-clicking its name in the sidebar or by right-clicking it and selecting Rename. Note that this only works with groups you have created, not the X Tabs Group at the top of the sidebar. To remove a group entirely, right-click it and click Delete. This will close all tabs contained in the group.
Step 4: Get a bird’s eye view
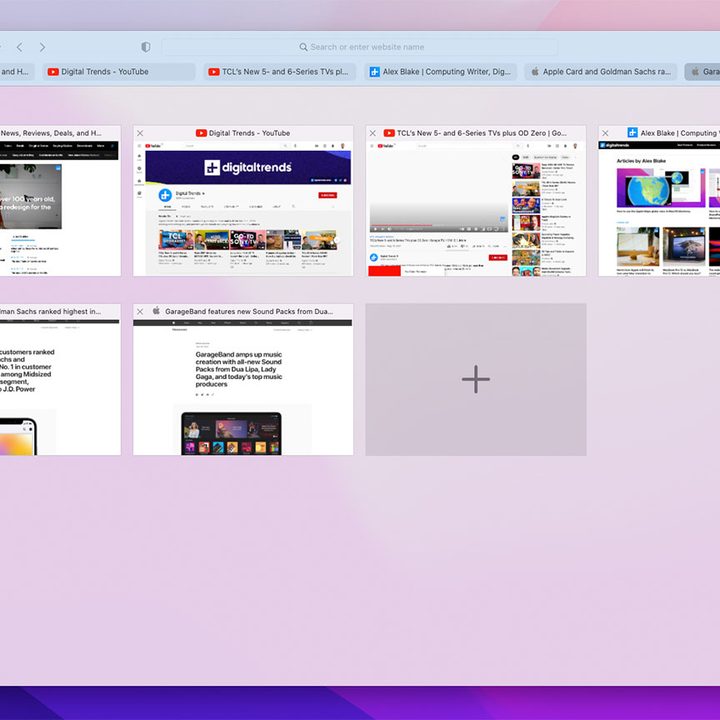
If you use a lot of tabs at once, it can be hard to find the one you want because tabs shrink in size the more you have open. However, there’s a quick way to get a bird’s eye view of your tabs. Just press Shift + Command, click View > Show Tab Overview or click the Tab Overview button in the top-right corner of the Safari window (it looks like four squares arranged into a larger square). This will show all your tabs as large tiles. Just click one to make it the active tab.
Additionally, you can add a new tab to a Tab Group using the overview feature. Open the overview, then click the large Plus tile, and a new tab will open. And if you need to find a specific tab, open the overview and start typing. You will notice the cursor is active in a Search Tabs box in the top-right, and results will appear as you type.
Step 5: Move and reorder tabs

Reordering your tabs is as easy as clicking and dragging one to a new place in the tab bar. There is another, more ordered way to do it, though. Right-click any tab, then click Arrange Tabs By and choose either Title or Website. This will arrange the tabs alphabetically either by tab name (the website title that’s shown in the tab) or by the website address.
Step 6: Reopen closed tabs and windows

Accidentally closed a tab? Not to worry — you can instantly reopen it by pressing the Command + Z keyboard shortcut. Keep pressing it to keep reopening other tabs.
If there’s a specific tab you want to reopen, click History in the menu bar to see recently visited websites. Or click History > Recently Closed for a long list of recently closed tabs. You can even reopen tabs from days prior by clicking History, then choosing a date from the bottom of the menu and picking a tab.
To reopen a closed window, just press Shift + Command + T, or click History > Reopen Last Closed Window.
Bonus tips

Want a quick way to switch between tabs? Just press Command + Shift + Right Arrow or Command + Shift + Left Arrow to move along the row of tabs. Alternatively, use Command + 1 to Command + 9 to switch to the tab that corresponds to each number. Both are great Mac keyboard shortcuts that will save you time.
And if you have several Tab Groups open when you close Safari, the likelihood is you will want them open again when you next launch your web browser. To ensure they load when Safari opens, click Safari > Preferences in the menu bar, then click the General tab. Under Safari Opens With, click All Windows From Last Session.
Safari isn’t the only option you have for browsing the web, of course. You can choose from any of the best browsers for Mac.