One you know how to use PowerPoint, you can craft a great presentation. What's even better, however, is the option to use Presenter View. This lets you leave notes for yourself that can be viewed on your computer screen while everyone else is only seeing your presentation.
However, if you're worried about a technical hiccup taking down your slide or don’t want to be glued to the computer, it's a good idea to add notes to your PowerPoint presentation and print it out. This lets you see both your slides and your presenter notes, giving you an analog way to carry on the presentation without the need for a monitor.
Interested in the feature? Here's how to print a PowerPoint presentation with notes on Windows, Mac, or directly from the web.
Print PowerPoint slides with notes on Windows
Printing your presentation in PowerPoint on Windows takes only a few steps. If you want notes with your slides, it’s a simple setting.
Step 1: Open PowerPoint to the presentation you want to print.
Step 2: Select the File tab.
Step 3: Choose Print and select your printer in the Printer drop-down if necessary.
Step 4: In the first drop-down box below Settings, pick which slides you want to print. You can print them all, the current slide, or a custom range.

Step 5: Click the next drop-down box for Print layout and select Notes page. You’ll see a preview on the right.
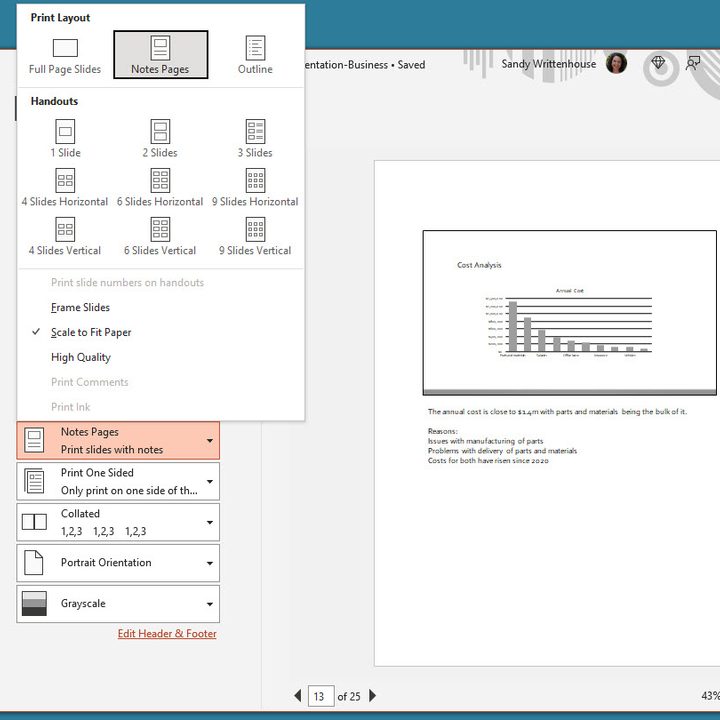
Step 6: Adjust any other settings you’d like before printing, such as switching Portrait orientation to Landscape orientation or Color to Grayscale.
Step 7: Click Print.

Print PowerPoint slides with notes on Mac
If you use Microsoft PowerPoint on Mac, you can print your slides with notes a just a few steps, like on Windows.
Step 1: Open PowerPoint on your Mac to the presentation you’d like to print.
Step 2: Click File > Print from the menu bar.
Step 3: In the pop-up window, choose your printer in the Printer drop-down box at the top if necessary.
Step 4: Choose which slides you’d like to print. You can print all slides, specific numbers, selected slides, or a custom range.

Step 5: Click the Layout drop-down box and choose Notes. You’ll see a preview on the left.

Step 6: Optionally, adjust any other settings you’d like such as Orientation, Output, or Scale.
Step 7: Click Print.

Print PowerPoint slides with notes on the web
Maybe you’re using PowerPoint on the web and prefer to print from there.
Step 1: Visit PowerPoint on the web, sign in, and open your presentation.
Step 2: Select the File tab.
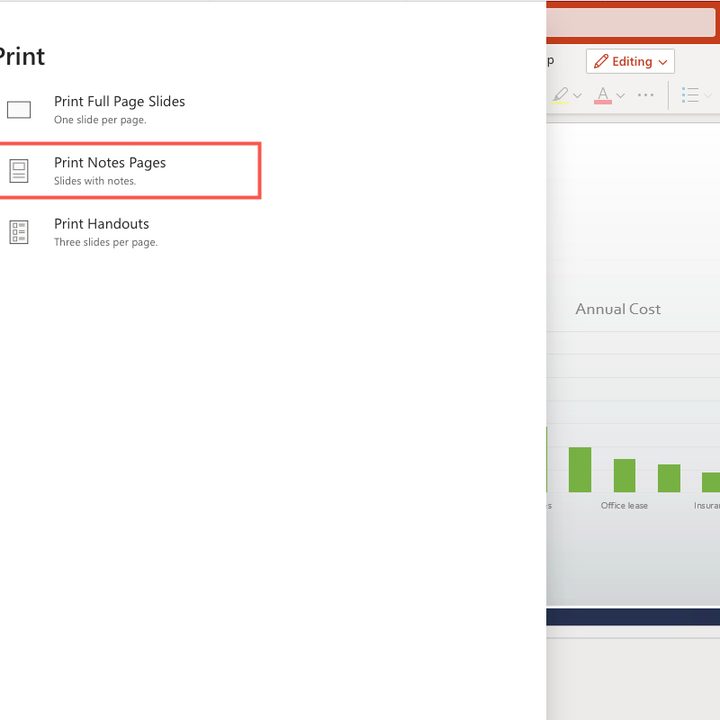
Step 3: Choose Print and pick Print notes pages.
Step 4: In the small pop-up window, select Open PDF to view your presentation file.

Step 5: Depending on your web browser, click the Print button or download the file to print on your computer.
There is much more that you can do with PowerPoint, such as embedding videos in presentations. Make sure you follow our PowerPoint best practices to compose presentations that really make an impact.