When you first bought your Windows PC, you were likely excited about its ability to connect to Bluetooth. But you still haven’t quite figured out how to activate the feature so you can pair your Bluetooth wireless mouse, Bluetooth keyboard, Bluetooth speaker, Bluetooth headset, Bluetooth headphones, or any other Bluetooth-capable devices you can think of using with your computer.
That Bluetooth problem stops now. To help you out, we’ll show you how to turn on Bluetooth using different methods, and we’ll guide you through pairing your Bluetooth device with your Windows computer or laptop.
Method 1: Windows settings
Before you can start using a Bluetooth device, you must get things configured. That means taking a trip to the Windows settings menu, which means the Control Panel on Windows 7 and the Settings app on Windows 10.
Windows 10
Step 1: On a Windows 10 computer, you’ll want to open the Action Center (it looks like a comment bubble on the right end of the Windows 10 taskbar). On the menu that appears, click on the All Settings button. Then, select Devices and click Bluetooth & Other Devices on the left-hand side.
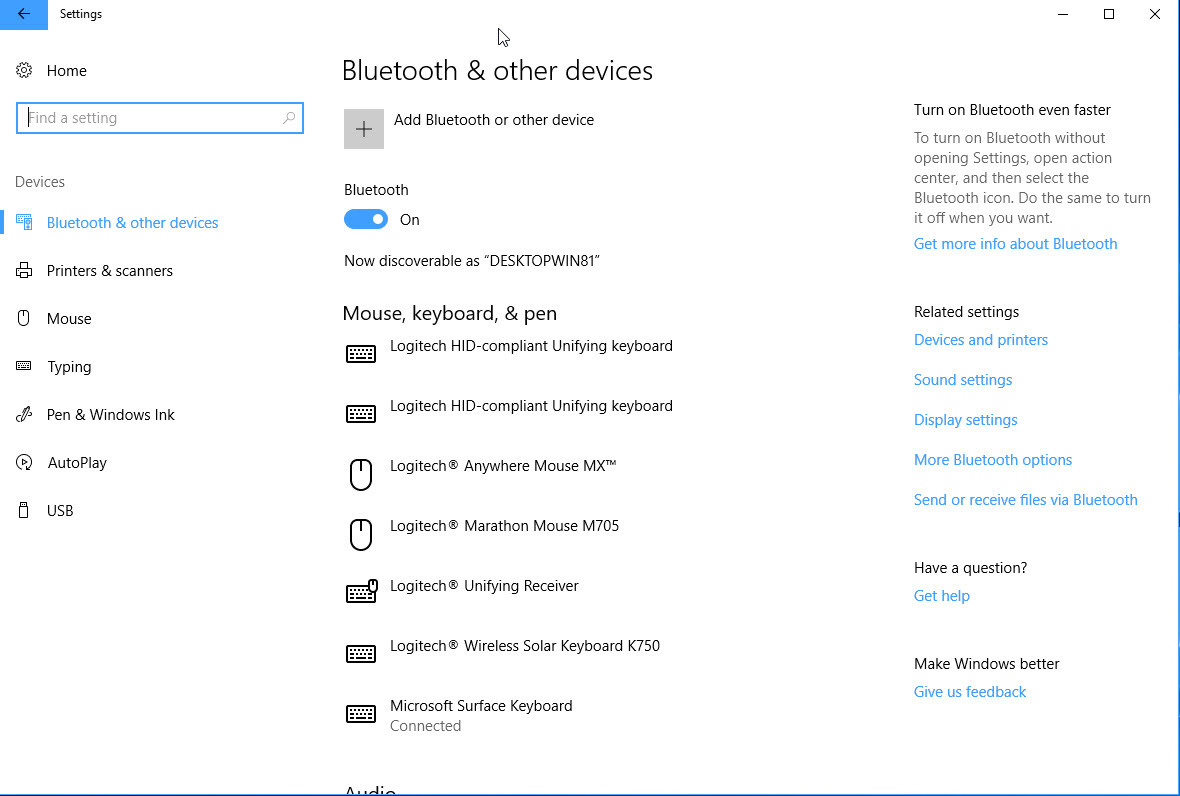
Step 2: Within the Settings menu’s Bluetooth section, toggle Bluetooth to the On position. Once you’ve turned Bluetooth on, you can click Add Bluetooth or Other Device. After the Add a Device window pops up, click on Bluetooth, and Windows 10 will start searching for Bluetooth wireless devices.

Step 3: Assuming you kicked off your Bluetooth device’s pairing mode, you’ll see it show up in the list of available devices. Select it, and then continue as instructed. Once you’ve connected the device, it will show up in the list of connected peripherals.
Windows 7
Note that Windows 7 is considered “end of life” (EOL) and no longer receives Microsoft’s critical security updates. That makes it dangerous to use, as malware could infect your machine without you knowing.
Usually, once a Bluetooth adapter is installed and configured on a Windows 7 system, it’s automatically turned on and ready to use. In some PCs — like a notebook with built-in Bluetooth — there might be a keyboard shortcut that will turn Bluetooth on or off, or an icon might be present in the system tray that will perform the same function.
Additionally, different PCs and Bluetooth adapters can include the utilities necessary for making a Bluetooth connection. However, users can generally hit the Start button and select Devices and Printers. Once you’re here, choose Add a Device, pick the option you want, and click Next. Different devices will often have very different procedures for pairing, though, so don’t forget to look up the specific directions for your device.
Method 2: Click the Bluetooth button in the Action Center
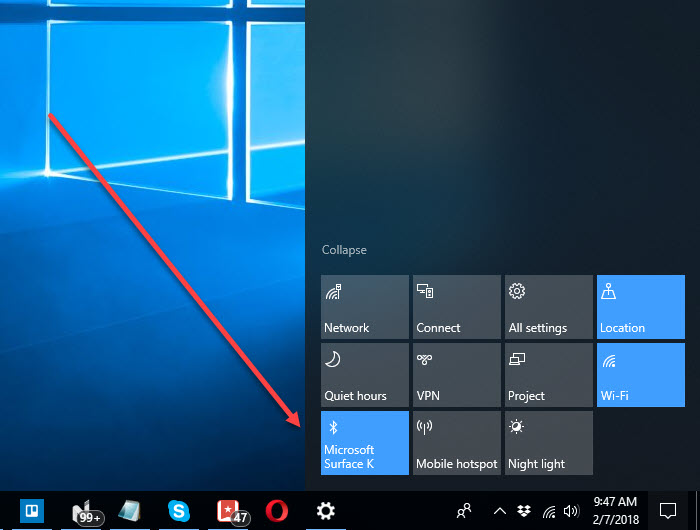
Windows 10 makes toggling Bluetooth on and off really easy. All you have to do is navigate to your Action Center and select the Bluetooth button (look for the icon). You’ll know the Bluetooth setting is off when the button is gray. If it’s on, it might read “not connected” if you’re not already connected to a Bluetooth device, or it will tell you that another device is currently attached and connected.
You should only have to complete this pairing process once. Once your Bluetooth device and PC have a record of each other, they should automatically connect if the device is switched on and in the appropriate range. When you’re not utilizing the Bluetooth setting, you can disable Bluetooth to extend your battery life. Leaving your Bluetooth function on can potentially leave it exposed to hackers or other issues, so it’s a good idea to just turn it off when you aren’t using it.
How to turn on Bluetooth on Windows 11

Windows 11 isn’t quite generally available yet, but when it is, you’ll need to know how to enable Bluetooth on Windows 11. Don’t worry too much, though, as the process is very easy. It’s one of the things that Microsoft tried to make easier in the operating system.
Step 1: Click on the area next to the clock — it has your Wi-Fi, battery, and sound icons.
Step 2: In the toggle that pops up, look for Bluetooth.
Step 3: Click the Bluetooth box and make sure it’s lit up. Bluetooth will be turned on. If it’s not lit up, then Windows 11 Bluetooth is turned off.
Step 4: Right-click on the icon and choose Go to Settings.
Step 5: You’ll be taken to the Bluetooth and Devices page, where you can manage and remove different devices. You can use the toggle to turn Bluetooth on.
If getting to the Bluetooth settings with the methods we described above is too complicated for you, then don’t worry — you can still enable Bluetooth in Windows 11. Just search in the Start menu for “Bluetooth settings” and click the appropriate search result. You’ll then be taken to the Bluetooth settings page we just described.
Editors' Recommendations
- If you use a VPN, don’t skip this important Windows 11 update
- A massive Windows 11 AI feature may launch next week despite privacy concerns
- Scores of people are downgrading back to Windows 10
- Windows 11 might nag you about AI requirements soon
- The next big Windows 11 update has a new hardware requirement