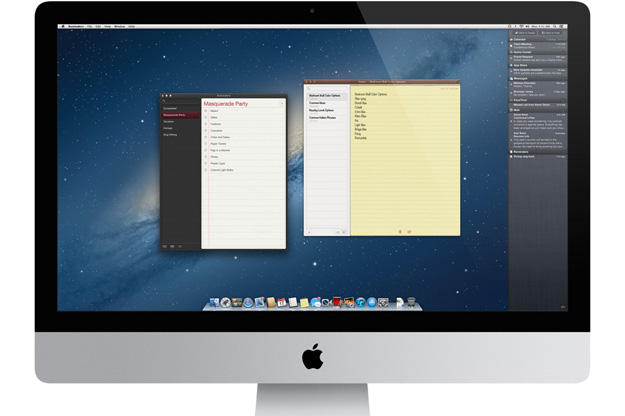
 Now that we know Apple’s new iMac will be available starting Friday, November 30, it’s time to prepare yourself – especially if this is your first time using a Mac. Mac newbies will find that the homescreen appears foreign, the trackpad will do confusing things, and there will likely be a plethora of helpful tricks that you’ll never unearth. Luckily, we’re here to help. You don’t have to learn everything from scratch, but Apple’s OS X is different enough that you might just find this guide useful.
Macs come with OS X
First things first: You don’t need to install Windows on a Mac computer. You certainly can if you want to, but you don’t have to. Mac computers come with Apple’s own operating system (OS) called OS X, with versions named after big cats. Think Leopards, Lions, and, according to rumors, even Lynxes. The newest release to date, version 10.8, is called Mountain Lion.
OS X isn’t a complete departure from Windows. Nothing’s so shockingly different that you’d feel as if you’re navigating something that’s not a computer. That said, there are many OS X-exclusive features and applications that you won’t find on a Windows machine. Some applications, like Reminders and Notifications, are tightly connected to the cloud. You can write a reminder on your computer and access it on your iPad or iPhone if you happen to have either.
A handful of the OS X features you need to know to get started are:
- Dock and menu bar: You can use the dock at the bottom to launch apps or go back to an open app if you’ve temporarily navigated to another homescreen. You can customize your dock to display oft-accessed programs. The menu bar is at the top of the screen. Here, you can find small icons of programs that work in the background (cloud services like Dropbox and Google Drive, among others). At the top left-corner of the menu bar is the Apple icon where you can find the Log Out and Shut Down commands.
Mission Control: One of the default dock icons is Mission Control. Mission Control gives you an overall view of all the windows and desktops you have open. Yes, you can add and subtract as many desktops as you want – something that’s especially useful for MacBooks with smaller screens. To access a desktop, you can either go back to Mission Control and select one, swipe upwards with three fingers on your trackpad, or double-tap with two fingers using a Magic Mouse. We’ll discuss OS X touch gestures in more detail later on.
- Launchpad: Want to see all your Mac applications and not just those displayed on your dock? Find the silver icon with the rocket graphic to launch your app screens.
- Dashboard: When you access Mission Control, you’ll notice that the screen at the very left is not another desktop. It’s called the Dashboard, and you can pin various widgets on it, including currency and measurement converters, virtual Post-it notes, clocks, and more.
- Finder: Think of finder as Mac’s My Documents’ folder. It’s where you can access all your files.
- Spotlight: You’ll find the Spotlight window situated next to the time on the thin menu bar on top of your screen (look for the little magnifying glass). Spotlight is a text search bar that’ll help you find files and even word definitions via OS X’s built-in dictionary.
How to install, exit, or delete Mac apps
- How to install Mac apps: When installing a Mac app, you’ll be prompted to drag the app’s icon into the Applications folder. By doing so, you’re making the app available on the apps homescreen accessible via Launchpad. You can download apps from the Mac App Store (similar to the iOS App Store, except it sells OS X apps), or anywhere on the Internet.
- How to quit Mac apps: Clicking the teeny “x” button on the top right-hand corner of an application won’t truly close the app. In order to properly exit a Mac app, click the app name at the menu bar on top, then find “Quit” on the drop-down menu. Alternatively, you can right-click an app icon on the dock and click Force Quit. If all else fails, you can always hit “Command + Q.”
- How to delete Mac apps: To delete Mac apps, open Finder and go to the Applications folder. Drag the icon of the app you want to delete to the Trash icon on the dock. You can also download third-party Mac apps like Appcleaner (free) to delete previously installed programs on your computer.
How to use keyboard shortcuts and gesture controls
- Forget the Control Key; the Command key is your new best friend. Command is the new Control when using a Mac. For example, if you’re used to pressing “Control + I” on a Windows machine to italicize text, it’s now “Command + I” on Mac.
- You’ll find yourself using a lot of keyboard shortcuts on Mac. Check out this handy list of shortcuts compiled on Apple’s website. Believe us when we say it’s a must-check, as it contains incredibly useful info. Know how to take screenshots on a Mac? It’s “Shift + Command + 3 (or ‘4’ to take a screenshot of a specific area).” How’d we know that? We learned that from the shortcuts list.
- You’ll also be using gesture controls a lot. MacBooks have built-in trackpads. If you have an iMac or don’t want to use your laptop’s trackpad, you can use either a Magic Mouse or a Magic Trackpad – both of which recognize gestures. While gestures vary subtly depending on the accessory used, the ideas are similar. Swiping sideways using multiple fingers, for instance, lets you scroll horizontally or switch desktop homescreens. Pressing down on the trackpad or mouse is double-clicking, while tapping with two fingers means right-clicking. To learn more about your device’s gesture control settings – and to tweak it, if you want – launch System Preferences and click on the trackpad or mouse icon.
How to share external drives between OS X and Windows
If you have an external hard drive you’ve been using on Windows that you also intend to use with your Mac, know that it won’t work right out of the box. All hard drives used with Windows use the NTFS proprietary file system, and that – surprise, surprise – doesn’t work on OS X. You can either choose to convert your drive into a Time Machine for exclusive use with a Mac, or follow either of these instructions so you can use it with both systems:
- Download and install compatibility programs on Mac. Two programs you can use are Paragon ($20) and Tuxera ($32). Simply installing them on a Mac computer will make it compatible with the hard drive you use for Windows. We recommend going this route as it is easy and hassle-free, but if you’re really not willing to shell out that much for a program, you can choose the option below.
Change your external hard drive’s format from NTFS to FAT32, which works with both Mac and Windows. Before you do this, make sure you back up your all your files because formatting your drive will wipe it out. A downside to converting your file format to FAT32 is that it doesn’t support files larger than 4GB.
One way to convert your external hard drive to FAT32 on a Windows computer is to download third-party software programs. Search for “NTFS to FAT32 converter” on Google to find a number of free programs, such as FAT32 Format.
You can also format your drive on Windows via the Command prompt. Click the Start button, type “Run” (without the quotation marks) in the search box, then type “cmd” in the box that pops up. This will launch the command prompt. Type “format /FS:FAT32 X:” in the prompt, changing “X:” with the drive’s letter. You can find the drive’s designated letter by checking Windows Explorer – it will look something like “Removable Disk (X:).”
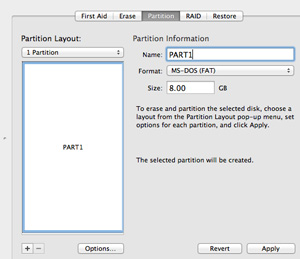
On OS X, go to Applications with your external hard drive plugged in. Find the Utilities folder and click on Disk Utility. Choose the hard drive you want to format on the left-hand side, choose Partition, and pick FAT under the Volume drop-down menu.
More to discover
Did you know that you can share your MacBook’s Internet connection? If you only have a USB Wi-Fi dongle instead of a mobile hotspot that you can wirelessly connect to, simply plug the dongle into your Mac, go to System Preferences, click Sharing, then tick the check box next to Internet Sharing. Your phone or tablet can now hitch a ride on your MacBook’s Internet connection via Wi-Fi.
We’ve barely scratched the surface with this guide. Don’t be afraid to discover what a Mac can do. After some exploration, your Mac will soon become more of a familiar sight than an intimidating alien environment.
Anything to add for Windows users new to OS X and Mac computers? Sound off in the comments!
Editors' Recommendations
- Best refurbished MacBook deals: Get a MacBook Air for $140 and more
- iMac deals: New, renewed and refurbished iMac computers
- Best Apple deals: Save on AirPods, Apple Watch, iPad, MacBook
- This laptop beats the MacBook Air in every way but one
- These 6 tweaks take MacBooks from great to nearly perfect


