Cooperative zombie shooter games have been chasing the legendary formula of tense action, cooperation, and endless replayability of the Left 4 Dead games for over a decade now. Many have tried, and yet none have quite nailed that same feeling as teaming up with your buddies and running through one of those classic campaigns, even if it is for the 100th time. Back 4 Blood is unique from other imitators because the developer, Turtle Rock, is actually made up of the team that originally created Left 4 Dead all those years ago. Without being able to use the actual name, they decided to make the sequel they couldn’t before under a new, albeit clearly referential, name.
The core concept of Back 4 Blood is almost identical to the Left 4 Dead games. You and three friends will take on various campaigns that task you with navigating areas brimming with zombies, called Ridden here, that want to rip you apart. You have plenty of guns and abilities to help you deal with the horrific hordes, but one new system this game adds on top is a card system. Now, cards would probably be the last thing on your mind when thinking of a zombie shooter, but this system is incredibly important if you want to make it to the later parts of the game. To help you get a grip on what cards are, how to build your deck, and the best cards to look out for, here’s the Back 4 Blood card system explained.
Further reading
- A beginner’s guide to Back 4 Blood: How to fight back against the horde
- Back 4 Blood PC settings guide
- Best zombie games of all time
The card system explained
Cards are essentially modifiers to any campaign you’re about to embark on. There will always be randomized elements, such as Ridden placement and which special types appear when, but the cards can impact your game in major ways. These can be both good and bad depending on the situation. Cards are broken down into four categories: Reflex, Discipline, Brawn, and Fortune. Reflex cards buff things like your reload speeds, Discipline can increase your ammo capacity, Brawn will help you stay alive, and Fortune makes items spawn more often.
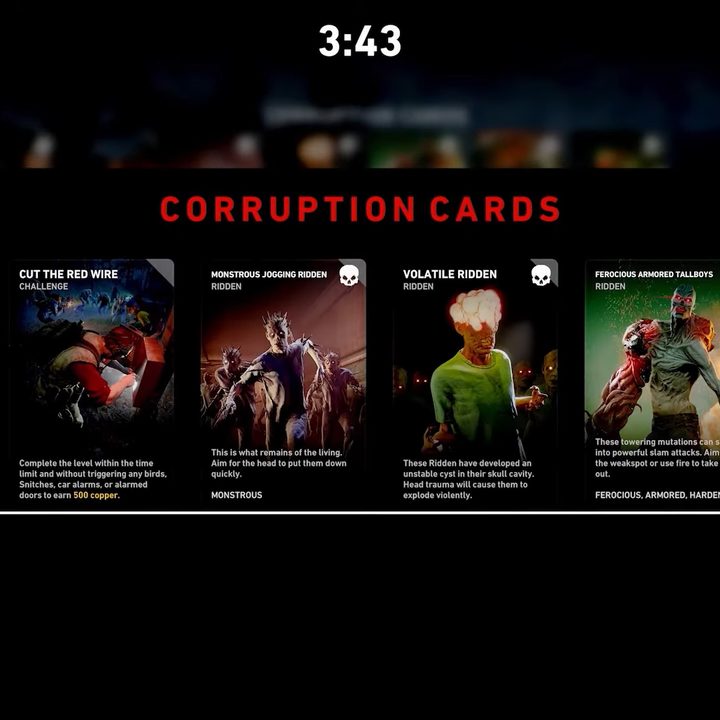
Every time you begin a new campaign, you will draw five cards from your deck and be asked to pick just one. That card will apply to that mission. You will start the game with a basic start deck, which has things like extra lives, but you will soon want to build your own custom deck. Each deck can hold up to 15 cards, but we’ll cover deck building later on. In addition to your own cards being drawn, a Corruption card is also drawn and applied to the game. This will make things harder, like covering the map in fog or spawning more of a certain type of Ridden.
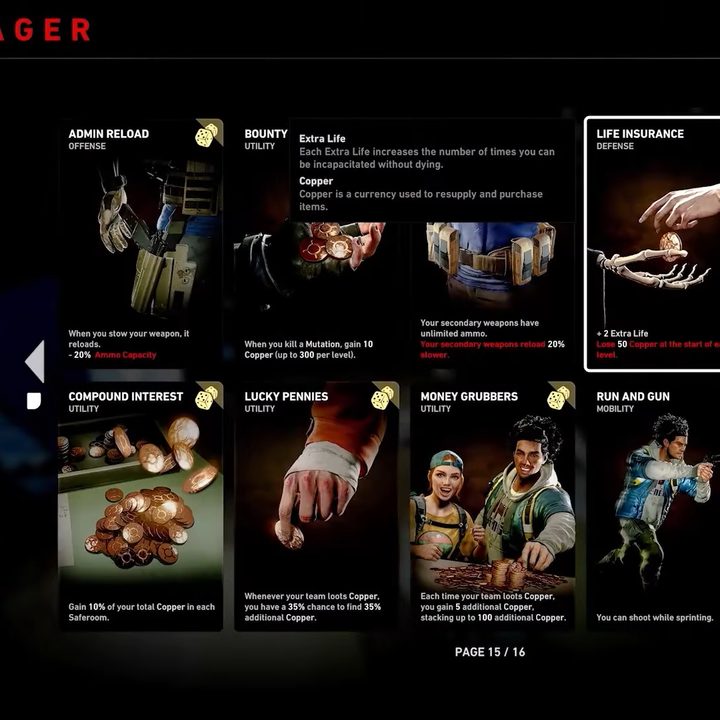
In addition to the one card you play initially, which is automatically applied at the start of your campaign, you will also choose four more cards while in your safe house. These cards will appear later in the campaign to collect but can only be picked up and their effects applied if you have enough copper to buy it. So long as you keep surviving, you can stack up more cards and buffs as you complete missions.
How to build your deck
Now, there’s nothing you can do about what Corruption cards will be drawn. The only thing you can control is what cards you have in your deck to try and mitigate whatever hurdle the game decides to throw at you. To do this, the first thing you need to know is how to get cards in the first place.
There are a few different ways you can add new cards to your collection in Back 4 Blood. The most common way is to just find them as random drops during missions. Basic Cards will appear in some circumstances and are an easy way to grab an extra card while playing.
The primary way the game wants you to earn new cards is through a system called Supply Lines. Between missions, when you can explore your base camp, you can access a menu called Supply Lines where you will be able to purchase new cards using Supply Points. Supply Points are yet another currency, but unlike copper, this currency is persistent between games. You will get these as you play the game normally, so you don’t have to go out of your way to get them.
A Supply Line will show you what rewards you’re going to unlock by spending your points, and you need to go in order, with prices going up the further you go. Thankfully, you’re not locked into spending your points on just one linear Supply Line. After you unlock everything in the initial Supply Line, you will then get the option to spend your points in a variety of them, bouncing around and spending your points on whatever strikes your fancy.
When it comes to finally building your deck, you will want to add cards that fit with what kind of playstyle you want to use. Brawn cards would be great for more aggressive players, while Fortune or Discipline can be great for different types of support players, for example. Keep in mind that you can build multiple decks, so don’t feel like you’re limited to just one style of play. You should also consider that some cards, typically ones with major bonuses, may come with some negative aspects as well. For example, the Shoulder Bag card gives two extra Support Inventory, but you’ll deal 10% less damage. Weigh these pros and cons carefully.
Finally, don’t just slam all your cards into a pile and call it a day. Back 4 Blood doesn’t exactly shuffle your deck each time, at least from our experience. Cards seem to come out in the order you have them in your deck, so whatever card you have on top should be the one drawn as your first free buff, with the ones following being the ones most likely to show up during your run. Structure your deck from most to least important for best results.
The best cards in Back 4 Blood
Finally, let’s take a look at some of the absolute best cards we’ve found in Back 4 Blood. Depending on what type of build you want, some of these won’t apply, but we’ll give you at least a few that you’ll want to slot into your deck no matter how you like to play.
Second Chance: No matter what role you’re playing, this is a fantastic card to draw. It will give you +1 Extra Life and +5 Health, making it an all-around handy card.
Two is One and One is None: The name of this card is way more complicated than what it does. This card allows you to carry two primary weapons instead of one primary and one secondary, but at the cost of slowing down your weapon swapping speed by 25%.
Marked for Death: This card will make any Ridden you tag with the ping system get a glowing outline, making them easier for teammates to spot, but also increases the damage they take by 10%.
Hellfire: For all you run and gunners out there, get this card to move 45% faster while shooting or for a flat 5% movement speed buff when not firing.
Antibiotic Ointment: This is one for the healers out there, and it’s a simple +20% healing efficiency bonus.
Ammo For All: Ammo is a bit more precious in Back 4 Blood than Left 4 Dead, so this bonus 10% ammo capacity for your entire team is one everyone will thank you for having.
Ridden Slayer: Special Ridden are quite bullet spongy, especially on harder difficulties. They do have weak points, though, and this card will make hitting those squishy bits deal 35% more damage so you can clear them out that much faster.
Superior Cardio: Taking a cue from Zombieland, don’t neglect your cardio. This one card will give you +20% stamina, +20% sprint efficiency, and +5 health just to be nice.
Breakout: The point of Back 4 Blood is to work as a team, but sometimes you just need to take care of yourself. This card lets you hold a button to free yourself from a Ridden’s grab rather than having to wait for a teammate to free you, plus gives you a 50% reduction to your breakout cooldown.
Reload Drills: Another universally good card, this one just makes your reload speed 20% faster. Be warned, once you get used to this, it will be hard to go back.