
A lot of the fun in Bravely Default 2 comes from the game’s extensive job system. Every boss has an Asterisk, and beating them will allow you to take that Asterisk and get a new job. In this Bravely Default 2 jobs and abilities guide, we’ll walk you through all the jobs in the game, the best job and subjob combos, and a few tips for grinding Job Points (JP).
Each job gives you access to a new list of abilities as well as different weapon prophecies and base stats. Building your party requires more than throwing a couple of jobs together and hoping for the best, so make sure to carefully consider what each job is good at when building your lineup.
Further reading:
- Bravely Default 2: How to find the last chest in Hydrangea Hills
- The best JRPGs of all time
- The best anime video games
How to unlock every job in Bravely Default 2
You’ll unlock most of the jobs in Bravely Default 2 by simply playing the game. There are 24 jobs in total, and you’ll only miss three of them if you stick to the main storyline and ignore side content. Two of those come from easy side quests in Chapter 1 and Chapter 3, while the last job only becomes available after you beat the game once.
We won’t mention specific boss names or reference story events, but there may be minor spoilers below.
Prologue
The Prologue introduces you to all the key jobs you need for the rest of your play-through. The Black Mage and White Mage jobs will likely follow you until at least Chapter 3, and the Monk job is useful throughout the game. Make sure to start leveling up the Freelancer job early so you can unlock JP-boosting passive skills.
- Freelancer
- How to unlock: You’ll unlock the Freelancer job by starting the game.
- Description: The most basic job in Bravely Default 2, Freelancers specialize in nothing. However, the job has some useful JP-boosting skills and comes with Examine, allowing you to fill out the Lore Book and discover enemy weaknesses.
- Black Mage
- How to unlock: You’ll unlock the Black Mage job automatically after your party joins you at the beginning of the game.
- Description: The Black Mage job comes with a small range of elemental magic with various intensities. You get fire, water, and lightning magic, allowing you to hit most weaknesses early in the game.
- White Mage
- How to unlock: You’ll unlock the White Mage job automatically after your party joins you at the beginning of the game.
- Description: White Mages heal and support the party, and you’ll probably have one in your party for the majority of Bravely Default 2. Raise and Arise give you ways to revive allies without spending a Phoenix Down, and the various healing spells are essential for making it through most battles.
- Vanguard
- How to unlock: You’ll unlock the Vanguard job automatically after your party joins you at the beginning of the game.
- Description: The Vanguard job is a basic damage-dealing job, focusing on high HP and physical attack stats. It’s a powerful job on its own, but you’ll want to round out your Vanguard with another job. Berserker and Beastmaster are good early-game pairings.
- Monk
- How to unlock: Beat Horten, the second and final boss of the Prologue.
- Description: The Monk job is all about using your HP as a resource. Early on, Qiwong Wave is useful for sneaking in some damage while an enemy is defaulting, and Focal Blast can one-shot most enemies if you have the MP to spare. Otherwise, the Monk job pairs well with any job with high HP and defense stats, such as Shieldmaster and Vanguard.
Chapter 1
Chapter 1 rounds out the basic lineup introduced in the Prologue. The Thief job is the most important, so make sure to level it up quickly. Otherwise, Chapter 1 brings the game’s first optional job, which you can pick up at any point during the chapter.
- Bard
- How to unlock: Beat the first boss of Chapter 1.
- Description: Bards use songs to buff party members and debuff enemies. It’s a good idea to open a battle with Don’t Let ‘Em Get to You or Don’t Let ‘Em Trick You depending on if you need to buff your physical or magical defense. Otherwise, Close Those Tired Eyes can put a target to sleep. There are a few key Bard skills that you’ll want to pair with your healer, particularly those that raise defense.
- Beastmaster
- How to unlock: Beat the second boss of Chapter 1.
- Description: The Beastmaster job should be familiar to JRPG fans, just like the previous ones. Beastmasters capture and release monsters. Having a leveled-up Beastmaster early can help a lot, especially if you can capture monsters that deal damage a boss is weak against. Most monsters deal far more damage than you can early, and you can push that even further when targeting a weakness. For skills, there isn’t much outside of capturing and unleashing monsters. Muzzle is useful occasionally, though, allowing you to silence an enemy.
- Thief
- How to unlock: Beat the third boss of Chapter 1.
- Description: The Thief job is focused on quick physical attacks and stealing items. It’s a little unexciting, but you’ll probably keep a Thief in your party for the majority of your playthrough, and that’s because of one key skill: Godspeed Strike. It deals massive damage and even more if you can buff your speed stat. Otherwise, stealing gives you something do other than defaulting, and the job comes with a couple of physical attacks for stealing HP or MP.
- Berserker
- How to unlock: Beat the fourth boss of Chapter 1.
- Description: Berserkers trade speed for damage, focusing on powerful physical attacks. Shell Split and Scale Strip are useful for getting in some damage while lowering physical or magical defense, while Crescent Moon and Level Slash give you a way to deal damage to multiple opponents at once. Consider pairing the Berserker job with any damage-focused job, such as Vanguard or Swordmaster.
- Gambler (optional)
- How to unlock: Complete the quest Taking a Gamble from the Gambling Hall in Savalon.
- Description: The Gambler job is the first optional job in Bravely Default 2, and it’s a fun one. Instead of HP or MP, most of the Gambler skills use money. Most have an element of RNG, too, forcing you to spin a wheel that could buff whatever skill you’re using. The Gambler job is high risk, high reward, with a list of abilities that covers everything from massive physical damage to reviving fallen allies. Consider leveling a Gambler early.
Chapter 2
Chapter 2 is all about specialization. Here, you’ll finally have access to wind and stone magic and powerful debuffs.
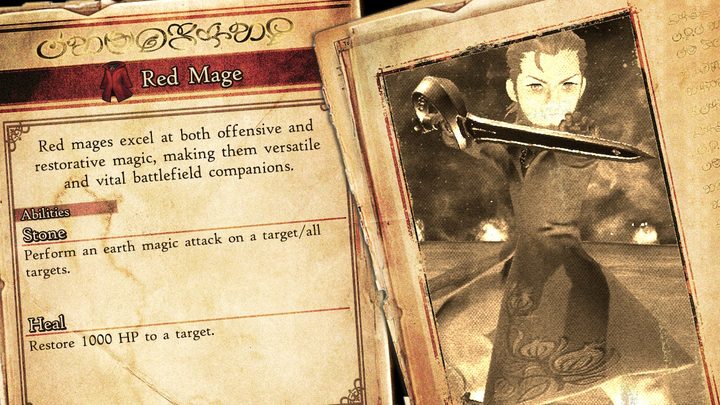
- Red Mage
- How to unlock: Beat the first boss of Chapter 2.
- Description: The Red Mage job sits between the White Mage and Black Mage jobs, balancing offensive and defensive magic. We highly recommend training your Black Mage as a Red Mage once you’ve unlocked all the Black Mage skills. Black Mages deal fire, lightning, and water magic. The Red Mage job rounds that out with stone and wind magic, and it includes several healing spells to take some heat off of your healer.
- Ranger
- How to unlock: Beat the second boss of Chapter 2.
- Description: Despite the name, the Ranger job isn’t focused on ranged attacks (range doesn’t really matter in a turn-based RPG, after all). Instead, the Ranger job comes with a list of physical attacks that are effective against different families of monsters. Most players will find Ranger skills useful with nearly any build.
- Shieldmaster
- How to unlock: Beat the third boss of Chapter 2.
- Description: The Shieldmaster job comes with a huge HP buff and a range of skills that allow you to redirect damage. Reprisal and Bodyguard are a solid combo, redirecting damage to your Shieldmaster and forcing the attacker to take 5o% of that damage back. Otherwise, The Gift of Wisdom is an excellent skill for topping off the MP of your mages without using elixirs. Any high-HP, damage-dealing job makes a good pairing with Shieldmaster. Consider Swordmaster, Berserker, or Vanguard.
- Pictomancer
- How to unlock: Beat the fourth and final boss of Chapter 2.
- Description: The Pictomancer job focuses on debuffs that can control the battlefield over time. That includes reducing physical and magical attack, restorative power, and physical and magical defense. Later job levels award light and dark magical attacks, too, allowing you to target some enemy weaknesses. Consider pairing the Pictomancer job with one of your magic users (healer or Black Mage). It also pairs nicely with the Ranger job if you’re looking for a more flexible build.
Chapter 3
Chapter 3 brings a few more flexible jobs, allowing you to replace the White Mage and Black Mage jobs you’ve likely been using up to this point. Like Chapter 1, there’s an optional job that you can pick up at any point during Chapter 3.
- Dragoon
- How to unlock: Defeat the first boss of Chapter 3.
- Description: The Dragoon job comes with a range of physical attacks that work well with spears. Outside of those attacks (a few of which are imbued with lightning magic), the Dragoon job has the signature Jump skill, allowing you to jump out of the battlefield and slam down on the next turn. As a largely damage-based job, you can pair Dragoon with Swordmaster, Vanguard, or Berserker, to name a few. It works with basically all nonmagic jobs, though.
- Spiritmaster
- How to unlock: Defeat the second boss of Chapter 3.
- Description: The Spiritmaster job will likely replace — or at least bolster — your White Mage. You’ll likely have a Red Mage handling some healing duties at this point, and it can feel like your healer isn’t doing much. The Spiritmaster job fixes that. In addition to powerful light magic, the job comes with versions of White Mage skills that take place over a series of turns instead of all at once. For pairings, any of the support classes work. White Mage is great if you need some extra healing, but consider Pictomancer, Oracle, and Bard as well.
- Swordmaster
- How to unlock: Defeat the second boss of Chapter 3.
- Description: You’ll unlock the Swordmaster job alongside Spiritmaster, and it’s very much the yin to the previous job’s yang. Swordmasters can adopt several different stances to attack multiple times in turn, perform counterattacks, and more. The Swordmaster job pairs well with most other physical jobs, including Ranger and Vanguard. Make sure to keep your speed stat in mind, though.
- Oracle
- How to unlock: Defeat the third and final boss of Chapter 3.
- Description: The Oracle job supports your team by controlling time. Instead of defense or attack buffs, you can use skills to give your team haste, slow enemies down, and deliver more hits whenever you attack. The job comes with some fire, water, and thunder magic skills, too, so consider replacing your Black Mage with an Oracle.
- Salve-Maker (optional)
- How to unlock: Complete the Glynn Awakens side quest outside of Ederno.
- Description: The Salve-Maker job allows you to combine items to create new ones as well as to spend some money to create a medicine that either increases or decreases BP. Honestly, it’s one of the least useful jobs in the game. It’s a bit like a late-game Freelancer job, meaning that it comes with some useful skills, but they don’t make a huge difference in battle.
Chapter 4
Things change a bit in Chapter 4. Instead of a linear series of bosses, you’ll be able to unlock the first three jobs in any order you want. There isn’t a best way to go about it, so just track down whatever job seems most interesting to you.
- Archanist
- How to unlock: Complete the questline starting in Wiswald.
- Description: Archanists are masters of powerful offensive magic. In addition to dark magic, the Archanist job comes with skills that combine other types of magic. Meltdown, for example, combines fire and wind magic. The job works well with any offensive magic build, so consider pairing it with Oracle or Red Mage. Pictomancer makes a deadly combo, too, allowing you to debuff enemies and follow up with powerful elemental magic.
- Bastion
- How to unlock: Complete the questline starting in Halcyonia.
- Description: The Bastion job is all about protection. Rampart and Vallation allow you to erect barriers to block a physical or magical attack, and later skills allow you to gain multiple BP in a turn while restricting opponents from earning BP. It’s tough to place the Bastion job, but it usually pairs well with fast physical jobs. That includes Thief, Monk, and Gambler.
- Phantom
- How to unlock: Complete the questline beginning in Savalon.
- Description: Phantoms specialize in dealing critical damage and multi-hit attacks. You can pair the Phantom job with basically any physical class, but as many Bravely Default 2 players have already figured out, it works best with the Thief job. Adding critical hits to the Thief’s Godspeed Strike makes a powerful attack even more powerful. This combo will easily take you through the rest of the game.
- Hellblade
- How to unlock: Defeat the final boss of Chapter 4.
- Description: The “final” job you unlock in Bravely Default 2 is an extremely powerful one. The Hellblade job allows you to speed HP to deal physical attacks infused with elemental magic. You want to put the Hellblade job on your damage dealer, pairing it with either Berserker, Vanguard, or Swordmaster.
New Game+
New Game+ brings one additional job, allowing you to reach the game’s true ending.
- Bravebearer (optional)
- How to unlock: Beat the game normally, then reload your save to begin the path to the true ending.
- Description: The Bravebearer job is Bravely Default 2‘s ultimate job and a reward for reaching the true ending. The job basically throws all rules out the window, with multiple physical skills that deal damage multiplied by the time you’ve played. It’s a reward for beating everything, so you don’t need to worry about pairings.
The best job combinations in Bravely Default 2

There are countless ways to build your party in Bravely Default 2. Half the fun is experimenting with different builds to see which jobs work together. We have five job combinations that you can use throughout the game. If you want to experiment, make sure to check weapon proficiency for each job as well as the base stats. You don’t want to pair the Thief job with a low-speed stat, for example.
Black Mage/Red Mage
This is an essential combo, so we recommend having a character leveling up the Black Mage on your way to unlock the Red Mage job. With both, you can cover all of your elemental bases. Black Mage gives you fire, water, and lightning, while Red Mage gives you wind and stone. Even better, the Red Mage job has a few healing spells available, freeing up your healer to buff and use other skills.
White Mage or Spiritmaster/Bard
Similar to the last combo, this one just makes sense. The White Mage job has all of the healing, revival, and status healing skills you need, while the Bard job comes with a slew of status-boosting skills. Early, you can buff your team or debuff the enemy team using Bard skills while keeping your White Mage healing magic in your back pocket. Later, replace the White Mage job with Spiritmaster.
Vanguard or Monk/Shieldmaster
The Vanguard job is caught between taking damage and dealing it, forcing you to carefully balance how much HP your Vanguard has left. The Shieldmaster job fixes that issue. A huge boost to base HP with the Shieldmaster job makes it a perfect pairing with Vanguard, which is already focused on soaking up attacks. This combination can dish out damage, but more importantly, it can take just as much.
For a more offensive build, replace Vanguard with Monk. The high HP of Shieldmaster gives your Monk plenty of fodder to activate skills.
Phantom/Thief
Outside of an unintentional Persona 5 reference, this job combo is surprisingly powerful. The Phantom job boosts your critical, evasion, and speed stats, all of which pair well with the Thief job. The Thief’s Godspeed Strike becomes very deadly with a change to critical and the high speed stat of the Phantom job.
Arcanist/Pictomancer
The powerful elemental magic of the Archanist job makes a natural pairing with the Pictomancer’s debuffs. This late-game setup is great for your Black Mage, allowing you to still target weaknesses with magic while giving you a few more support skills. Leveling up this combo is a little tricky, though, as the Pictomancer’s skills aren’t great on their own. Consider leveling up the Archanist job first, or use a maxed-out Black Mage.
How to grind JP in Bravely Default 2
Bravely Default 2 is a traditional JRPG, so get ready for some grinding. Thankfully, there are a few things you can do to make the grind a little easier and cut down the time it takes to max out every job.
Level up a group of Freelancers
The first thing you should do is level up the Freelancer job on all of your characters to level 12. That gives you access to two key passive skills: JP Up and JP Up and Up. The former multiples all the JP you earn by 1.2, and the latter multiplies JP earnings by 1.5. Combined, they deliver 1.7x JP. After you’ve earned these passive skills, you can equip them even if you don’t have the Freelancer job equipped.
It’s a bit of a bummer at first, but giving your entire party nearly twice the JP makes grinding experience with other jobs much, much easier.
Multibattles are best, but rare monsters work
You can get into multibattles by running into a group of enemies close to each other. Each wave will raise the JP multiplier at the end of battle, so you want to round up as many mobs as possible.
There are a two ways to go about doing that. The first is to expend items that attract certain types of monsters. You’ll get multibattles this way, but most are only with a few mobs, and you’ll spend a lot of items. A better way to go about it is to return to an area in the overworld where enemies flee from you. Then find a corner and scare as many enemies as you can into that corner. Run in once you’ve rounded everyone up and repeat.
If you’re having trouble, you can also grind battles with rare monsters. Late in the game, you can down some of the earlier rare monsters within a few hits. This process isn’t quite as fast as doing multibattles, but it’s still faster than grinding random encounters.
Explore when you aren’t playing
Finally, you can earn JP even when you aren’t playing Bravely Default 2. The game’s online portion allows you to explore while your Switch is in Sleep Mode. When you encounter other players exploring, you’ll sometimes stumble upon treasure. If nothing else, make sure to start exploring before you turn off your Switch. If you explore for the maximum 12 hours, you’ll usually end up with a few JP orbs.


