
The way you build your character in Cyberpunk 2077 determines a lot about how you interact with the world. You can choose to focus on being a run-and-gun style killer who bursts into a room full of enemies guns blazing, or go the sneaky route and complete your missions without taking a single life. Hacking is a skill you will want to learn early on no matter how you want to play. It opens up a ton of options, as well as being one of the most lucrative and quick ways to earn some Eurodollars in Night City. Don’t worry if you’re not a computer wizard in real life. Hacking in Cyberpunk 2077 isn’t as complex as that, but it does still have some intricacies you’d do well to learn before loading up your first Breach Protocol. Here’s our full diagnostic on how to hack in Cyberpunk 2077.
Further reading
Hacking 101

Hacking in Cyberpunk 2077 can be broken down into two categories: Quickhacking and Breach Protocols. These each function differently, but do share a few similarities. First is that scanning is your best friend. Anything in the world that you can hack will show up with a quick scan of the environment. You’ll see doors, cameras, access points, and even people that you can hack for different effects that will make your life easier. Similar to the detective vision in other games, this is a tool you’ll want to be using at all times to get the best view of the situation.
Quickhacking can be done after scanning a hackable object or enemy and is limited by your character’s RAM. You can, and should, upgrade this at Ripperdocs so you can give yourself the biggest edge in any situation before anything goes sideways.
Breach Protocols are done to hack into access points. These can be things like antennas and laptops and have a mini-game associated with them. This makes them more difficult than a Quickhack, but success will give you much better rewards.
How Quickhacking works
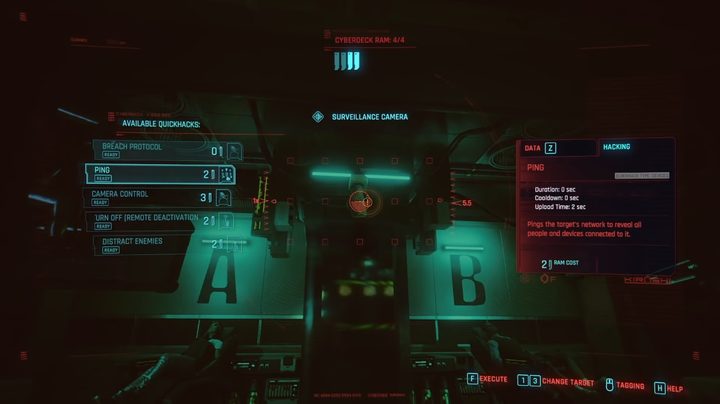
Quickhacking will require you to have a Cyberdeck installed. The better the Cyberdeck, the more RAM you get to perform even more hacks. Quickhacks are primarily good for distraction purposes. After scanning an area you’ll have the option to take control of the security camera systems, distract guards, and even screw with any Cyberware they have. Some hacks can be lethal, so consider what you want to that unsuspecting guard if you’re trying to stay non-lethal.
Your hacking options for whatever you’re targeting will be listed on the left side of the screen, as well as the required RAM to perform that hack. Any options highlighted in red can’t be done either due to lack of remaining RAM or if that option has already been done. If you don’t know what one of the Quickhack options means, you can see a description by tabbing over to the Hacking menu on the right side for a full list. The right side of the screen will also show you relevant data to your hacking target. You can see, for example, what type of character they are, what group they’re affiliated with, a list of abilities, and what they are weak to.
Once you pick your target and hack of choice, just select it and watch the results.
How Breach Protocols work
This is the “real” hacking in Cyberpunk 2077. You will need a high enough intelligence level to even attempt this type of hack on certain Access Points, as well as get physically close enough to jack into the device. The upside to this type of hacking is that any hack you do on an Access Point will impact all the enemies in an area rather than a single target like Quickhacking. You can spot an Access Point when scanning by looking for the little network icon in the area. You can also unlock a Ping Quickhack to find the Access Point if you use it on a person or object connected to the network.
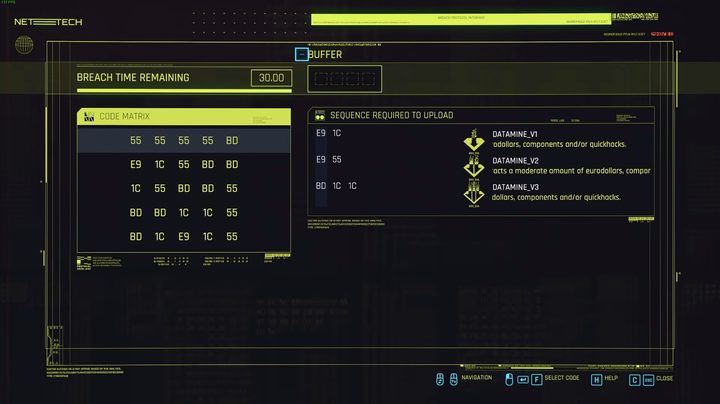
Once you find an Access Point, with a high enough level of intelligence to hack it, you will plug yourself in and start the mini-game. This screen can look quite overwhelming at first, but once you know what you’re looking at, becomes a lot more manageable. You have your time limit at the top left, the Code Matrix right below that, a Buffer meter on the upper right, and the different sequences you’re trying to match, plus their effects, on the right. You can, and should, fill in multiple sequences at once to trigger multiple rewards.
Now, on to the hacking itself. What you’re attempting to do is match the code found on the sequences on the right from left to right. However, you can only choose codes in an alternating order of rows and columns in the Code Matrix. For example, if you pick the top right option in the matrix, in this case, 8D, the next option you can pick can only be in the far right column. In the image above, that would lock me out of the bottom sequence because the only codes available in that right column are 8D and 55 while that sequence would need 1C. That means you need to plan ahead to know which code you should pick to make sure you have the option for the next one in the sequence in the following row or column.
Every code you pick will take up one of the slots in the Buffer section. You will only have that many codes to select before either completing one or more sequences or the hack will fail. This is another upgrade option available from Ripperdocs you should invest in.
One thing that can make Breach Protocols a little easier is to take a second to highlight the sequence you’re going for on the right. This will highlight all the codes in the matrix that fit the sequence so you can quickly plot out what order to select the codes in. Also, if things are going poorly, you can always back out of a Breach Protocol and start over from scratch, only with less time on the clock. Just be aware that all Breach Protocols are randomized each time so you can’t completely cheese the system this way.


