
Destiny 2: How to complete The Lie quest and obtain Felwinter’s Lie

With the Guardian Games over, there’s not much left on Bungie’s calendar for the rest of Destiny 2’s Season of the Worthy. Luckily, a surprise quest just made its way into the game, which will take a lot of time to complete.

The new quest, called The Lie, is a little mysterious at the moment. While there’s no end reward listed, a datamine indicates that completing it will give players Felwinter’s Lie. This legendary shotgun was a beloved Iron Banner reward in the first Destiny game. If you want the gun, you’ll need to prepare yourself for a long grind. Here’s what you need to know to complete The Lie.
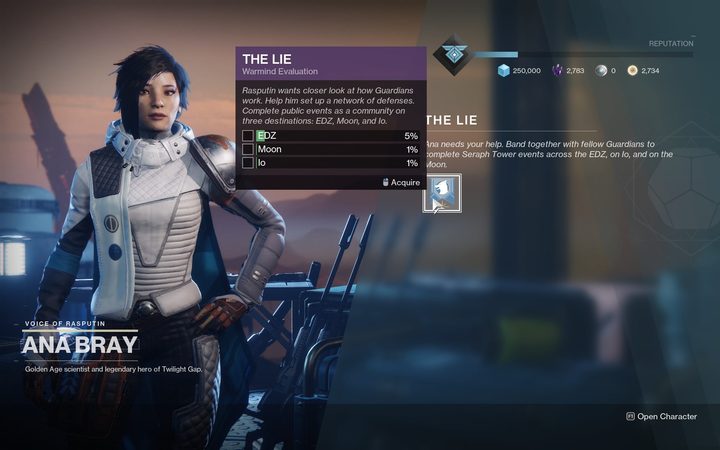
Destiny 2 The Lie
Image used with permission by copyright holder

Warmind evaluation

When you start the game, head over to Mars and speak with Ana Bray. She’ll pass along a new task straight from Rasputin. The A.I. wants to gather data about the Seraph Towers, the new public events that were introduced in Season of the Worthy. If you haven’t opened all three bunkers yet, you’ll want to make sure you’ve done that.

Here’s where the grind comes in: Players will collectively need to complete 9,000,000 Seraph Tower events to get the next step. That means that each of the three Seraph Towers will need to be cleared 3,000,000 times. It’s a similar incentive that was used in last season’s Empyrean Foundation project, which brought Trials of Osiris back to the game.

UPDATE: This step is now complete, thanks to a slight scale back of the requirements. If you had the quest, you can now move on to the next step.

Vostok

With that nightmare over, head back to Ana Bray. She’ll send you on a new mission, which will require you to go to the multiplayer map Vostok. You’ll find it in your director, so you don’t need to load into Crucible games for this. This is a quick mission that requires you to find three energy signatures and listen to some dialogue. It’s a cakewalk compared to the other steps, so enjoy this change of pace while you can.

Get 1,000 shotgun kills

If you thought you were done with the grind, here’s some bad news: the next step requires you to get 1,000 shotgun kills. There’s no real trick here either; you just need to start killing. Focus on PvE activities that spawn a large number of enemies. Seraph Towers is a good place to grind if you’re not sick of it already. Otherwise, the Escalation Protocol event will give you a lot of thralls to kill. Equip your favorite shotgun, preferably one with a high rate of fire, and get to work.

Warmind Heuristics

This part was previously bugged, but a new hotfix has finally given players access to the final step. To complete this, head to Mars and talk to Rasputin. After that chat, interact with the Seraph Bunker door and you’ll enter a new mission called “The Tyrant.” This is fortunately pretty straightforward. You’ll follow objective markers and get a little bit of backstory about the Felwinter. After ducking through some vents, you’ll see a sarcophagus. Interact with it and you’ll finally obtain Felwinter’s Lie.

Make sure to pick this up before Season of the Worthy ends on June 9, as the quest will no longer be accessible after that date.

Editors' Recommendations

Giovanni Colantonio
Giovanni is a writer and video producer focusing on happenings in the video game industry. He has contributed stories to…
Where to find all inventory upgrades in Alan Wake 2
Saga stands in front of an evidence board in Alan Wake 2.

While the first Alan Wake game certainly had plenty of scares and horror in it, the mechanics were not as strictly of the survival horror variety. Alan Wake 2 has gone fully in this direction, however, with a much darker tone, disturbing imagery, and restrictive combat mechanics that sustain the tension when The Taken attack.

Aside from limited ammo, low health, and tough enemies to bring down, a key aspect of survival horror games is an inventory system. The first game let you hold essentially as much ammo, batteries, and weapons as you wanted in each chapter, but the sequel introduces a grid system that will look familiar to Resident Evil fans. Just like Resident Evil, your inventory starts off quite small, but you can see there is plenty of space for it to grow. There are specific items hidden in and around Bright Falls that can let you expand your carrying capacity, but many are well hidden in dark corners. Here are the locations of every inventory upgrade in Alan Wake 2.
All inventory upgrades

Read more
All stash locations in Alan Wake 2 and how to open them
Alan drenched in green light in Alan Wake 2.

FBI agent Saga Anderson and her partner, Alex Casey, are called into Bright Falls to investigate a murder committed by a strange group calling themselves the Cult of the Trees. These dangerous cultists are your main enemy in Alan Wake 2, and they put up quite a fight despite mostly using basic tools as weapons. They seem mindless and primitive, but the fact that they have a series of Cultist Stashes hidden all around the world suggests otherwise. These treasure troves are very well hidden, and they're protected with a small puzzle to try and prevent those who may stumble upon one from grabbing all the goodies inside. You'll find yourself short on supplies essentially all the time in Alan Wake 2, so scooping up some extra ammo and batteries is always welcome. Here is where you can find all the Cultist Stashes in Alan Wake 2 and how to open them.
All Cultist Stash locations
There are a total of 21 Cultist Stashes to find and unlock in Alan Wake 2. Each zone has its own set to find, and they all have different puzzles you need to solve to open them. None are missable, but some can't be obtained until you make story progress or get specific tools.
Bright Falls Cult Stashes

The first Cult Stash you can find comes as soon as you reach the town of Bright Falls for the first time. Instead of going straight to your destination down the block, turn around and head toward the dead end. Behind the truck will be a big locked box. To open this one, all you need to do is play a little game of Simon Says. The keypad will flash three buttons in a sequence that you simply need to repeat to open the box and grab the loot.

Read more
What is the code to the Lizard’s lab in Spider-Man 2?
Spider man pressing keys on a tablet.

Dr. Connors, aka The Lizard, is forced back into his reptile state after Kraven injects him with his old serum in Marvel's Spider-Man 2. This would be bad enough, but he's also the only one who knows the truth about the symbiote and how to potentially get it off of Peter. Before that can happen, you need to track him down and inject him with the cure, and your search begins at his home in Queens. While exploring Connors' home, you discover that he had his own laboratory built underneath it for his experiments. Naturally, he wanted to keep this secret and put a passcode on the entrance. There's a small puzzle to uncover the code, and this isn't a puzzle you can skip. Here's how to open the lab.
How to open the Lizard's lab

After exploring Connors' home and finding the panel to the lab, you will see a screen with four colored panels with one to four dots on each in order. Each one plays a tone, so the code is asking you to find the right musical tone. The clue here is the sticker of the barn on the upper right. If you visited the baby's room on the upper floor, you will have heard the Old MacDonald song when interacting with a toy in the room. That's the tone you need to recreate. The correct order to press the keys is 4,4,4,1.

Read more