
Patch 5.45 brings new steps for Final Fantasy XIV Shadowbringers relic weapons. The new steps will send you hunting for certain items and introduce you to the latest raid. Before you get to that, though, you need to know how to earn a Shadowbringers relic weapon.
We’ve detailed all of the steps below, from unlocking the required quest chain to grinding the content from the latest patch. It’ll take a long time to do everything, so buckle in.
Further reading:
- Final Fantasy XIV free trial: Level cap, limitations, and included content
- How to get and upgrade the FFXIV Shadowbringers Skysteel tools
- The best Final Fantasy games, ranked from best to worst
How to unlock the Shadowbringers resistance weapons relic quest chain
Like any quest, there are prerequisites you’ll need to have completed for this one to show up. This one requires a bit of time travel.
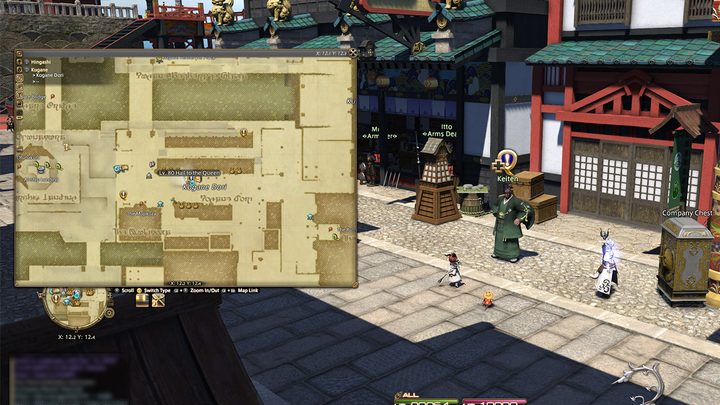
To start the Save the Queen: Blades of Gunnhildr quest chain, you’ll need to have fully completed the 24-man raid series from back in Stormblood. That’s the Return to Ivalice raids of Rabanastre, Ridorana Lighthouse, and Orbonne Monastery. Assuming you’re otherwise up to date, having those quests done and dusted should cause the quest Hail to the Queen to show up in Kugane Market. Accept that, and you’ll be on your way.
Shadowbringers resistance weapon relic steps
Step 1 — Thavnairian Scalepowder (iLvl 485)
So after months of teasing, what does the Shadowbringers relic chain have in store? Not a whole lot, actually. As far as relic weapon steps go, this is one of the tamest attempts yet. All you need to do is follow the quest’s natural progression from Kugane Market.
It’s a long opening chain, so be ready to set some time aside for its few fights and cutscenes. There’s nothing too difficult here, and once you’re through following the cutscenes, you’ll be given exactly the right amount of Thavnairian Scalepowder to craft your very first iLvl 485 Shadowbringers relic.
Step 2 — How to get Memories of the Dying (iLvl 500)
As of Shadowbringers patch 5.35, shiny new relic weapon upgrades have been added to the game with the proper introduction of the Bozjan Southern Front. Although you don’t need to to upgrade this zone now, you’ll need to get to rank 10 before you can continue with later steps in this quest chain.
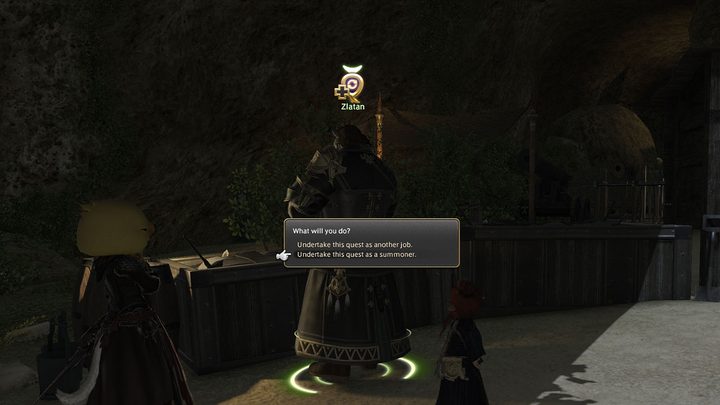
Switch to the class whose relic you want to upgrade and speak to Zlatan in Gangos, at which point you’ll be asked to produce the following Memories of the Dying:
- Tortured Memory (x20)
- Sorrowful Memory (x20)
- Harrowing Memory (x20)
- Bitter Memory (x6)
You can earn these in two different ways. The first is to naturally procure them as rewards while you fight your way around Bozja. It’s incredibly slow compared to the next method, but it doubles as a very effective way to level another class to 80.
If you just want to quickest, most efficient way to get a shiny new weapon for your preferred class, though, you can simply farm FATEs in any of the Heavensward areas to the same effect. Why Heavensward, you ask? It’s presumably to ensure the legacy zones aren’t completely dead for those rocking FFXIV‘s expanded free trial.
Heavensward FATE areas that net Memories of the Dying are as follows:
- Coerthas Western Highlands
- Dravanian Forelands
- Dravanian Hinterlands
- Churning Mists
- Sea of Clouds
- Azys Lla
So long as you’re on the quest For Want of a Memory, they should drop from whichever method you choose.
Like Atma from past relics or the Yokai Watch event currencies, should you find one at the end of a FATE or battle, the relevant Memory of the Dying will flash up on the screen with a swish noise. You’re not guaranteed to get them, but the odds seem dramatically higher in Heavenward areas than in the Bozjan Southern Front.
Early reports suggest it takes around an hour to get 20 of one type of memory, so you’re looking at a little over three hours total to get the materials needed to complete your first relic. In Bozja? You could run around for around two hours without getting a single one, never mind a set of 20. That’s just how it goes.
With the necessary memories in tow, you should turn your original ilvl 485 relic into one at iLvl 500. All that’s left for Patch 5.35 is a couple of old dungeons to get your weapon to look its best. That’s detailed down in Step 3.
Step 3 — Bitter Memories of the Dying (iLvl 500)
With an iLvl 500 weapon in tow, you should be able to grab the sidequest The Will to Resist from Zlatan in Gangos. What this asks of you is a mere 6 Bitter Memories of the Dying.
Tying back into the need for Heavenward to look nice and populated for the swatches of Free Trial players, these come from Heavensward dungeons mostly, but a single one can be nabbed from the Duty Roulette: Leveling queue once per day. You don’t have to have the weapon equipped, so feel free to run the dungeons on any class you please. They do have to be proper runs, though. No undersized parties or similar antics will work to speed it up.
For Bozjan Southern Front-focused players, Bitter Memories of the Dying will drop randomly from enemies found there.
Step 4 — Patch 5.45 steps (iLvl 515)
With patch 5.45, you can continue the relic weapons quest line. Before you start, make sure you’ve reached rank 10 in the Bozjan Southern Front. You can earn Mettle (rank experience) by completing skirmishes and critical engagements. Eventually, you’ll pick up The Lady of the Blades quest and unlock the Castrum Lacus Litore raid. Complete Castrum Lacus Litore and the follow-up Delubrum Reginae raid, and then talk to Gerolt to start the In the Queen’s Image quest and Zlatan for the Change of Arms quest.
You’ll need 15 Loathsome Memories of the Dying, and there are two ways to earn them for this step: Critical engagements in the Bozjan Southern Front or Crystal Tower raids from A Realm Reborn.
After that’s done, talk to Gerolt again to start The Resistance Remembers quest. This step is necessary for the first weapon you upgrade but not any subsequent ones. To complete it, you’ll need the following:
- Haunting Memories of the Dying (x18)
- Vexatious Memories of the Dying (x18)
You can find the Haunting Memories from the Heavensward raid series (Mhach raids) or Gyr Abania FATEs. For Vexatious Memories, you can earn them from Stormblood raids or Othard FATEs.
Once you hand in the required items, talk to Zlatan again to start the A New Path of Resistance quest. This the final stage for patch 5.45, and it’ll take you a while. You need 15 Timeworn Artifacts, which you can earn from running Delubrum Reginae or by reaching higher levels of the Palace of the Dead. Delubrum Reginae has a 100% drop rate, so we recommend sticking with it for this step. If you have a job to level, however, Palace of the Dead awards Timeworn Artifacts by clearing floor 100, with random drops from floor 51.
Turn in the quest, and you’re done. The first time you run this line, you’ll be able to customize the substats of your weapon for free. You’re not locked in here, so don’t worry too much. If you want to reallocate your stats later, you can with four Aetherial Sealants.
How to make more resistance weapon relics
To craft additional relics for your other classes, all you need to do is grab the sidequest Resistance is (Not) Futile from Zlatan in Gangos. Toss him your own Thavnarian Scalepowder and you’ll have another new weapon:
How to get back to Gangos
Gangos is a little out of the way. It’ll no doubt get far bigger in subsequent patches, but for now, its tiny size makes it difficult to track down.
To get back to Gangos, all you need to do is travel to the Doman Enclave. If you attuned to the aetherytes in both areas, you’ll be able to teleport from here to Gangos. If not, you’ll have to hop on another boat from there.
Can’t teleport to the Doman Enclave? Then you need to teleport to Namai and travel roughly west to the dock. From there, you can take a boat to the Doman Enclave, and then another boat to Gangos. Remember to attune to the aetherytes this time.
Where to find Thavnairian Scalepowder

When it comes to making a second Resistance weapon relic, you’ll need to obtain your own Thavnairian Scalepowder. This part falls more in line with traditional relic steps, requiring you to obtain and spend a decent amount of Poetics. You get these from almost any serious activity these days, so you shouldn’t ever have to work especially hard to get enough for Thavnairian Scalepowder.
Once you have 1,000 Poetics, head to Auriana in Revenant’s Toll or Hismena over at Idyllshire to exchange your tomestones for the required amount of Thavnairian Scalepowder.


