
Many of the best JRPGs are defined by their boss battles, and Final Fantasy VII Remake is no different. Across its 18 chapters, you’ll face off against 22 tough foes. Fret not, though; our Final Fantasy VII Remake boss guide will explain the best techniques for dispatching each boss with ease.
Further reading
- Final Fantasy VII Remake: Best weapon builds for Cloud Strife
- Final Fantasy VII Remake: Best weapon builds for Tifa Lockhart
- Best Final Fantasy games
Chapter 1
Scorpion Sentinel
Final Fantasy VII Remake starts off with one of the tougher boss battles in the game, or at least, one of the longer ones. Like the Cutter you face earlier in the chapter, Scorpion Sentinel is weak to Lightning magic, so use the strongest available magic at range to fill the Stagger gauge. We recommend using Barrett for the majority of this fight, as Scorpion Sentinel can nullify most of Cloud’s attacks.
After you’ve shaved off about a quarter of its health, Scorpion Sentinel will jump on the wall and attack from a distance. Use Barrett to chip in damage, making sure to activate Overdrive when possible. At half health, it’ll jump back, bringing some debris along with it. Hide behind the debris as Scorpion Sentinel is charging its Tail Laser attack. A hit from it can bring you close to death from full health.
Once the attack has popped off, close in with Cloud, using Focused Thrust to build Stagger. While doing so, keep using Barrett for Lightning and Focused Shot whenever possible. Your goal here is to Stagger it, as Scorpion Sentinel will become more aggressive once it reaches a quarter of its health. Once low enough, it’ll start repairing, allowing you to launch an assault on the left and right legs. Do so quickly, and Scorpion Sentinel will topple over.
Chapter 4
Roche
You’ll encounter Roche twice during chapter 4, once at the beginning and another time at the end. The first fight takes place during the motorcycle mini-game and is fairly simple. Dodge and block Roche’s attacks when he’s at a distance, and attack when he’s close. Also keep your special ability in mind.
The second attack is much more difficult. At the beginning of the battle, Roche will restore your HP and MP with an Elixir, so you’re all topped off going in. This is a fairly simple boss battle, but it can feel tough if you don’t know what you’re doing. Switch to Punisher Mode and guard, waiting for Roche to attack. Once he does, you’ll unleash a counter-attack and deal massive damage.
Once he’s Pressured, use Fire magic and Focused Thrust to build the Stagger meter. Roche is weak to Fire, so this is preferred to Focused Thrust. Don’t go overboard, though. Roche is an aggressive opponent, and you’ll die quickly if you don’t keep your guard up. Continue blocking and chipping in Fire damage when possible, and Roche will go down.
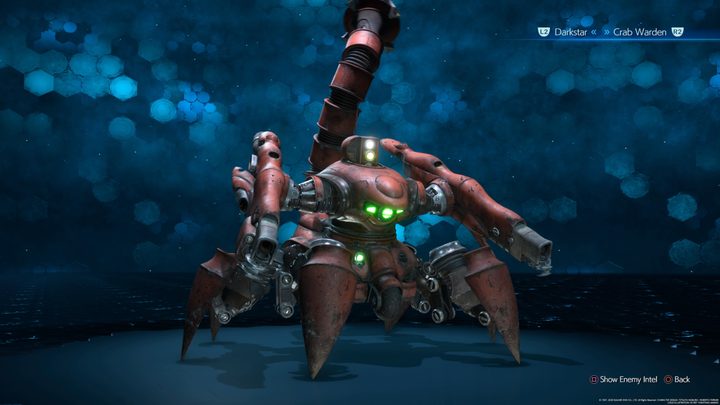
Chapter 6
Crab Warden
Crab Warden, like the other mechanical bosses you’ll face in the game, is weak to Lightning magic, so prepare for the battle with the strongest stuff you have. You’ll have Cloud, Tifa, and Barrett in your party. It’s best to pressure with Cloud and Tifa, leaving Barrett on healing and long-range attack duties.
Start the battle by taking out the four legs. Doing so will build Crab Warden’s Stagger meter, and after removing a few legs, it’ll enter full Stagger. In this state, Crab Warden’s Generator will be exposed, which is its weak spot. Focus your assault there, using Lighting magic and attacks like Triple Slash when the ATB gauge is full.
Like Scorpion Sentinel, Crab Warden will launch a devastating attack once its health is low. Thankfully, some cleverly placed crates can protect you from the assault. Again, target the legs, being sure to find cover whenever it gears up for a missile attack. Once they’re dealt with, Crab Warden will spawn a few Slug-Ray enemies, which, again, are weak to Lightning. Deal with them first before finishing off Crab Warden.
This is the first chance in the game to summon Ifrit, so if you can get the chance, make sure you do it. However, save Ifrit’s abilities for when Crab Warden is Staggered.
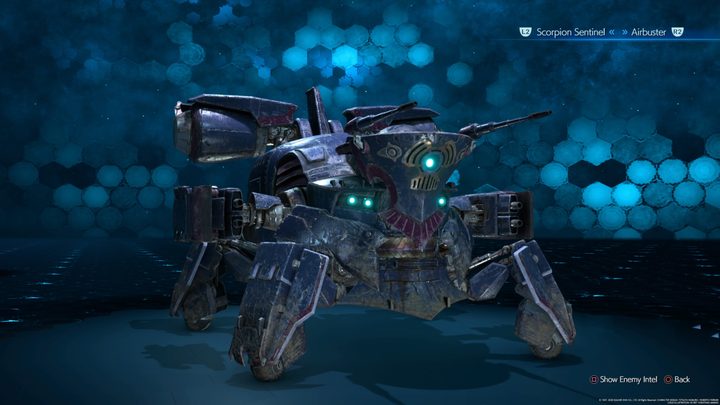
Chapter 7
Airbuster

Another robot means more Lightning magic. At this point, you should have Thundara unlocked, so make sure you’re using that instead of standard Thunder, as Airbuster is one of the tougher enemies in the game. You can make this battle much easier throughout chapter 7, though. You’ll pick up keycards throughout the chapter that allow you to weaken Airbuster in three ways: M-Units, A.I. Cores, and Big Bomber Shells. Select the latter two whenever possible; M-Units simply offer item drops before the battle.
It’s best dealing with Airbuster at a distance, so equip Barret’s weapon with the Elemental Materia linked with Lightning for a little extra oomph to your standard attack. At the beginning of the battle, Airbuster will block Cloud, Tifa, and Barret so they’re apart from each other. Keep switching characters during this phase to attack Airbuster’s back, using your strongest Lightning magic and ATB abilities when they’re available.
Eventually, Airbuster will head down the gangway and begin charging a Tankbuster attack. Quickly run to either side of the T-shaped platform to hide from the laser. A single hit is enough to kill you. After that attack, Airbuster will launch its hands out, which will attack you with electricity. Deal with them using Barret, paying attention to when Airbuster charges Tankbuster.
Once low on health, Airbuster will start launching Big Bomber attacks, which can wipe your entire party. Thankfully, if you got rid of as many shells as possible earlier in the chapter, it’ll only be able to launch this attack once. Dodge this attack, heal if necessary, and close the gap to finish off Airbuster.
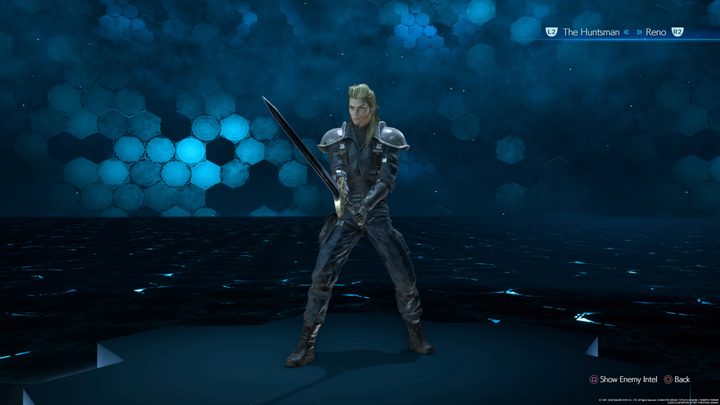
Chapter 8
Reno

Reno is another duel like the one with Roche in chapter 4. However, Reno doesn’t have any particular weaknesses, and magic does very little to build his Stagger gauge. The same rules apply as in chapter 4: Use Punisher Mode, guard whenever possible, and deal physical damage to build Reno’s Stagger.
The beginning of the fight is simple, but Reno will eventually throw out EM Mines that stun you. Take them out right away, as it can make squaring off with Reno tougher. You may want to equip Elemental-Lightning on your armor, too, to reduce the damage. Don’t put it on your weapon, though; Reno has great resistance to Lightning magic.
Be patient, dodge and counter when possible, and Reno should go down without too much trouble.
Rude
Reno’s partner, Rude, pulls most of the same punches, just without a stun baton to deal with. Despite being human, Rude actually has a minor resistance to Fire, though he’s weak to Wind. Unlike Reno, you’ll have Aerith in your party for Rude, which makes this fight pretty straightforward.
Let Cloud handle the up-close battle, while you, as Aerith, deal damage from a distance. Use the strongest Wind magic you have when possible, and heal if needed. After dealing some damage, you’ll get a cutscene, after which Rude gets a lot more difficult.
He’ll pound the ground and unleash a shockwave that’ll stun you, so dodge backward to avoid it. Late in the battle, he’ll crouch and start glowing. Don’t attack him here, as he’ll block the damage and counter you. Instead, wait for the glow to leave and continue attacking, using ATB abilities and Wind magic as they become available. As long as you heal properly, Rude will go down without much of a challenge.
Chapter 9
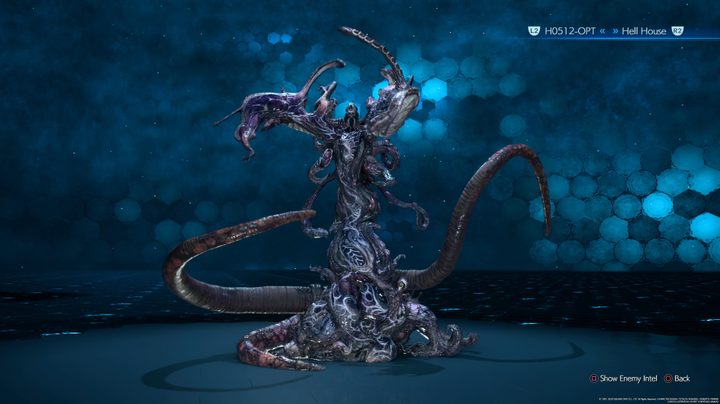
Hell House
Hell House is one of the most iconic bosses in Final Fantasy VII, and it’s one of the toughest in Remake. The key is knowing what type of magic to hit Hell House with as it cycles through resistances. You only have Cloud and Aerith for this fight, and Cloud’s physical attacks won’t do much. Across your two characters, make sure to have Fire, Ice, Wind, Thunder, and Poison magic equipped.
In the beginning, Hell House will cycle through different window colors, those being red, white, blue, and green. During this time, Hell House will absorb all magic of the corresponding color, red for Fire, white for Ice, blue for Lightning, and green for Wind. However, also during this time, Hell House will be weak to the opposite magic. For example, if the windows light up red, you’ll want to hit Hell House with your strongest Ice magic. Likewise, Wind and Lightning are opposed.
Because Hell House will constantly cycle through resistances, the only summon you should bring into battle is Chocobo and Moogle. If all you have is Ifrit and Shiva, don’t summon them. There’s too high of a chance that they end up healing Hell House rather than hurting it.
Between these cycles, Hell House will rain down chairs and launch stuffed bears, the latter of which will explode if you get too close. During the Chair Salvo onslaught, make sure to guard, not dodge. It’s hard getting a grip on where the chairs are going to land, so it’s better to guard, as a single hit can deal massive damage.
With a sliver of health gone, Hell House will expose its head and arms, opening it up to physical attacks. Be careful, though, as it’ll also gain the Hospitality ability, which sucks a character through the door, taking off a significant chunk of health.
At around half health, Hell House will start using an ability called God House Mode, completely shielding it from physical attacks. Chip in with Aeirth and wait for God House Mode to run its course. Hell House is vulnerable after it uses this ability, and its Stagger gauge builds much faster. Attack and Stagger, using your strongest ATB abilities once Hell House is open.
If that wasn’t enough, there’s a third phase that combines all previous phases. The windows will shine different colors, God House Mode will come into play, and Chair Salvo will be replaced with Heavensword, adding rockets to the flying chairs. Use the same techniques described above, setting Cloud as the healer and using Aerith’s ranged attacks and magic to deal damage. After about 20 minutes of fighting, you should be able to take down Hell House.
Chapter 10
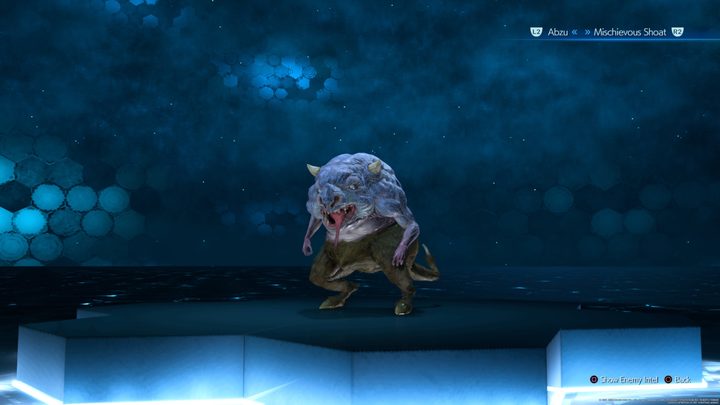
Abzu

Abzu is a walk in the park compared to Hell House. You now have Tifa in your party, and Abzu is weak to physical attacks, so you should be able to Stagger it quickly. It’s weak to Fire, but magic attacks do very little toward building Stagger. Rather, equip Cloud’s sword with Elemental-Fire to deal extra damage on your physical attacks. You should also bring Ifrit as your summon.
As for the fight itself, it’s pretty straightforward. Keep Cloud in Punisher Mode, countering Abzu’s swipes when they come. Focus on the horn first, as taking it out will push Abzu into a Pressured status. Follow that up with Focused Thrust and Focused Strike, and you should push Abzu into Stagger quickly.
There are three attacks you should be aware of: Backwash Spout, Backwater Blast, and Pounce. The first two are very easy to avoid, just pay attention to them when they come up. Get as far away as possible and dodge when Pounce is coming, though. If Abzu gets on top of you, you’ll become Bound.
About halfway through the fight, Abzu will cast Enrage, making him far more aggressive and upping the damage of his attacks. Stay consistent, countering attacks and dealing Fire magic, and Abzu should go down.
Chapter 11
Ghoul
Ghoul is easy as long as you know what you’re doing. It’s weak to Fire, so make sure you have your strongest Materia equipped. Also, equip Aerith with her Mythril Rod, and use Ray of Judgement to build Stagger. The key to this battle is paying attention to what form Ghoul is in. In physical form, it’s weak to physical attacks. However, it’ll change periodically to a ghostly form, where you can only hit it with magic.
Keep switching your tactics and guarding whenever Ghoul picks up objects from around the room to throw them at you. It shouldn’t take too long for Ghoul to enter Stagger. Once it does, it’ll be in physical form, so use your strongest ATB abilities to knock off a chunk of health.
After, Ghoul will start grabbing party members, leaving them in a Bound status. You don’t want to attack the Ghoul holding your party member, though. Instead, the real Ghoul will be on the opposite side of the room. Attack this one to release your Bound party member. Other than that, though, Ghoul pulls very few punches, and doesn’t deal much damage as long as you’re guarding and dodging.
Eligor

Like chapter 8, chapter 11 starts with an easy boss battle and ends with a hard one. Equip your party with Ice and Wind magic. Eligor is weak to Ice but not to Wind. Despite that, when Eligor flies into the air, you can quickly fill its Stagger gauge by hitting it with Wind magic. You may want to equip Steal on one of your characters, too. Eligor holds the Bladed Staff for Aerith, and this is the only point you can get it in the game.
The tough thing about Eligor is that it’s resistant to physical attacks (attacks on its wheel will bounce off). Eligor will go back and forth between AoE attacks on the ground to flying around the arena. Use the time on the ground to attack from the back — avoiding the AoE attacks — and building ATB. Once it flies, unleash Wind, Poison, and Lightning magic to build Stagger and bring Eligor to the ground.
If you don’t Stagger it quick, Eligor will start using Javelin Bolts, which rains spears on the arena. Hide behind some nearby shipping containers to avoid this attack.
Late in the battle, you’ll be able to start attacking the wheels. Focus all of your strength there, as taking out the wheels will quickly push Eligor into Stagger and allow you to finish it off for good.
Chapter 12
Reno and Rude
You’ve fought Reno and Rude individually; now it’s time to fight them together. The battle starts with Reno, and it’s the same as before: Elemental-Lightning on armor, counter-attacking, and strong ATB abilities. Meanwhile, Rude will bomb the arena in a helicopter. You shouldn’t worry too much about these attacks, though. Stick to the edges of the platform, and you’ll avoid the bomb rush entirely.
After Staggered for the first time, you’ll be able to shoot the helicopter with Barret. The helicopter will eventually come down, and Rude will join the fight, just at half health. Focus on him first, as his health is lower. Remember that Rude is weak to Wind, and he’ll go down quickly. Focus again on Reno, who shouldn’t pose much of a threat.
Chapter 13
Failed Experiment
Failed Experiment is easy as long as you have Elemental-Ice on Tifa and Barret. It’s very weak to Ice, and physical attacks do little damage. Other magic has no effect on Stagger, though, so spend your ATB charges on Ice during the fight. To begin, deal with the Unknown Entities, which will eventually bring out Failed Experiment. It’ll spawn more throughout the fight, but those pose little threat, so keep your focus on Failed Experiment.
This is a relatively simple battle. Focus on the Appendages and take them out. Once you do, Failed Experiment’s heart will show, allowing you to rush in and push it into Stagger. Keep repeating the process, using your Summon and Limit Breaks as they become available. Later in the fight, it’ll start using Plasma Discharge, spraying balls of energy around the battle arena.
Getting hit with one can take you out from full health. Dodging isn’t possible and guarding doesn’t do much. Instead, hide behind the nearby shipping containers. Keep repeating the process above, and you’ll be on your way.
Chapter 14
Abzu (again)
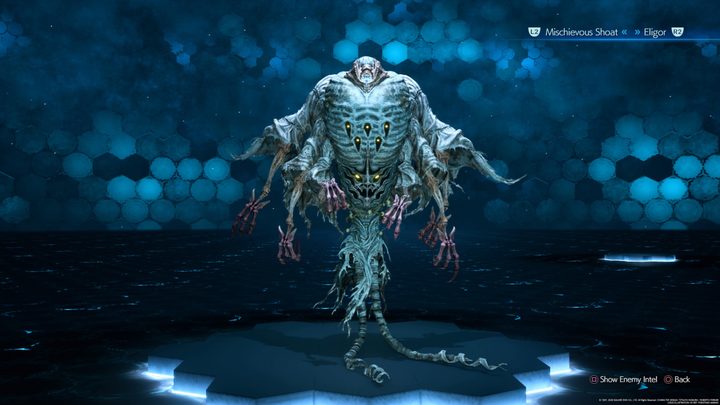
You’ve had Abzu, now you get to have Abzu with Shoats. Abzu isn’t any stronger and its attacks don’t deal any more damage, so use the strategy above to take it down. The only thing to keep in mind during this fight are the Shoats. Take them out first, which should be simple. The arena where this battle takes place is huge, so you can run away to deal with Shoats without worrying too much about Abzu.
Chapter 15
Valkyrie

Valkyrie is weak to Lightning and Wind, so have those tied with Elemental Materia on Cloud and Barret. Use Barret at the beginning of the fight, with Cloud and Tifa on magic duty. It’ll be far away, so physical attacks are worthless. Stagger it once, and close in with Cloud and Tifa to deal damage.
Out of Stagger, Valkyrie will launch a drone that flies around and shoots a laser at you. Focus your attention on it first before moving back to Valkyrie with Barret. The same rules apply as above. However, Valkyrie will also start using a Drill Drive move, where it launches into the ground. Avoid this attack by dodging, and move in with Cloud and Tifa to deal damage. It’ll be stuck in the ground for a moment after using Drill Drive.
Keep it up, and Valkyrie will go into Stagger again. Once out, it’ll start using its strongest attacks. The first is a buzz saw mode, where Valkyrie will move around the area spinning its arms. Dodge this when it comes your way, and you should be fine. The more difficult tactic is when Valkyrie starts using its shield.
This shield blocks most damage. Instead of attacking, find the blue vertical laser in the arena and lure Valkyrie toward it. If it gets hit, the shield will go down and the Stagger bar up. One hit and you should be able to end the fight. If not, rinse and repeat.
Chapter 16
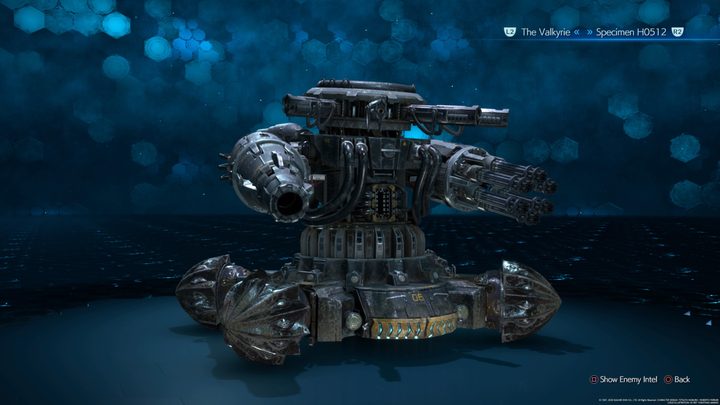
Specimen H0512
Specimen H0512 is pretty easy. This is a physical boss battle, but know that H0512 has a slight resistance to Lightning. Start by taking out the claw, which will quickly push H0512 toward Stagger. Keep attacking, and you’ll eventually get him there.
Throughout the battle, it’ll release enemies into the arena. Focus on them first, then back on H0512. Eventually, the claw will grow back, so again, take it out to build the Stagger bar. Keep in mind that it’ll get more aggressive the more health it loses, so use Punisher Mode while guarding to counterattack. As long as you don’t get too greedy, this is a simple one.
Chapter 17
Swordipede
Welcome to hell, otherwise known as chapter 17. You have four boss battles in a row, and they’re not easy. That said, this first one is straightforward. Your party will be split between Cloud and Barret, and Aerith and Tifa. Swordipede will move back and forth between the two parties, and you will, too.
Swordipede isn’t special — it has no weaknesses or resistances — but it can be tough to hit. In the first party, use Barret to attack at range and only switch to Cloud when you have some time to attack the head. The same goes for your second party. Aerith attacks at range, and Tifa chips in when possible.
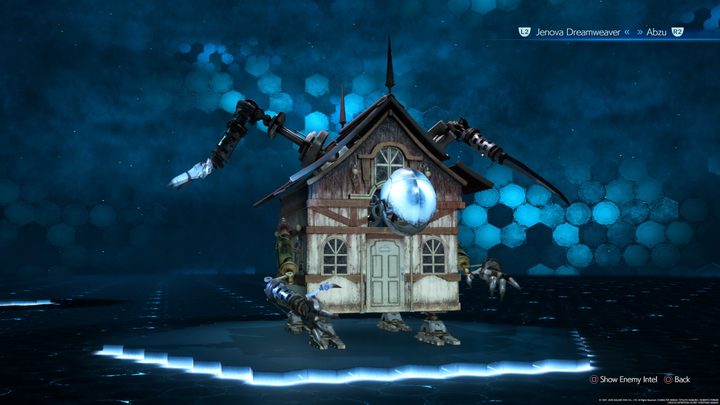
Jenova Dreamweaver
Jenova Dreamweaver is annoying. She’s resistant to magic attacks, and she’ll counter physical ones. You’ll want to use Aerith throughout this battle, as she can attack from range without being countered. Stick on Aerith for most of the battle, using Cloud and Tifa for ATB abilities once their meters fill up.
You’ll need to dodge behind a pillar whenever you see Black Light charging up. Once the coast is clear, rush in and deal with the left and right tentacles, which will push Dreamweaver into Stagger. Unleash everything you got while in Stagger. If you weren’t able to take them both out before another charge of Black Light, run back and hide again.
At around half health, a bunch of tentacles will spawn around the arena, which you need to take out first before attacking Jenova. There are about 30 of them, so switch to Cloud and run around cutting them down. Triple Slash works well here, as you can take out three in one go if you aim properly. After they’re gone, go back to the strategy you were using before.
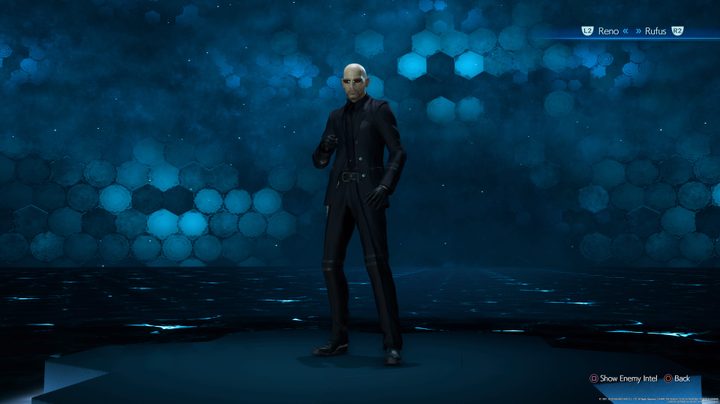
Rufus and Darkstar
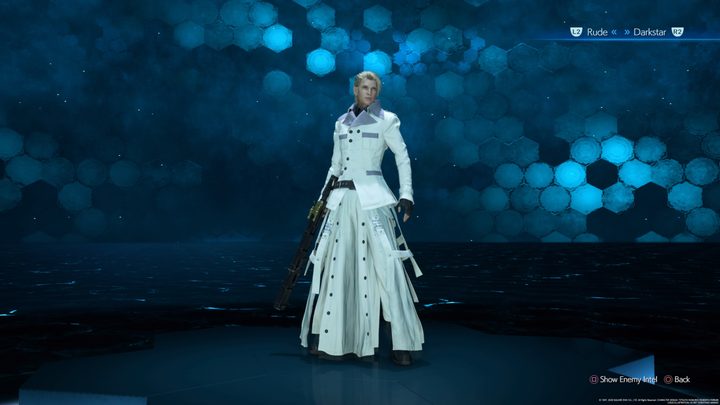
This battle is really difficult, especially in the beginning. You’re fighting with Cloud solo, but you have two opponents: Rufus Shinra and his dog, Darkstar. Darkstar is basically a more powerful guard dog, and you should take him out first. He’s not hard to defeat on his own, but with Rufus attacking you, it can be tough.
That’s the prerequisite. With him out of the way, it’s time to face Rufus. He has resistances to just about every status effect, as well as magic attacks. This is a physical battle, but don’t just go in swinging. Rufus uses two attacks, Guns Akimbo and Bright Lights, and between them, Reload.
Use Braver while Rufus is reloading, and you’ll instantly Stagger him. Don’t attack Rufus unless he is reloading or Staggered, as he’ll counter your attack and hit you. This fight is all about patience and timing, so hang back and use Braver when you have an opening.
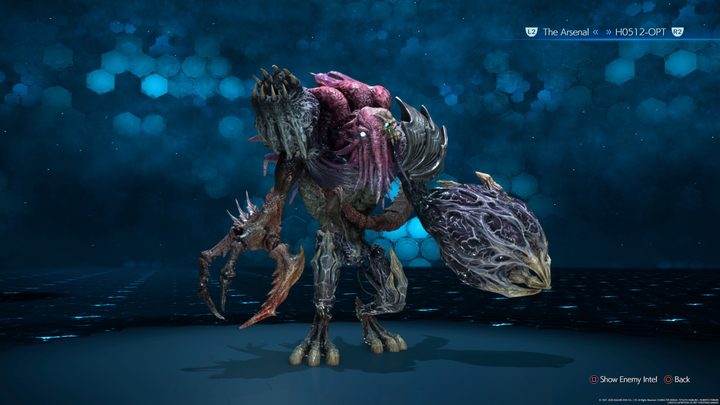
The Arsenal
If you thought Rufus was tough, get ready for The Arsenal. This boss is super tough, despite being weak to all types of magic. Start the fight by taking out the Barrier Drones so you can actually damage The Arsenal. Once they’re cleared, attack at range, using Ray of Judgement and Maximum Fury once they’re fully charged. Also, save Barret’s Limit Break until the end of the battle.
Keep the pillars around the room in mind, too. Hide behind them when The Arsenal uses Saturation Fire. Also pay attention to the floor, as The Arsenal will use Voltaic Discharge, which spawns electric circles around the room. Between these attacks, it’ll also charge Homing Laser. It deals serious damage, but takes about 10 seconds to charge. During this time, attack the cannon. It’s a weak spot, and you can take off significant health in a short time.
After a while, it’ll enter its second phase, where it’ll start moving around the arena. The only new move here is Firewall. The Arsenal will trap you between two walls of fire and begin charging its Pulse Cannon, which can kill you instantly. Thankfully, you can see Firewall coming pretty easily. Dodge out of the line of fire before the walls come up, and you’ll be safe.
Once low on health, the final phase starts. Your party will be trapped between Firewall with no way to escape. Pulse Cannon will start charging. Rather than run at The Arsenal, go behind you to hide behind some debris. Pulse Cannon will destroy it, and it’ll start charging again. You have less than a minute to finish off The Arsenal. Use Maximum Fury, Ray of Judgement, and Barret’s Limit Break, and hope for the best. If you don’t defeat it in time, Pulse Cannon will certainly wipe your party and you’ll have to start all over.
Chapter 18
Motor Ball
Chapter 18 is easier than chapter 17. Now, you only have three bosses in a row instead of four. The first is Motor Ball, which is the easiest of the bunch. This takes place during the motorcycle mini-game, so there’s nothing special about this battle when it comes to loadout.
Motor Ball has three wheels on each side, and your job is to take out all six to Stagger it. After taking out one side, slow down and quickly move to the other. Motor Ball will raise the damaged side and slam it on the ground. Otherwise, just pay attention to whenever Motor Ball is charging attacks and block or avoid them. Once Staggered, close in and deal damage. You should only need to repeat this process a few times.
Whisper Harbinger and its three friends
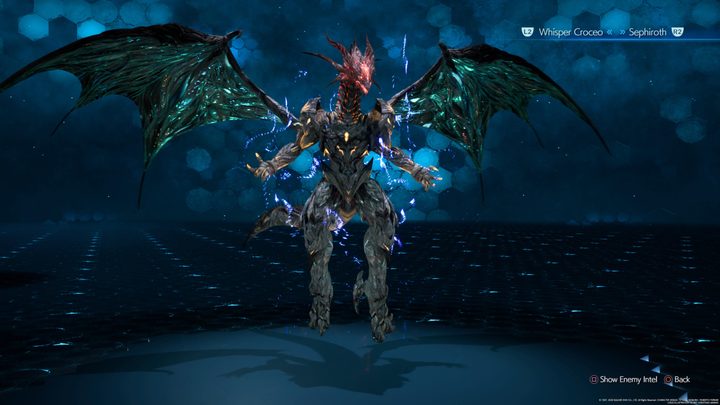
You had an easy one, now time for a tough one. Whisper Harbinger is a huge enemy, but you never attack it directly. Instead, it has three minions: Whisper Viridi, Whisper Croceo, and Whisper Rubrum. For the first stage, you’ll need to fight all three of them, taking them out one at a time. Although it sounds tough, these forms don’t deal much damage and mostly attack physically, so Punisher Mode should come in handy.
Then, you’ll have to fight each one individually. In this stage, each Whisper will deal more damage and unleash attacks faster. Same as before, counter incoming attacks and work to Stagger. Once defeated, the Whisper will stay in a Staggered state. Continue attacking it to deal damage to the Whisper Harbinger.
Finally, all three Whispers will combine into Whisper Bahamut. At this point, you should have access to Counterstance, so use it to deflect attacks and build the Stagger bar. Whisper Bahamut is scary, but it doesn’t pose much of a threat. Take it down, and you’ll have to face the Whispers on their own again.
This phase is similar to when you fought the Whispers individually. Push them into Stagger and continue attacking to deal damage to the Harbinger. Once they’re dealt with, Whisper Harbinger will have just a little bit of life left, so finish it off with magic or Aerith’s attacks.
This battle is tough simply because it’s so long. Make sure you heal properly and block whenever possible. Although it may seem easy in the beginning, you’ll quickly find your party low on health with few ways to heal if you expend all your MP. Take this one slow.
Sephiroth
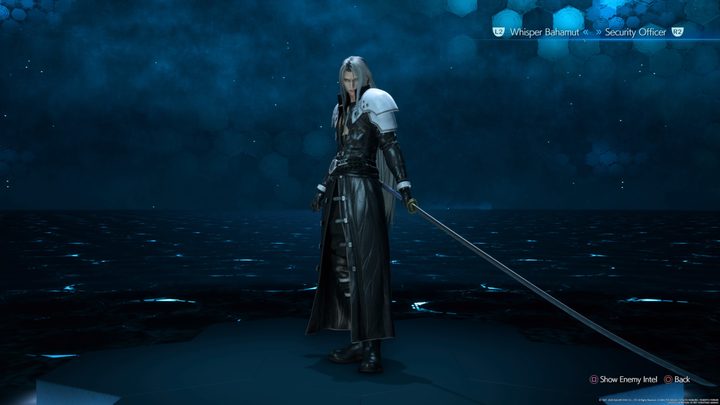
Sephiroth combines all of the challenges you’ve faced thus far. He uses all forms of magic, so equip Elemental-Fire and Elemental-Ice to Cloud’s armor if possible. In the beginning, it’s just Cloud, and the fight is mostly a duel. Counter attacks when they come, being careful not to go overboard into a combo.
Whenever you see an attack coming, use Counterstance. The only exception is Scintilla. This is Sephiroth’s version of Counterstance, so don’t attack when he’s using it. Eventually, as long as you’re countering, he’ll become Staggered and another party member will join you. During this phase, he’ll start casting a lot more magic, so be careful if you don’t have a resistance to it.
At around half health, Sephiroth will bring out a black wing, and your third party member will join. He’ll start using Octosalsh, which will deal eight massive blows to whomever it targets. Keep Manawall up here if you can, and heal immediately after. This move can easily wipe your entire party.
Continue the same routine of blocking and chipping in physical damage when possible. Once very low on health, Sephiroth will start counting down from 10. If the countdown reaches 0, a comet will come down and kill your entire party, full stop. You can prevent that from happening by using your strongest ATB abilities, though.
There are two other attacks in this final phase, Shadow Flare and Heartless Angel. The latter sends a sword down and creates a large, damage-dealing circle. Run as far away as possible when this attack comes up. For Shadow Flare, avoid the energy balls that form around the arena.
Again, block and attack when you have an opening, using your Limit Breaks when they become available. Sephiroth is difficult, and the battle takes a long time. Like the previous battle, take this one slow, wait for your opening, and pay close attention to healing.


