
One of the key features of vampires, at least in their original depiction, is their ability to take the form of a bat to quickly traverse the night. In V Rising, you technically can shapeshift but it won’t make a big impact on your ability to travel. You have all the normal weaknesses of the mythical creature, such as aversion to sunlight and the need to suck blood in order to survive, but you must stick to normal methods of transportation most of the time. Getting on a horse certainly speeds up your traversal, but the map is quite large and sometimes you just want to get from one side to the other quickly.
Fast travel appears in V Rising in two different ways: Waygates and Cave Passages. Both of these have their own benefits, drawbacks, and ways to unlock them. However, as you grow in power, you will need to visit the far-reaching areas of the world much faster and much more often, making fast travel invaluable. Here’s how both methods of fast travel work in V Rising and where you can find them.
How Waygates work

Waygates are the most traditional fast-travel method in V Rising. You will come across them naturally as structures on the map, indicated by a gate with a swirling icon on your map. Once you get close enough to one to ping it on your map, you will see its name and it will remain there permanently. By interacting with a Waygate, you can select any other that you’ve already found to instantly transport yourself to that location. Sounds good, right? Well, there are a few catches.
The first is obvious — in order to use it you need to find any Waygate you want to use and travel to it, but there aren’t a ton in each area. There’s almost always one close to any point of interest you are likely to want to visit, but you will still be hoofing it a bit. The second drawback is the big one. You are unable to go through any Waygate so long as you have anything on your character besides your equipment or consumables. That means you can’t quickly transport crafting resources like wood, fibre, stones, or anything else you’ve been collecting. If you’re going out to scavenge for resources like this, a Waygate can get you to a spot to collect, but you’re on your own getting back to your castle.
One advantage to Waygates is that you can actually create your own. Once you’ve beaten the boss named Polora the Feywalker in the Gleaming Meadows, you will get the blueprint to craft your own Waygates and place them in more convenient locations. To build one, you will need:
- 10 Gem Dust
- 20 Copper Ingots
- 20 Planks
- 200 Blood Essence
Waygates that you build can also only be used by you, so if you’re on a PvP server, don’t worry about an enemy player warping right next to your base if you place one there.
All Waygate locations
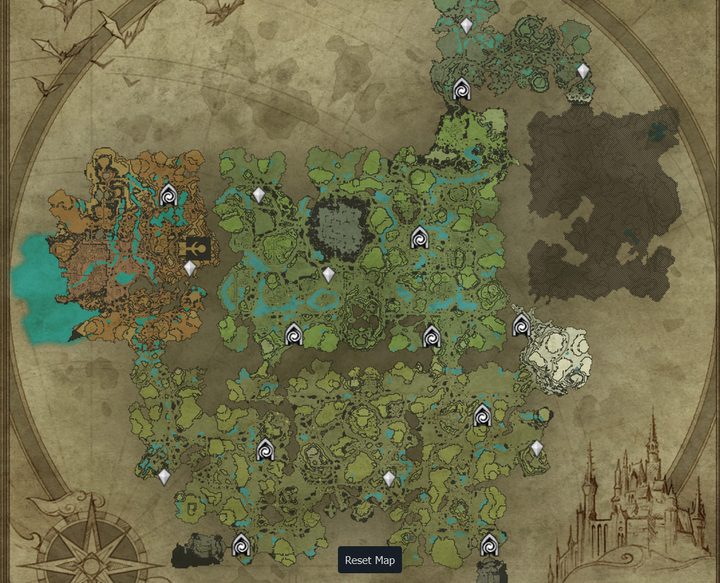
There are 10 default Waygates to find in V Rising, though you can of course build more. The standard ones are located in the following places marked by the swirling icons on the map above:
- There are four Waygates in the Farbane Woods, located on the bottom section of the map. The downside is that they are all essentially on the far corners of the region, making them not super useful for getting around the interior of the zone itself.
- Up in the middle area, Dunley Farmlands, are another four Waygates. Three of them are almost in a line along the southern portion, with only one up near the middle, again not offering a ton of utility for the zone as a whole.
- In Silverlight Hills, you’re stuck with the single Waygate by default. If you intend on spending a lot of time in this area, you’ll need to make more gates yourself to avoid long, dangerous treks.
- The last solo Waygate is up in the Cursed Forest, and is right near the entrance to the zone. The same thing could be said here as with the Silverlight Hills Waygate, though this initial fast-travel point is a bit more useful.
How Cave Passages work
Cave Passages are the alternative form of fast travel at your disposal in V Rising. Think of these as one-way fast-travel points. Each one you enter can only move you directly to a predetermined exit, making them less versatile than Waygates. You can spot these caves as glowing red cracks in the landscape, and can use them even without discovering the exit.
The downsides of Cave Passages are in their strict limitations, but the benefit is that you can freely take them holding resources. To make the most out of them, you can try to build your castle close to the entrance, or exit, of one of them to more easily transport goods.
All Cave Passage locations
By comparison, there are only four Cave Passages to the 10 Waygates in V Rising — four entrances and four exits. Since you can only go into the entrance points, unless you immediately turn around after exciting one, we’ll just tell you where the entrances are and where they dump you out. Again, reference the map above and look for the gray crystal icons to spot the Cave Passages.
- The Cursed Forest has two entrances. The one to the far north, directly above the Waygate, takes you all the way down to the far southwest point in the Farbane Woods. The other, more to the east, shoots you over to the northwest area of the Dunley Farmlands.
- From the center Cave Passage in the Dunley Farmlands you can zip straight down to the middle of the Farbane Woods.
- Lastly, the single Cave Passage in Silverlight Hills will spit you out on the far east coast of Farbane Woods.


