Call of Duty Black Ops: Cold War has finally released the next chapter in its zombie mode. Firebase Z takes players deep into the Vietnamese jungle searching for Samantha Maxis, an operative trapped in the Dark Aether by Doctor Peck. Your mission is simple — get in, find Maxis, kill thousands of zombies, and get out. Firebase Z comes with all the fixings that make any COD zombie map playable. Most notably is the return of the Tombstone perk, a popular safety-net perk from past zombie modes.
An essential part of any new Zombie map is its Wonder Weapon and the steps involved in finding it. Firebase Z introduces the Rai-K 84, the latest in a long line of Wonder Weapons. Here’s how to find and use the Rai-K 84 on Firebase Z.
- The best multiplayer games on the PS5
- The best zombie games of all time
- The best Call of Duty games, ranked from best to worst
Die Machine brought us the D.I.E Shockwave Wonder Weapon with four different mods players could attach to it. Now, in Firebase Z, we’ve been gifted what some are calling the best Wonder Weapon to date. The Rai-K 84 is what it sounds like — a combination of the Ray Gun and the Ak-47. While you can find it in the mystery box, you can also follow this multi-step process to obtaining one for yourself every time.
Step 1 — Turn the power on
It has been the first objective in every game of zombies since Verruckt from Call of Duty: World at War. You will spawn in a small village area where you’ll ultimately come to Pack-a-Punch your guns. However, you’ll need to head through a teleporter to reach Firebase Z itself. Purchase the door in the center of the village. Head up the stairs, over the balcony, and through the teleporter.
Now you’re in Firebase Z. Three paths lay ahead of you. Each leads to a different reactor core and will have you buying two separate doors for each one. Finally, you’ll have to spend 500 points to initiate the reactor. Once activated, you’ll have to kill zombies near the reactor to power it up while subsequently defending it from taking damage.
Players should do each of these reactors back-to-back-to-back over three or four rounds. For the best results, head up the middle path first. This is the most challenging reactor to defend, so it’s best to do it as early as possible. You’ll also be one step ahead in the Wonder Weapon process.
Once all three reactors have been activated, you can return to Ravenov and Pack-a-Punch your weapons. Now, the hunt for the Rai-K 84 can begin.
Step 2 — The Blueprint

From the teleporter in Firebase Z, head down the right path until you find the Weapons Lab in the back right. This will be your base of operations for everything Rai-K 84 related. On the wall in the right corner will be a large blueprint. Interact with it to add it to your inventory. There’s also an upgrade mannequin in here as well.
Step 3 — The eye

You’ll now be looking for a scientist lost somewhere in Firebase Z. You’ll need his eye to complete a retinal scan on the computer in the Weapons Lab. From the teleporter, head down the left path and out into the Scorched Defense. Hug the right side of this area until you find a body propped up against a tank. You’ll be able to interact with it — the corpse of our missing doctor. Needless to say, you’ll be taking his eye by force. Be careful though, a group of zombies will spawn in on top of you. Killing them will effectively end the round you’re on (assuming you’ve kept one zombie alive to complete these steps). Return to the Weapons Lab and use the eye at the computer.
Step 4 — The keys and the Mimics

A drawer will pop open once the eye is scanned. Inside will be a set of keys that open the lockers in the Barracks. These lockers can be found in the tents on the Barracks’ left and right sides after heading up the middle path. You will want to keep one zombie alive at the end of the round, ideally a crawling one, as multiple Mimics will spawn on this step.
Open one locker at a time until you hear the sound of a spawning Mimic. Kill it and see if it drops the next item you need, the Barrel Assembly. Dr. Strauss will confirm when you’ve picked up the piece. However, if the Mimic doesn’t drop it, open another locker. Continue opening lockers and killing Mimics until you find the Barrel Assembly.
Step 5 — the Aetherium Converter
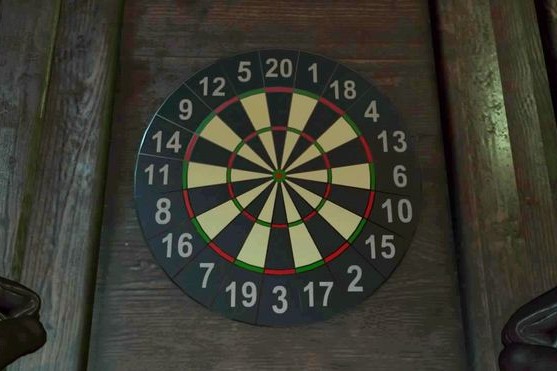
This is, by far, the most challenging step in the entire Wonder Weapon process. Back in the Weapons Lab, you’ll be able to interact with the computer. A radar-looking wheel will activate, and a ‘blip’ will move both clockwise and counter-clockwise around the wheel. You’ll need to keep track of where to blip stops. It will make three stops in total; each stop correlates to segments on a dartboard. You will find the dartboard in the Mess Hall left of the Pack-A-Punch machine.
The best way to memorize the segments is to have a picture of the dartboard cued up on your phone or laptop. Save the image above to whatever device you’d have handy when playing zombies. The absolute best strategy is to watch the blip until it passes over segments numbered 20, 3, 6, and 11. These are your North, South, East, and West points on the dartboard. You’ll have an easier time figuring out which segment the blip landed on as it relates to one of these four points.
Once you’ve established which segments the blip landed on, you’ll need to shoot those segments in that order on the Mess Hall dartboard. Once you’ve shot all three, shoot the bull’s eye, and the center will open. You must use a weapon that can shoot one bullet at a time. Burst fire weapons will register incorrect hits as they strike the same sport two or three times.
Step 6 — The Power Cell

You’re nearing the end, don’t worry. However, you will have to progress until round 15 to complete this next step. This is where you’ll first encounter the Mangler Zombies. These Terminator-like enemies are equipped with a high-powered arm cannon that shoots flaming charged-projectiles at you. They pack a serious punch. These atrocities will be carrying the Power Cell in their arm-cannons.
Just as they’re charging up, concentrate your fire on the Manger’s arm to stagger it. Then, open fire and break its armor off. If done right, the Mangler will drop the Power Cell. It may be concealed in the Mangler’s body, so keep your eyes peeled.
Once you’ve found it, take it back into the Weapons Lab and place it on a charger on the right side of the room. You will have to let the Power Cell charge for one FULL round. You don’t need to kill zombies near it or interact with it in any way. Just place it at the end of the round you found it, survive the next round, and pick it up at the beginning of the third.
Step 7 — Put it all together

You’ll have a small window of opportunity to grab the Power Cell once it’s done charging and construct the Rai-K 84. Interact with the workbench to build the Wonder Weapon. Now you have the all-powerful Rai-K 84 and are ready to lay waste to every Mimic and Mangler zombie in sight. The Rai-K 84, in its base form, should carry you up through round 20. Afterward, you’ll need to Pack-A-Punch it three times to unlock its full potential.
The Rai-K 84 has an under-barrel attachment that shoots a red plasma-like projectile. Fire this into a crowd of zombies and open fire on it. It will kill everything in sight and heavily damage Mimic and Manglers. The best strategy for the Rai-K’s alternative ammo is to create a chain of zombies behind you. Then, fire the projectile at your feet to lure the zombies into it. Don’t worry; this can’t damage you. Turn around and open fire as the red orb slows the crowd. Shoot the orb to eviscerate nearby zombies.
Not only is the Rai-K 84 essential for climbing high rounds in Firebase Z, but you’ll also need it if you plan on attempting Firebase Z’s main quest/easter egg to rescue Maxis. As of now, there are no mods or upgrades for the Rai-K 84 outside of Pack-A-Punching it. We’ll see what future updates add to the mix. Perhaps the Rai-K will receive the same treatment as the D.I.E Shockwave.
Editors' Recommendations
- You can get Call of Duty and Alan Wake with PS Plus in July
- The best zombie games for Xbox One
- Call of Duty: Warzone and Black Ops Cold War AMP63 pistol: How to unlock it
- Call of Duty Outbreak Zombies: Pro tip guide
- Call of Duty: Black Ops Cold War/Warzone Season 3 brings new maps and weapons