Call of Duty Black Ops: Cold War‘s latest undead experience, Outbreak Zombies, is the most immersive one yet. Teams of four will warp between maps as they complete objectives, upgrade their gear, and vanquish the undead. Taken at face value, Outbreak Zombies has one simple goal: Complete the main objective and get to the beacon. Yet Outbreak Zombies is so much more than that.
Players will learn the basics rather quickly, but there are strategies, formerly reserved for the pros, that they need to know. We’ve assembled a guide full of advanced Outbreak Zombies strategies — an Outbreak Zombies pro tip guide, if you will — put together by a dedicated team of Outbreak players. We’ll be updating this routinely as new and better strategies are discovered.
See more:
- The best zombie games of all time
- Call of Duty: Black Ops Cold War’s second season includes a bigger zombies mode
- How to find the new Wonder Weapon in Firebase Z — Black Ops Cold War Zombies
Outbreak Zombies: Advanced objective tips
Defend on Golova: Block the doors
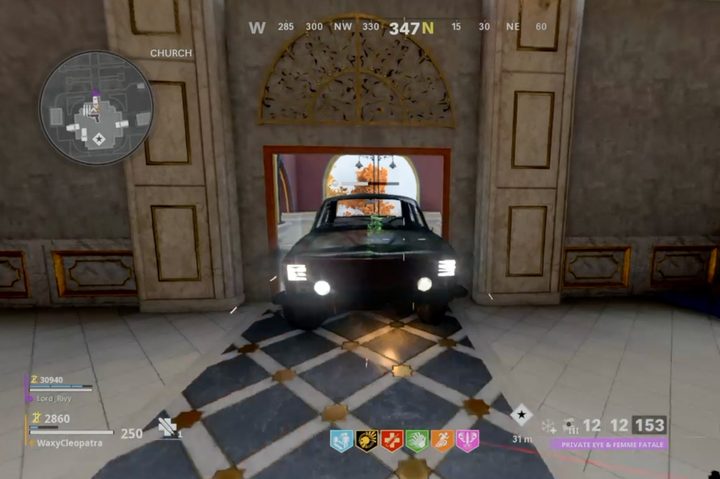
Defend can get crazy, especially on higher rounds and tight spaces. When the squad gets Defend on Golova, they’ll have to hunker down in the church at the back of the map. There are three main entrances to the church and two narrow hallways in the back. Zombies can also climb up from the outside and come through the windows in the very back. Basically, there are more points of entry than players can realistically cover. However, we hold the secret.
All you’ll need are three healthy vehicles. Drive right up the front steps to the church, or enter through a breach in the outer wall on the right side (facing the church). Drive the vehicle through the doors, and leave it parked diagonally in the doorway. Most of the vehicles must remain outside. We’ll explain why in a moment. You can use motorcycles to block the door by parking it parallel with the doorway. Follow this simple rule: If you can’t squeeze by, neither can the zombies.
With all three main entryways blocked, climb up the back of the church and enter through the roof to start your defense. Zombies will only enter the church through the two narrow hallways on the sides and from the back behind the altar. A four-person team can easily hold the hallways and stairs as zombies funnel in.
Players cannot block these inner doors as the vehicles will disappear once the Defend starts. That’s why it’s important to keep most of the main entry-blocking cars outside. (See image above.) Even if these cars are destroyed, they’ll still keep zombies from entering the main doors. Megatons can still pose a threat, but the slow drip of incoming zombies will make them easy to deal with.
Defend on Alpine: Get on the roof
While on the topic of Defend, let’s talk about holding the ski lodge on the snow-capped mountains of Alpine. Your first high-wave Defend on Alpine probably didn’t go very well. Zombies can enter the building from every door, window, and opening, making it impossible to hold any lane while inside. However, players shouldn’t be inside the ski lodge when defending. They should be on the roof. Here’s how and why.
Head up to the second floor of the ski lodge. Mantle on top of the snack bar, where the crafting table is, then jump up on the steel air vents and through the window. You’ll now be on the middle roof of the ski lodge. Head to the far right side and look down through the window. You’ll have a clear view of the machine and can easily keep zombies off of it.
The best part about being on the roof (and why it’s the only way to win high-round Defends on Alpine) is zombies can’t swarm you. The only thing players have to worry about is the occasional plague hound or lone zombie making the jump from the snack bar to the roof.
Don’t leave this position. As tempting as it may be to grab salvage and drops down below, it’s too risky. The only reasonable excuse for leaving the roof is to grab max ammo, and that’s only if you’re completely out. One player can even keep an eye on the roof entrance and warn teammates about any incoming zombies.
You will need a weapon with enough range to reach the machine. A properly set up Hauer 77 shotgun can do the job. We’ll touch on that later in this article. Wonder Weapons and ARs will also get the job done.
Escort and Dead Wire
Dead Wire is, arguably, the best weapon mod currently available in Outbreak Zombies. When it triggers, it’ll zap and stun hordes of incoming zombies, making for easy pickings. Dead Wire helps in all situations, but it’s instrumental during Escort missions. Here’s why.
Zombies approach in large groups from one singular direction during an Escort. Besides Elites, Dead Wire should be able to zap and damage the entire group before they get close to the rover. Furthermore, when approaching the final anomaly, you can shoot your Dead Wire right at it to zap zombies before they ever show their decaying faces.
Retrieve: Pre-position vehicles
Retrieve is the most difficult of all the Outbreak Zombies objectives. Grabbing the canisters isn’t the hard part. It’s returning them that can prove challenging, especially on higher rounds. Here’s how to make that easier.
Once you’ve played Retrieve on each map a few times, you should have a general idea of where each canister will spawn. Whether on Alpine, Golova, Ruka, or Sanatorium, you’ll want to grab three vehicles. Leave two of these vehicles in the general vicinity of Canister A and Canister B. Make sure they’re pointed toward the rocket so all you’ll have to do is get in a drive. Do not leave the vehicles too close to the canister spawn spot; they’ll end up destroyed in the crossfire.
Finally, leave the third vehicle back by the rocket. Begin the objective and go on foot to whichever objective you feel is easier. Grab the canister and hop in the vehicle you’ve left nearby. Drive up to the rocket and deposit. Then hop in the vehicle you left by the rocket and drive down to the next canister. Now you’ll have two means of escape from the second objective.
Getting a Retrieve between rounds 1 and 5 is a good time to grind points, salvage, and equipment before the timer runs out. Bring the second canister back to the rocket but don’t deposit it. Instead, leave it nearby and spend the rest of the time killing the infinitely spawning zombies. Deposit the canister with 30 seconds remaining for an added safety net.
Players may also choose to stockpile vehicles near the rocket instead of guess where the canisters will spawn. However, this strategy makes them more susceptible to Tempests.
Memorize the objective/map cycle
The first six waves of Outbreak Zombies will randomize the main objectives. However, they’ll cycle through the same pattern for the remainder of the game. For example:
- Wave 1 — Holdout
- Wave 2 — Eliminate
- Wave 3 — Defend
- Wave 4 — Retrieve
- Wave 5 — Escort
- Wave 6 — Secure
- Wave 7 — Holdout
- Wave 8 — Eliminate
- Wave 9 — Defend
Do you see what we’re saying? If you get Holdout on wave 1, you’ll get Holdout on waves 7, 13, 19, and so on. Use this trick to prepare for the next objective before warping. For example, if you know you’re about to get a Holdout on Golova, you may want to trade out that Cruise Missile for a Sentry Turret or Death Machine.
Outbreak Zombies: Pro loadout tips

Weapon mod pairings
Weapon mods have been intriguing players since their inception in Die Machine. However, the question is, which are best for Outbreak Zombies? Dead Wire, CryoFreeze, and Brain Rot are the only ammo mods a successful squad needs to be running. Here’s why.
Dead Wire is so lethal because it can kill an entire train of zombies at once. It stuns and holds them in place, leaving them open to damage from other players. Only one member of the squad needs to be running Dead Wire, though.
CryoFreeze is the second-best ammo mod for a similar reason. Anything that can slow down zombies on high rounds is going to aid in survival. Fully armored zombies run way faster than they should. CryoFreeze will hold them in place. Fully upgraded, CryoFreeze will also trigger on most Elites. While it won’t freeze Megatons and Krasny Soldats in place, it will cause consistent effect damage. Only one other squad member should be running CryoFreeze.
Brain Rot has been a fan favorite since Die Machine. Two players running fully upgraded Brain Rot and Elemental Pop can, in theory, recruit an army of zombies to do their bidding. Brain Rot can also change Manglers, Mimics, and Tempests to fight on your side. Brain Rot also triggers far more often than you’d think, especially if it’s the first bullets fired out of your gun after the 30-second cooldown. If you know you’ve got a Brain Rot cocked, seek out an Elite in a crowd of zombies and change them. It can save you valuable ammo as well.
Best field upgrade combos
Your field upgrade is going to make or break your Outbreak Zombies experience. The best field upgrades in Outbreak Zombies are Healing Aura, Ring of Fire, and Frenzied Guard. Here’s why.
Healing Aura, when fully upgraded, will heal any downed teammate from anywhere on the map. Furthermore, it will save teammates from going down by fully healing them and keeping them healed for 10 seconds. When the squad is getting overrun during a Holdout, Healing Aura will keep them alive. Only one member of the squad needs to be running Healing Aura, and it should be the squad member who won’t use it on themselves (i.e., your best player).
Ring of Fire is self-explanatory. Any seasoned Cold War Zombies player knows exactly what it does and why it’s the best field upgrade. Two squad members should be running Ring of Fire and staggering them during difficult challenges like Holdout or Defend. Make sure your squad has a “quarterback” to call out who should cast Ring of Fire and when. They should be calling the plays in general.
Frenzied Guard, when activated, will make all zombies target you for 10 seconds (15 when fully upgraded). It will repair all your armor as well. Furthermore, any damage you take will apply only to your armor, which repairs upon killing zombies. Where Ring of Fire is an offensive field upgrade, Frenzied Guard is defensive. You’ll be practically invincible for 15 seconds. Because all attention will be on the Frenzied Guard player, they should also be the one running Dead Wire.
The Hauer 77
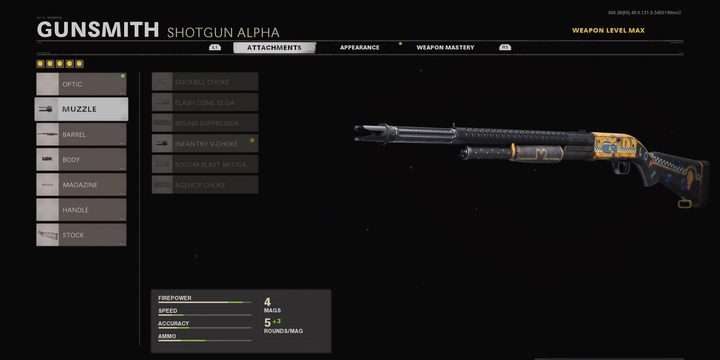
The Hauer 77 Shotgun is the best weapon in Outbreak Zombies other than the Rai-K 84, and even then, it’s close. With the right attachments, the Hauer can maintain range while one-shotting most normal zombies and making mincemeat of Elites. It’s up to players if they want to spawn in with an optimized Hauer or wait for one to drop in game. With luck on your side, you might find a Legendary Hauer on the corpse of an Elite enemy or in large loot boxes. Here’s the class setup:
- Muzzle — Infantry V-Choke
- Barrel — 25.2 Task Force
- Body — Ember Sighting Point
- Magazine — STANAG 8 Round Tube
- Stock — Marathon Pad
The only downside to the Hauer is when it comes to Manglers and Deadshot Daiquiri. Deadshot locks onto the enemy’s head. However, the Mangler’s weak spot is his arm cannon. While it’s easy to pull off the Mangler’s head while holding down the trigger of an AR, the pump-action Hauer proves difficult. Otherwise, the Hauer is a must-use weapon, whether you spawn in with the above loadout or find one in game.
Ready your weapons
This is a quick tip but one worth mentioning. At the beginning of each wave, pull out and ready your secondary weapon. You may have noticed a brief weapon animation that triggers the first time you pull out your secondary weapon in Outbreak Zombies. This resets with every new wave. Get this animation out of the way before you start engaging zombies.
Outbreak Zombies: Pro looting tips

When and when not to loot
Outbreak Zombies, while enjoyable, can drag at times, especially in the early stages. Players should only spend time looting during wave 1. Furthermore, they should only loot until they have enough money to Pack-a-Punch their primary weapon. Once everybody has Pack-a-Punched once, it’s time to focus on primary objectives and HVT side missions (referred to as Skull and Bones in this article).
After wave 1, there is no reason to spend time looting. Players will get all the salvage and points they need from main and side objectives. They should be able to make it to wave 6 in under 30 minutes with an Epic (or better) triple-Pack-a-Punched weapon and every perk.
Of course, this isn’t to say you shouldn’t loot along the way. We’re saying there’s no need to scour every corner of the map on round 3 for loot. If you hear a loot box on your way to the main objective, by all means, open it.
Keep items marked
Marking items for your teammates is helpful for letting them know if you’ve found a perk can or self-revive you don’t need. However, those marks don’t last long, and those items will disappear quickly. If you stand by an object and keep marking it, it won’t disappear. To be safe, keep spamming the mark button until your teammate arrives and picks up the item.
Mark the Aether Orb
While on the subject of marking, when you or a teammate finds the screaming Aether Orb, mark it before shooting it. When it moves, you’ll be able to keep track of it without keeping it on your mini-map. Remember, these marks don’t last long. You should still try your best to keep up. You can still mark the orb while it’s moving, but it’s not easy.
Don’t upgrade your secondary
Don’t waste points and resources upgrading your secondary weapon. Focus on getting your preferred primary triple-packed and upgraded to carry you to Wonder Weapon/Hauer 77 city. Every weapon in Outbreak Zombies, aside from the Hauer, won’t last past wave 10. Save your money to triple-pack Ray Guns and Rai-Ks when the time comes.
Farm Wonder Weapons
Rai-K 84s and Ray Guns should be your primary goal as rounds 8,9, and 10 roll around. While Ray Guns are fun, the splash damage can end up killing you long before zombies do. The D.I.E Machine also has little use outside of Holdouts. The Rai-K’s alternative fire mode is crucial for surviving high rounds as it can slow and damage elite enemies.
Megatons and Krasny Soldats will start dropping Rai-Ks after round 7 or 8. Keep your ears peeled for the audio cue alerting you that one’s nearby. You can also grind Skull and Bones side objectives and late-game Golden Loot Chests to find Wonder Weapons. Keep in mind, you’ll need 50,000 points to triple-pack a brand-new weapon. Make sure you have the money to spend before you trade away your fully kitted gun. Spend extra cash at the Mystery Box for a chance at a wonder weapon as well.
Eliminate the HVT side mission (aka Skull and Bones)
Skull and Bones is the most fruitful side objective in Outbreak Zombies. Understanding how they work is crucial to complete them without losing too much. Risk/reward is an important factor to weigh in Outbreak Zombies. How much armor and ammo will a task cost you?
Skull and Bones is the best way to farm Wonder Weapons in Outbreak Zombies without trying to track down a free-roaming Megaton. After you’ve done Skull and Bones enough times on each map, you should have a good idea of where the HVTs will spawn. Have one player standing in that general area with an Artillery Strike ready to launch. As soon as the HVTs spawn, blow them sky high. We suggest an Artillery Strike as they’re cheaper than Chopper Gunners (which would be overkill in this situation).
Ignore the Dragon Machine
While on the subject of risk/reward, players should ignore the Dragon Machine side objective. At most, they’ll get a large loot box for completion, but they’ll wind up losing most, if not all, of their armor trying to kill zombies inside the circle. As cool as the Dragon Machine is, it’s not worth it, especially on higher rounds. You’ll end up Dead Wiring and Brain Rotting zombies outside of the circle and will rarely get the objective completed in full. Not to mention Tempests and Manglers spawning in at this time. Just don’t do it.
However, if you need more points on early rounds, the Dragon Machine is useful for the number of zombies it spawns. You’ll also get 1,000 points upon completion. Don’t focus on killing zombies in the circle; focus on grinding points in general.