Over the last five or so years, Discord has consistently shown that it is the instant messaging platform for not only gamers but anyone looking to message, video chat, or stream with friends online. Among the reasons why are Discord bots. Bots can help you do everything from automate mundane tasks to start playing music across your server, and in this tutorial, we’re going to show you how to make a Discord bot.
Although automation is the main reason to use a Discord bot, you can really program one to do anything (anything that you can cram in some JavaScript code, at least). You don’t need any programming knowledge to get started, either. Our guide will get you started making your own Discord bots, even if you’ve never touched a line of code before.
How to make a Discord Bot
Step 1: Download Node.js and set up a Discord account.
Node.js is a JavaScript runtime that’s free and open source, and you’ll need it to actually make your bot work. Download it at nodejs.org and install it before you get started on anything else.
Obviously, you’ll also need a Discord account and your own server to use to test your bot. If you haven’t created one yet, go to Discord.com and create one. If you do have one, log in to your account and open up the server in which you want your bot to live.
You’ll also need a text editor program, like Notepad++ on Windows, to code with.
Step 2: Now you’ll need to create an application on Discord to make your bot work. This takes a little doing, but it’s not too complex. The goal here is to get an authorization token for the bot so that Discord recognizes your code and adds it to the bot on its servers.
First, head to discordapp.com/developers/applications/me. If your account is logged in, you’ll go straight to your list of applications. Hit New Application to get started. Give the bot a name, then hit the button marked Save Changes.
Now, on the right-hand menu, click Bot. Once in the new menu, click Add Bot under the Build-a-Bot option. If you only have one application — the one we just made — it should appear automatically. Otherwise, select it.

Step 3: In the box marked App Bot User, look for the words Token: Click to Reveal. Click that link and you’ll reveal a string of text. That’s your bot’s authorization token, which allows you to send it code. Don’t share it with anyone — that token allows whoever has it to create code for the bot, which means whoever has it can control your bot.
If you think the token has been compromised, the good news is that you can easily generate a new one with the Generate a New Token button.
Mark down your token. You’ll need it in just a second.

Step 4: Now scroll up to the box marked App Details and find your Client ID, a long number. Copy the number and add it to this URL, in the place of word CLIENTID.
https://discordapp.com/oauth2/authorize?&client_id=CLIENTID&scope=bot&permissions=8
The final URL should look like this, but with your client ID number in it instead of this fake one: https://discordapp.com/oauth2/authorize?&client_id=000000000000000001&scope=bot&permissions=8
Copy the URL with your client ID number in it into your browser. That’ll take you to a website where you can tell Discord where to send your bot. You’ll know it worked if you open Discord in an app or your browser and navigate to your server. The channel will say a bot has joined the room, and you’ll see it on the right side menu under the list of online members.

Step 5: While you’re doing that, you can also take a moment to create a folder in an easy-to-reach place on your computer where you can store all your bot’s files. Call it something simple, like “DiscordBot” or “MyBot,” so you know exactly what it is.

Step 6: You’re going to create three files for your bot from your text editor. In the first, paste this code:
{
“token”: “Your Bot Token”
}
Replace “Your Bot Token” with the token you generated earlier on your bot’s application page. Make sure the token is inside the quotation marks. Then save the file into the Discord bot folder you made on your desktop, using the filename “auth.json.” Remember not to save it as a .txt file — it won’t work if it’s .txt instead of .json.
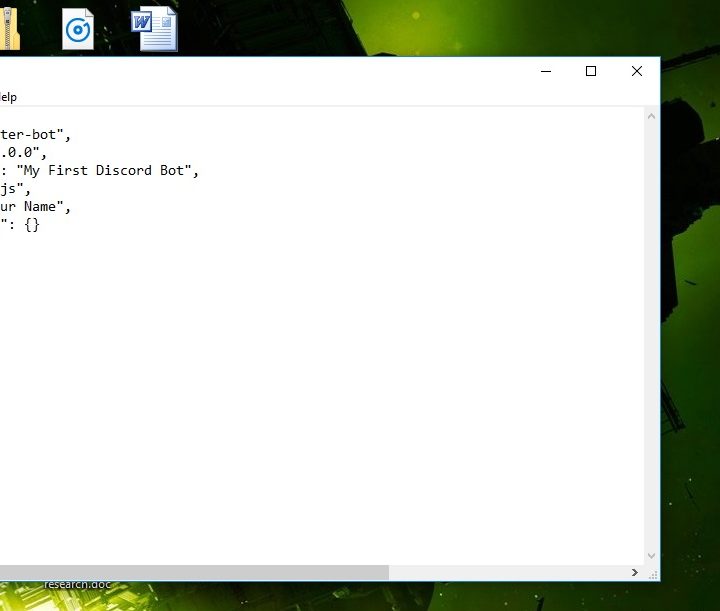
Make a new file, and put in this code:
{
“name”: “greeter-bot”,
“version”: “1.0.0”,
“description”: “My First Discord Bot”,
“main”: “bot.js”,
“author”: “Your Name”,
“dependencies”: {}
}
Replace the author name with your name if you want; you can also change the description to something else if you want something more in line with what you’re making, which will be handy for remembering what your bot is supposed to do.
Save this file as “package.json” in your Discord bot folder.
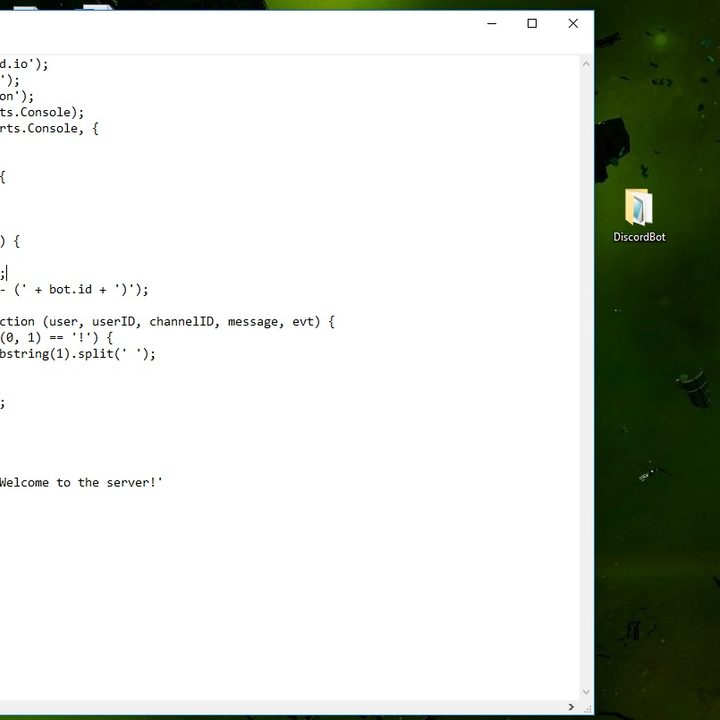
Step 7: There’s one more text file to make, and this is the important one that controls your bot’s behavior. You’ll want to be familiar with JavaScript to really have full control of your bot and know what you’re doing, but if you’re new to coding and just want to make something, you can copy and paste this code into the file to make a simple bot that will greet you in your server.
(Thanks to Medium user Renemari Padillo, whose bot tutorial helped us create this one. Check out his tutorial for code troubleshooting and other advice.)
var Discord = require('discord.io');
var logger = require('winston');
var auth = require('./auth.json');
// Configure logger settings
logger.remove(logger.transports.Console);
logger.add(new logger.transports.Console, {
colorize: true
});
logger.level = 'debug';
// Initialize Discord Bot
var bot = new Discord.Client({
token: auth.token,
autorun: true
});
bot.on('ready', function (evt) {
logger.info('Connected');

logger.info('Logged in as: ');

logger.info(bot.username + ' - (' + bot.id + ')');
});
bot.on('message', function (user, userID, channelID, message, evt) {
// Our bot needs to know if it will execute a command

// It will listen for messages that will start with `!`

if (message.substring(0, 1) == '!') {

    var args = message.substring(1).split(' ');

    var cmd = args[0];


    args = args.splice(1);

    switch(cmd) {

        // !ping

        case 'ping':

            bot.sendMessage({

                to: channelID,

                message: 'Pong!'

            });

        break;

        // Just add any case commands if you want to..

     }

 }
});
This code sets up a Discord bot that will respond to certain messages — specifically, anything that starts with a “!” character. In particular, we’re programming the bot to respond to the command “!intro”, so if anyone types that in your server while the bot is in it, the bot will respond with a programmed message. In our code, we defined the message as, “Greetings! Welcome to the server!” You can change both the prompt message and the response message by redefining them in the code above. Just make sure to maintain the single quotation marks around the messages.
Save this last text file as “bot.js” in your Discord bot folder.
Step 8: On a Windows PC, you can easily get to the Command Prompt by clicking the Windows icon and typing "cmd" in the field. Once it’s open, type “cd” followed by the file path to your folder. On our test computer, the command looks like this: "c:\Users\Phil’s Desktop\Desktop\Discordbot" - that should change the command prompt line to include the file path to your folder.
Alternatively, you can navigate to your folder in Windows and hold Shift while right-clicking on a blank area of the folder, then choose Open Command Prompt.

Step 9: Now it’s time to make use of Node.js. In the Command Prompt, with your Discord bot folder in the file path line, type “npm install discord.io winston –save.” This will automatically install files you need to for your Discord bot into the folder directly.
Also use the following command line prompt to install additional dependencies: npm install https://github.com/woor/discord.io/tarball/gateway_v6
That should provide you with all the files you need.

Step 10: Now you’re ready to go. To try running your bot, type “node bot.js” in the Command Prompt (make sure you’re still navigated to your Discord bot folder).
To test your bot’s functionality, get back on your Discord server and try typing in “!intro,” or “!” followed by the prompt message you created in your “bot.js” file. If you coded your bot correctly, sending this command will cause your bot to reply to you with your set message.
Congratulations, you are the proud creator of a Discord bot.

The great thing about Discord is the community of shared interest and skill. Users on Discord are always making new tools to improve the service, including bots. Some creators will upload their bots to public databases and allow others to download the bots and use them for their servers. The bots listed in databases can have a variety of functions coded into them, so you’ll likely be able to find what you need. Before making your bot, do a little exploring on Discord to see if someone else has already made just the bot you need.
You can search Google for databases, as well as specific Discord bots. You can also try looking at Top.gg (formerly Discordbots) or Bots.ondiscord.xyz.
What could you do with your bot? Well, one thing you could do is inform friends that you're planning to start streaming Netflix on Discord for a watch party.