Though an expansion, Monster Hunter World: Iceborne features the largest region in the game and several new mechanics for players to use during their hunts. Monsters have more health, more moves to use, and are much stronger than in the base game. It can be a challenging endeavor, so we’ve compiled a set of tips and tricks to help you survive Master Rank, gleaned from our 60-plus hours with Iceborne so far.
See more
- How to prepare for the powerful beasts in Monster Hunter World: Iceborne
- Our guide to taking down all monsters in Monster Hunter World: Iceborne
- Everything we know about Monster Hunter World: Iceborne
Upgrade your armor

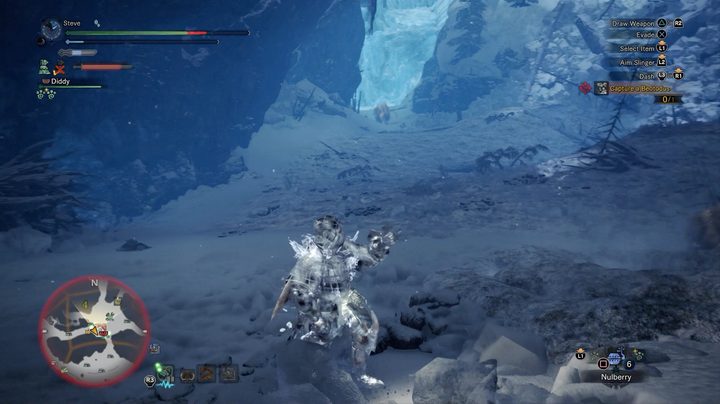
You’ll have to start Master Rank with your gear from High Rank. The first expedition sees you come across a Beotodus. If you can slay it during the expedition, that’s great. If you’re having trouble, however, look around for ore to mine.
Without slaying a monster, you can craft two sets of Master Rank Alloy gear. Your defensive stats will significantly improve instantly, allowing you to withstand more hits from Beotodus and Banbaro (the second new monster you hunt). Alternatively, you can craft two sets of Vespoid armor by killing and carving insects and digging through bone piles.
If you don’t need to upgrade before slaying Beotodus, you’ll still want to upgrade a piece or two with parts you carve during the hunt.
Keep forging armor
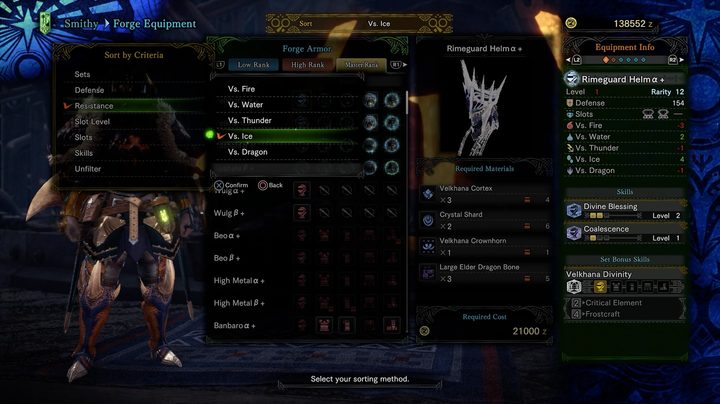
Each piece of armor you forge — helm, mail, braces, coil, and greaves — has an overall defensive stat. Master Rank armor starts at 114 and goes up from there. Obviously it’s a big jump from basic Bone armor to Elder Dragon armor. But stats go up gradually, with armor right next to each other in the forge menu being separated by as little as two points. What I’m trying to say is that overall defense shouldn’t always be your main focal point. The higher the better, but you also want to approach hunts on a case-by-case basis when it comes to your build.
If you press R3 in the forge menu, you can sort armor by defense, skills, resistance, slot level, and sets (the default). Resistance and skills are what we’re interested in here. If you’re having a tough time with Viper Tobi-Kadachi, forge armor with poison resistance skills. If Glavenus is wrecking you, make sure your fire resistance is in the positive. For Legiana and Shrieking Legiana, the windproof skill is a great plus. Meanwhile, Bleeding Resistance will help you out against Nargacuga.
Those are just a few examples. The point is: Sometimes lower-rated armor is better for a particular hunt. If you have time, forge armor that’s good for all five resistances (fire, water, thunder, ice, and dragon), and then forge armor with specific skill sets as needed. Also remember that you can use Armor Spheres earned from completing bounties and quests to upgrade the overall defensive stats of your armor. You’ll soon start nabbing Heavy Armor Spheres to help negate the high upgrade costs.
Don’t forget your Decorations
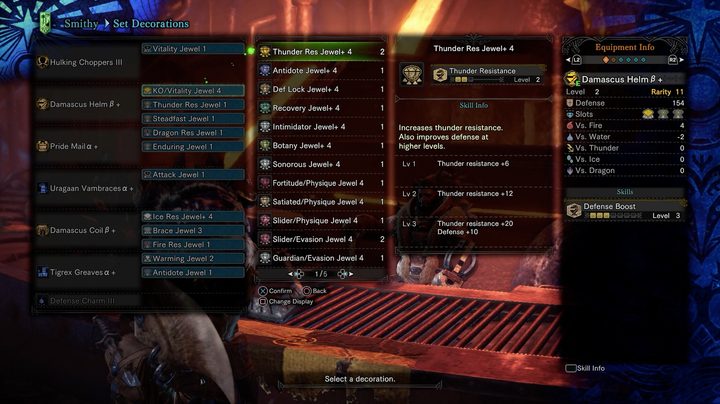
Each piece of armor has up to three Decoration slots for jewels. Your weapon has slots, too. Every quest we completed in Iceborne rewarded us with at least one jewel. Fitting your armors with jewels provides extra skills for your hunter. World veterans probably already know this, but please remember to check your jewels between hunts.
There are three jewel sizes. The larger the jewel, the better its effects are when equipped. Some pieces of armor only fit a small jewel, while other, better pieces of armor have the capacity to fit more valuable jewels. Like armor, Decorations can be set on a case by case basis. If you change armor, you’ll have to add jewels to it. So develop some builds, complementing your armor’s innate strengths with the right Decorations.
Another aspect of jewels that’s important is your weapon choice. Some jewels go better with certain weapons. If your play style and weapon routinely take you airborne, the Flight Jewel increases aerial attacks. If your weapon has thunder elemental damage built-in, the Bolt Jewel increases the power of those attacks.
While you will get a lot of jewels just by completing quests, you can craft more jewels by visiting Elder Melder in Seliana or Astera. If you tracked Tempered monsters in World and obtained the Streamstone, you can even reroll your jewels to get new random jewels from the Elder Melder.
Upgrade your weapon, pick a main
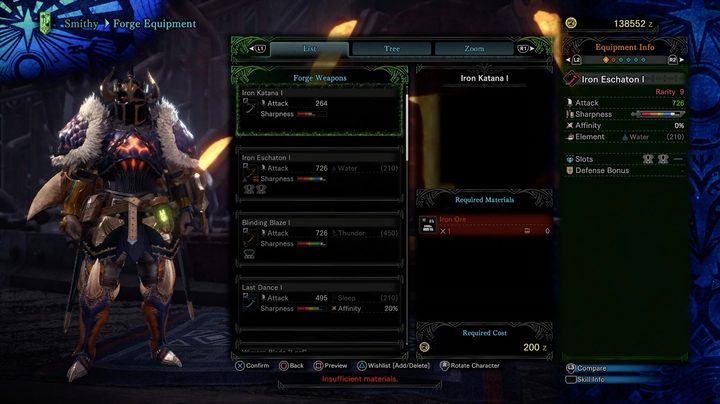
By now, you probably already have a favorite weapon from your time in World. At least during your early run through Iceborne, you probably want to stick with the weapon that you’re most comfortable with. By all means, check out the Training Area to test new weapons, but the mantra of Iceborne‘s campaign is survival over style in the early going. Do what works for you, and make sure you’re regularly checking and working towards weapon upgrades. Each weapon tree only has a few Master Rank upgrades, but the jump between each level is significant.
One more thing: If you want to try a new weapon, know that you don’t have to backtrack and work your way through the upgrade trees again. As long as you have the right parts and enough Zenni on hand, you can forge a Master Rank weapon. From there, you can upgrade it. So if you do want to experiment with other weapons, it won’t take you terribly long to unlock Master Rank versions of any of the 14 weapons (or all of them!).
Prepare for the cold
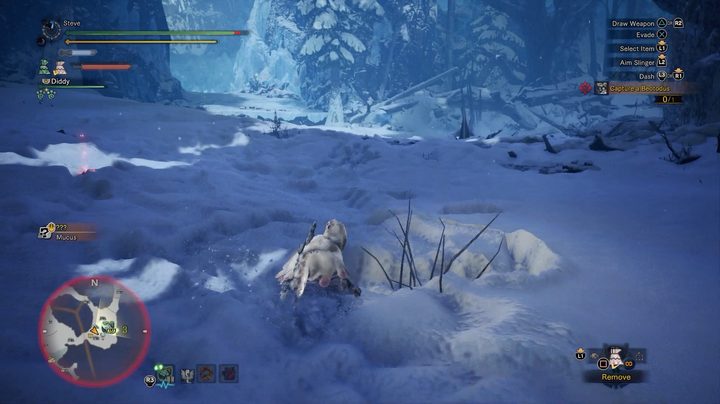
This one is obvious, but you need to consume Hot Drinks to keep your stamina gauge from gradually shrinking. Hoarfrost Reach has a bunch of Hot Peppers to gather that turn into Hot Drinks, but it’s always smart to just bring the max of five with you in your pouch. Hot Drinks can be purchased at the Provisions Stockpile.
Not too far into the campaign, you will be gifted a Warming Jewel from the Field Team Leader. You have to remember to speak with him when the exclamation mark is over his head to get it. But the Warming Jewel, when equipped, lets you hunt in Hoarfrost Reach without needing Hot Drinks. Once you get this useful Decoration, we recommend using it on all quests in Hoarfrost Reach.
Hoarfrost Reach has areas of thick snow that will slow your movement speed. Certain skills can buff this, but you can also bring energy drinks along with you that will help preserve stamina while sprinting through the thick snow.
Cultivate honey
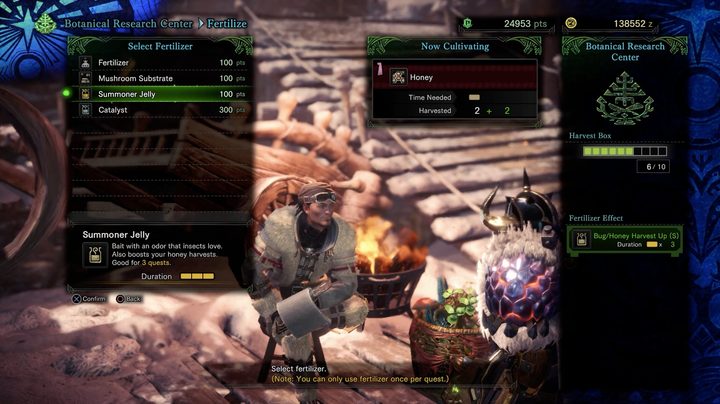
You may already have stacks of honey in your item box. If you do, that’s great and you might be able to ignore this. Master Rank monsters deal a ton of damage — the kind of damage that requires you to heal with every hit or two (at least at first). This means you can run through a bunch of healing supplies.
Honey makes the healing world go round in Monster Hunter World. We suggest cultivating honey with the Chief Botanist while you’re on quests. Apply Summoner Jelly to increase the return, and you’ll never have to worry about being low on healing supplies. Nothing is more annoying than being hamstrung on a quest because you’re playing with very few recourses to heal.
Have Max Potions on hand
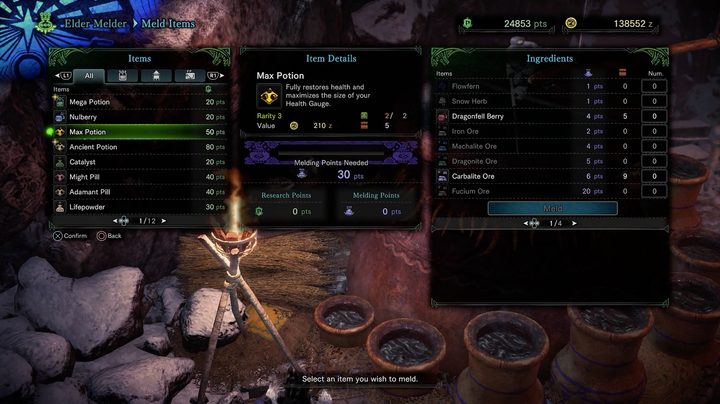
You can carry up to two Max Potions in your item pouch. That’s all you need, but these two potions are perhaps the most important item you can take with you on your hunts. Max Potions restore your health to max value, which is incredibly helpful after getting carted by a monster and losing your food buffs.
You can meld Max Potions at the Elder Melder, but the most efficient way to rack up Max Potions is through crafting (Mega Nutrients + Mandragora = Max Potion). Since you need honey to craft Mega Nutrients, you can see why we harped on honey cultivation.
Ancient Potions fully fill your health and stamina gauges, but since you can just eat rations to refill stamina, we wouldn’t worry too much about scouring for materials to craft them. Focus on Max Potions and always have stamina refilling items on hand.
Nulberrys are key
A ton of the monsters in Iceborne inflict blights, and since a lot of them are strong, fast, and unpredictable at times, it’s not always easy to avoid these afflictions. Nulberries cure blights, so it’s always helpful to have a full ten stack with you in your item pouch. You can find them throughout the locales in a pinch, but they aren’t as ubiquitous as herbs. If you’re running low on Nulberries, you can meld them for cheap at Elder Melder.
Use your Mantles and Boosters
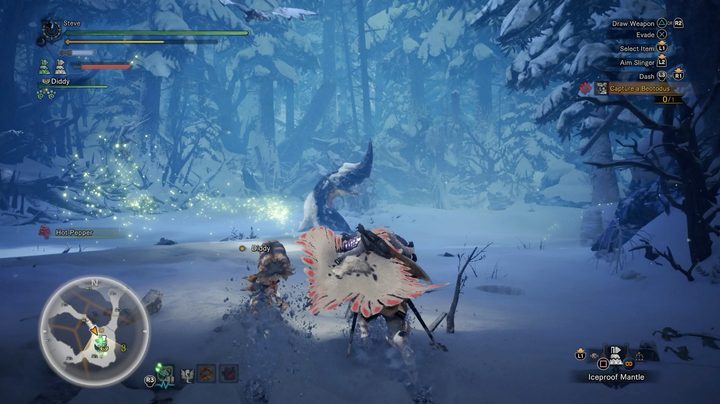
Make use of your Mantles and Boosters. Depending on how many you unlocked in World, you’ll have up to 17 at your disposal when you start Iceborne. The key ones are Temporal, Rocksteady, and Iceproof. Iceproof is a must when fighting in Hoarfrost Reach, while the other two make you sizably more formidable when it comes to taking damage.
Boosters such as the Health Booster and Affinity Booster can also be really useful. For health boosts, we recommend using the Health Booster in groups and the Vitality Mantle when running solo. The Vitality Mantle is better for you individually, while the Health Booster can heal your whole squad. Some mantles such as the Iceproof Mantle will upgrade by completing quests, so it’s important to have these unlocked.
Bring capture equipment
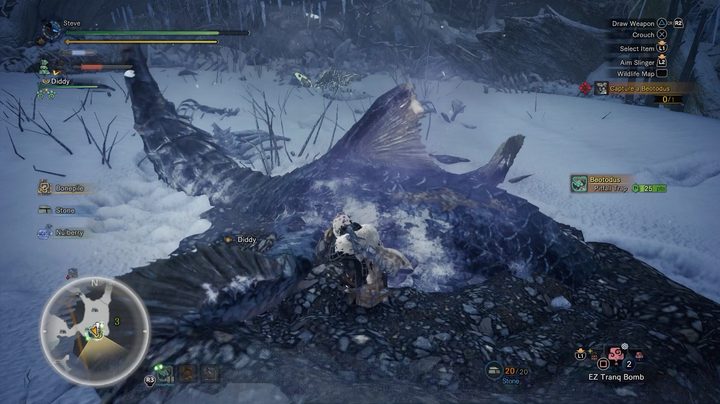
While it’s more satisfying to slay a monster, capturing monsters is even more of a smart play in Iceborne. Monsters have such huge health pools that it’s worthwhile to end the hunt early and avoid putting yourself in more danger. Bring Pitfall traps, Shock Traps, and Tranq Bombs with you on every quest. Once you see a limp or when a monster goes to sleep, consider going for the capture rather than finishing them off.
Some quests require you to slay the monster, and Elder Dragons aren’t susceptible to trap tools. But if you’re on a hunt quest, capturing is the way to go. Capturing also gives you more rewards than slaying monsters. It’s a win-win when it comes to time and rewards.
Complete optional quests and investigations
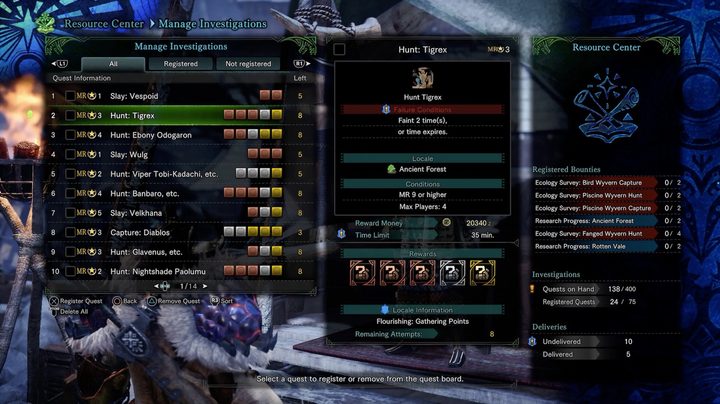
The mainline quests advance the story, while the optional quests and investigations round out the content. It’s important to complete optional quests to get monster parts for upgrading and forging new gear. You can replay optional quests as many times as you’d like, so this is where farming comes in.
The same goes for investigations, which you can register at the Resource Center. You’ll soon have loads of investigations to choose from and each one will hand out a randomized assortment of bonus rewards. If you’re stuck on a campaign quest, try your hand at some optional quests and investigations to work towards improving your build.
Master the Clutch Claw and Slinger
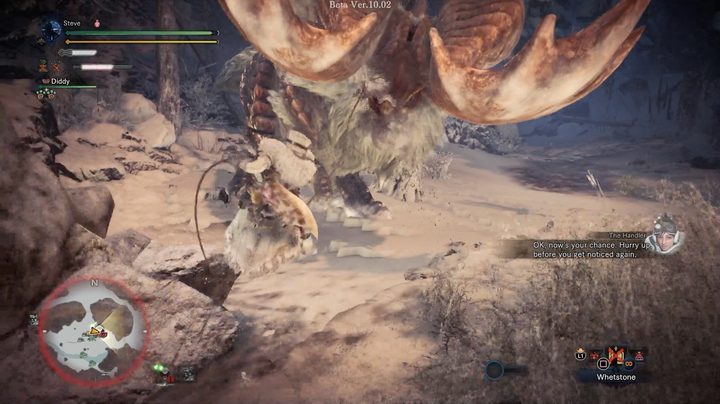
The Clutch Claw is a major new mechanic introduced in Iceborne. To use it, press and hold L2 to aim for a monster, then press Circle to fire the grappling hook. You have to be relatively close to the monster to pull this off. Clutch Claw lets you mount monsters with ease. Once you’re up there, you have a variety of moves to choose from.
You can stick with your standard attack, which can break off pieces of the monster’s natural armor. Attacks to that part of the monster will deal more damage if you manage to dismantle some armor. You can also snag Slinger ammo this way, which is more powerful than the standard stones you routinely find.
If you aimed for the head, you can use a claw attack by pressing circle. Along with dealing damage, this forces the monster to move in a different direction.
The coolest move of all is the Flinch Shot. While hanging onto a monster, press R2 to quickly shoot all Slinger ammo at the monster. The disorienting blast can deal a lot of damage, but the aftermath is what’s most beneficial. Monsters can ram violently into walls, onto thin ice that breaks and deals big damage when they hit the ground below, or into traps/bombs you set up prior to the move.
Clutch Claw can be incredibly useful. But beware that it eats away at stamina — a lot. Also, once the monster becomes enraged, they will almost instantly throw you off when you mount them. Use Clutch Claw to your advantage, but don’t overuse it.
The Clutch Claw also brings changes to the Slinger. You can now shoot Slinger projectiles without sheathing your weapon. Standard Slinger ammo such as stones doesn’t deal much damage at all, but you can use Slinger ammo as a helpful distraction. When a monster’s investigating the disturbance, you can get some free swings in. Not having to put away/take out your weapon makes this much more doable now.
Take a Raider Ride
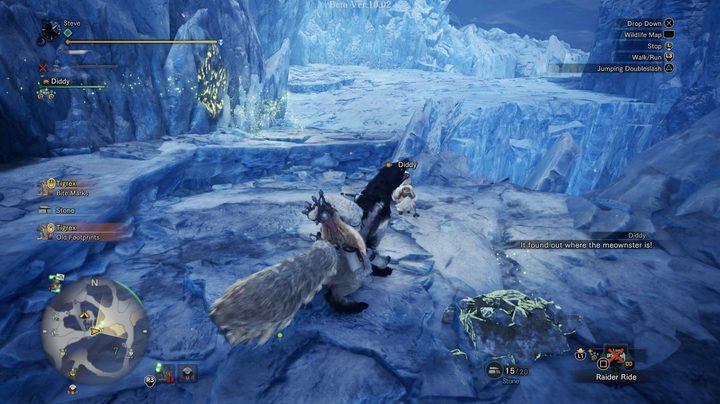
One of the cool new features in Iceborne is the ability to ride smaller monsters like Jagras and Wulg. In the item bar, navigate to Raider Ride. Once you call for a ride, a small native monster will appear next to you. You can mark a spot on the map and hitch a ride to that location. It’s a fast way to move around while conserving stamina. You can also fast travel between camps, but sometimes it makes more sense to catch a ride.
Visit the training area
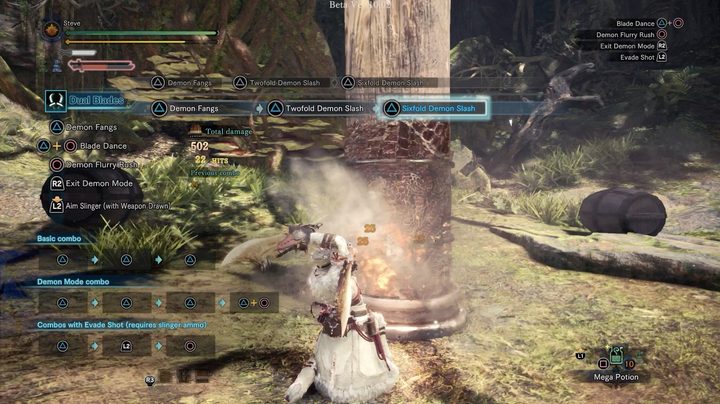
If you’re having trouble, you might want to hone your skills in the training area. Available in the main menu, you can practice combos, Slinger shots, and Clutch Claw moves to help you get a feel for the new movesets. Helpful on-screen prompts display move names, combos, and damage to give you a good idea of what to expect when you go on the hunt. The training area is a great place to experiment with unfamiliar weapons.
Hunt with friends
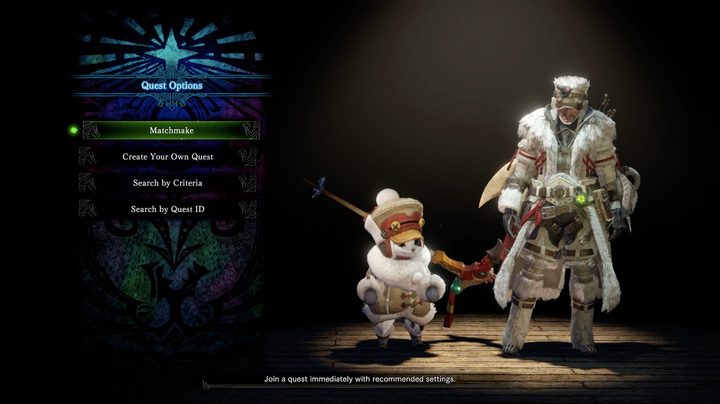
Iceborne introduces a new dynamic difficulty setting that scales monsters by party size (solo, duos, and group). It’s always easier to hunt as a group. Two-player and four-player hunts are more manageable than three-player hunts, though, since three-player hunts have the same difficulty as four-player hunts without the extra person. Duo hunts are probably the best, though, since you still get to bring your Palico along with you.