From the outside, most JRPGs appear similar. Typically people slot them into either turn-based or action RPGs, but in reality each one introduces or reinvents mechanics within those basic boundaries to different degrees to spice up the gameplay. This could be as simple as how spells work, how elements react, or how turns are decided. Xenoblade Chronicles 3 plays out in real time with a party of characters fighting in the field all at once. Aside from the smaller mechanical elements, the big new addition to this JRPG is the Ouroboros system.
The Ouroboros form isn’t just a strong move to pull out during fights, though it certainly fits that description. It is also tied directly into the narrative of Xenoblade Chronicles 3. These powerful forms can turn the tide of battle, but there’s just as much depth to this form as there is any other character. Plus, there’s more than one possible Ouroboros transformation depending on which characters create it. Let’s break down how Ouroboros fusion works in Xenoblade Chronicles 3 and every partner combination you can try.
Further reading
- How long is Xenoblade Chronicles 3?
- Xenoblade Chronicles 3 beginner’s guide: 9 tips and tricks to get started
- The 10 best JRPGs of all time developed by Japanese studios
How Ouroboros works

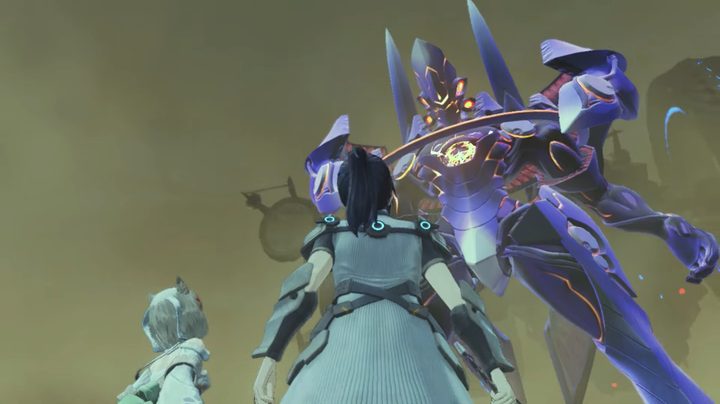
Ouroboros forms are made by fusing two of your party members together into a single unit through a process called Ouroboros interlink. Each possible combination results in a different form that have their own moves, strengths, and weaknesses. Not only that, but depending on which of the two characters you’re currently controlling when activating Ouroboros, you will get a slightly different version, leading to double the possibilities.
You just need to hit left on the D-pad while in combat to transform into the Ouroboros form.
How to unlock Ouroboros forms
Being such a strong move, and with Xenoblade Chronicles 3 loving to dish out tutorials over many hours, you won’t start off the game with this powerful move in your tool belt. In fact, you will only get access to some forms at first, with the second half coming later.
To unlock your first three Ouroboros forms, simply proceed through the game and complete chapter 2. The second set of three will be added to your set once you finish chapter 3.
Ouroboros tips

As great as the Ouroboros form is, you need to keep an eye on your timer. Just like all powerful fusions, they won’t last forever. Make sure you keep a close eye on the Ouroboros symbol that appears on the bottom left of the screen when you enter the form that will tick down to let you know when your fusion is about to end. Using Arts will make this gauge drain faster, so be warned. Once the meter is drained, the form will go on cooldown before you can use it again. To shorten this cooldown, you can manually cancel your Ouroboros form just before it runs out naturally.
The transformation process can also be used tactically. While transforming, your character will temporarily become invincible, so if you’re facing a boss that is about to unleash a devastating attack you can’t dodge in time, transforming could easily save your life. Just be warned that once the form ends, you will be spit back out at the same HP level you were when you entered.
Ouroboros have access to Ouroboros Talent Arts with the A button, but these need to be charged up by attack canceling into regular Arts. But, since Ouroboros skills can be spammed without any cooldowns, you can freely chain attack with your Arts to fill up your Talent Arts in no time.
You should also be smart about which characters you choose to fuse. For example, if your party only has one healer and one tank, you probably don’t want to fuse them and leave your other party members on their own. Essentially, aside from damage dealers, try not to leave your party without at least one support class.
Finally, make sure you upgrade your Ouroboros forms. Leveling up requires the use of Soul Points, or SP, which you can earn by completing quests, reaching specific landmarks in the world, and even inside of certain containers. Once you have some SP to spend, go into the Soul Tree to upgrade your forms in the following ways:
- Learn Skill: This teaches your Ouroboros forms new skills, which you should focus on first since you will start off with no skills.
- Heat Control: This upgrade increases the duration you can remain in Ouroboros form.
- Enhance Art: This is a simple damage buff to make your Ouroboros hit harder with all their attacks and Arts.
All Ouroboros partner combinations
There are six characters in Xenoblade Chronicles 3 that can pair up with one other character to make unique Ouroboros forms. With two possible permutations with each pair, that leaves you with a total of six forms. Here’s how they all break down.
Noah and Mio
If Noah is your character when fusing, you get a massive tank of an Ouroboros that can dish out tons of damage with its Arts, plus a high critical hit chance.
Mio’s form is less powerful, but makes up for it with higher agility, block rate, and a smidge higher crit chance.
Eunie and Taion
With Eunie in the driver’s seat, you get a powerful healer and all-around support unit that can provide tons of buffs to your team.
Taion’s is similar, but rather than give your team buffs, they are more focused on applying status effects on enemies.
Lanz and Sena
Starting with Lanz, you get the second most powerful attacker Ouroboros there is, plus a giant block rate, making it a reliable boss killer.
Sena’s form takes the prize as the No. 1 attack Ouroboros in the game, with decent agility, but at the cost of block rate.