Anyone can stroll into Best Buy or a local AV store and drop a pile of cash on some speakers and a TV, but that doesn’t mean you’ll end up with a home theater. That doesn’t even mean you will end up with a good TV or speakers. The most common problem is that consumers and sales people alike struggle with where to best spend money. Should we spend an extra $100 on the TV or use that for a better subwoofer? What about the fancy cables? Do I go with the $150 HDMI cable instead of buying a $30 cable and spending an extra $120 on the receiver? Do I even need a projector screen? Why is this so damn complicated? These problems are compounded in the world of home audio, where it’s not uncommon for the most expensive equipment on the market to actually be worse than mid-level gear.
Luckily, we’ve done all that work for you. This guide covers everything you need to asseble a real home theater system. We’re talking a giant-screen, 1080p-3D, glass-shattering, heart-thumping bass type of system. To go just one step further, we’ve also included things like a universal remote, light dimmers, and décor into the price. These often-overlooked pieces take the room from just an area with a big screen and some speakers, to a cozy theater. After all, a theater is more than just nice equipment; it’s about a certain look and feel, a particular milieu.
Three letters: D-I-Y
We’ve set up this guide to be helpful to DIY’ers. Most of the gear can be bought at brick and mortar stores, and the stuff that’s only available online is from reputable companies we have personally ordered from before.
This guide presumes that you’ll be comfortable running and hiding wires where needed (the projector, in particular) and setting things up for yourself using help from online AV forums and the all-powerful Google to get any help you might need. If you’re not down with that, that’s ok. You can always hire an installer; just be aware that’s going to bump the cost up a bit.
The system
Before we dive in, here’s what to expect: This system is designed to offer maximum performance for the dollar. That means the 5.1 speaker system isn’t made up of tiny little cubes that sacrifice performance for looks, but they aren’t monstrous 1970s-era speakers either. We also include a very capable A/V receiver with AirPlay and 4K, a 3D Blu-ray player, surge protection/power filtering, and the cables needed to hook everything up. This system also utilizes a projector and screen, so be prepared to control for ambient light (or spend more on a screen made for well-lit rooms). Ready? Let’s do this thing.
Theater sound
Done right, the sound system in your home theater can transport you right into the movie. We’ve chosen each component in this section not only because can it play extremely loud, but because it can also deliver the subtle nuances sound engineers put in the surround mix and dialog that are key to a thrilling experience.
Speakers: Pioneer SP-PK52FS Speaker System ($478)
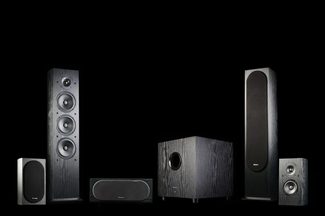
Every now and then a new speaker will be released that takes the idea, “you get what you pay for”, ignores it, and proceeds to walk all over the competition. These “entry-level” speakers from Pioneer have been acclaimed as bar-raising and standard-setting by almost every AV magazine in publication, including Digital Trends. The system we recommend uses a pair of SP-FS52 floor-standing speakers ($125/ea) for the front, the SP-C22 ($99) for the center channel, and a pair of SP-BS22-LR ($129/pr) bookshelf speakers for surround duty. You can also purchase another set of bookshelf speakers for a 7.1 system. While these speakers won’t win any beauty contests (they don’t have a nice glossy finish or real wood veneer that higher end speakers have) they excel where it counts: sound quality. If you want some lookers, check out the EMP system we list as an alternative. If you want smaller speakers that can still play crazy loud, checkout the HSU Research system listed below
Alt: HSU Research 5.0 Package or EMP Tek Impression Series E55TI
Subwoofer: SVS PB-1000 ($499)
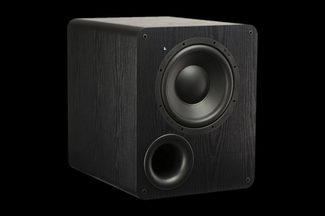
The single most underrated component in a home theater system is the subwoofer. But those of us who love this hobby will tell you this is where you need to spend a good chunk of cash. An under-powered, poorly-designed subwoofer will suck the life right out of your movie experience, whereas a quality sub can take even a mediocre system and make it glow.
The SVS PB-1000, like the Pioneer speakers we chose, is a true class leader in terms of price-to-performance. Be warned, it’s big, heavy and not particularly attractive. But what it lacks in aesthetics it makes up for in outstanding performance. Besides, this isn’t the centerpiece of your mantle, it goes in a purpose-built room. Go for it. The PB-1000 ships free to your home; and if you don’t like it, SVS will pay for return shipping.
If 18.4 x 15 x 18.4 (H x W x D – in inches) is just too big, consider The PB-1000’s smaller brother, the SB-1000. It’s the same price, but trades off some low end performance in favor of a smaller profile. On the other end of the spectrum is SVS’s PB12-NSD.
Alt: HSU Research VTF-2 MK4 or SVS PB12-NSD
Receiver: Yamaha RX-V475 ($450)
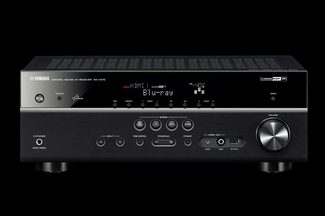
You could probably choose any $249+ receiver on the market and it would work well for this system. Practically all modern AVRs (audio/video receivers) support 3D, and all of them will do 5.1. Everything else is considered a bonus. In terms of power, there isn’t much of a difference between mid-priced receivers. Even if you find a receiver that claims to have substantially more power than the competition, we can almost promise you the ratings are manipulated by tricky measurement techniques. Jump up to $450 and you’re likely to find a host of HDMI inputs, as well as USB, Ethernet (for network features), and control via a mobile app. Still, even though entry-level receivers are so similar, we think the Yamaha RX-V475 offers the best bang for your buck.
The only area where the RX-V475 lacks is in the amplifier section. It is limited to a 5.1 system and has no zone 2 support at all. For both of those features you will need to jump to the RX-V575 ($549).
Alt: Sony STR-DN1040 or Yamaha RX-V575
Cables and Accessories: MonoPrice Subwoofer Cable and Speaker Wire ($46)
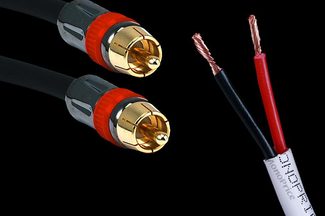
If there is one place on a home theater you can save money, it’s with the cables. Don’t get fooled into believing spending hundreds of dollars on fancy cables will improve the picture or sound of your system. At the same time, buying the absolute cheapest cables you can find might yield problems with reliability and longevity.
Monoprice is revered for offering some of the least expensive home theater accessories on the market, but we tend to avoid its cheapest-of-the-cheap offerings. However, go one step up to what it calls “high-end” and you can get a cable of solid design (won’t fall out, fall apart, or otherwise quite working) at a bargain-basement price.
You will need a single subwoofer cable and a roll of speaker wire. The placement of a subwoofer in a room can have a dramatic effect on its sound quality, so we recommend a 25-foot cable ($7) to give you enough length to move the sub around a bit. As for speaker wire, a 250-foot roll of 16-gauge wire ($37) will work nicely. Although you might be tempted to go with a 100-foot spool, you might be surprised how much extra is needed to properly route the wire, especially for the surround speakers. Depending on how you place the speakers in the room, you might also need to purchase wall mounts, a center speaker stand or wall plates. We would recommend purchasing all of these supplies through Monoprice to help save on shipping costs.
Alt: Blue Jeans Cables or Accessories4Less
Theater Picture
You’ll notice that more money is spent on the sound system than the projector and associated equipment. That’s because you don’t need to spend a lot of money to get a great-looking projector and screen. Spending a little more here will yield a trivial increase in performance, while cutting a little money in the sound system will have dramatic effects on performance. Trust us, the picture quality yielded by this system will blow you away.
Projector: Optoma HD25 ($949)
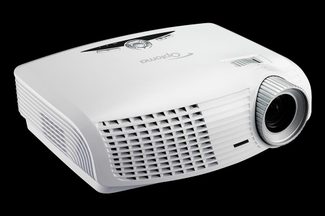
Optoma is noted for constantly breaking price barriers in the projector market. It produced the first sub-$1,000 720p projector and the first sub-$1,000 1080p projector. Although BenQ beat it out of the gate with the W1070 for 3D support, Optoma was close behind with the release of the HD25. The Optoma HD25 has all of the basics needed for a phenomenal home theater experience. It supports manual lens shift to make installation easier and uses RF 3D glasses. The 3D glasses are sold separately for about $60 a pop. We budgeted for two of them in this setup.
The BenQ W1070 is a great alternative. It is ISF certified and has day and night modes so a custom installer can tailor the image to your room for light and dark conditions. It also has a more generous throw distance of 1.15-1.5, as opposed to the HD25’s 1.5-1.8. That is a very important distinction because the throw distance determines how far away the projector needs to be from the screen. For more information on picking and installing the right projector, visit here.
Alt: BenQ W1070 or Epson PowerLite 3020
Screen: Elite Screens ER110WH1 ($300)
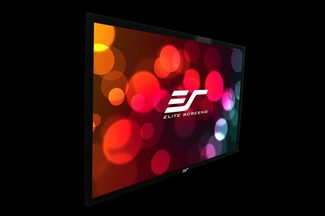
Recommending a specific screen for a room we have never seen is a tough task. There is no “best” screen. It’s more of a “What’s the best screen for my specific room?” question. The answer to that depends on the lighting in your room, how far away you sit from the screen, your viewing angle (straight on or off to the side), whether or not you plan on using 3D, and a host of other questions. That’s why we wrote an entire article about choosing a projector screen.
With all that working against us, we still managed to come up with a screen that should work for almost anyone who can completely darken their room. Affordable, sturdy and from a reputable manufacturer, this screen is tensioned to eliminate creases or waves in the material and installation is forgiving thanks to sliding wall mounts. The 2.36” aluminum frame is covered in a black velvet material to absorb any light from the projector that overshoots the screen.
If you can’t control the lighting during daytime viewing, you may have to consider going with a different screen (again, refer to the article linked above) but be prepared to spend a lot more.
Alt: DIY Screen Instructions by Seymour AV or Screen Innovations Sensation Series
Blu-ray Player: Samsung BD-F5900 ($129)
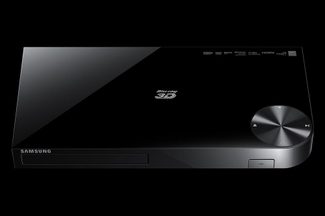
In this system, the Blu-ray player is the media hub where you which you use to access all sorts of streaming goodies. There are a number of good choices on the market, and all of them are likely to play Blu-ray discs just fine, but we chose a Samsung because of its smart features. Unlike other Smart Blu-ray players, which have a limited number of built-in apps, The BD-F5900 can access Samsung’s app store where you can download additional apps. The last trick in its bag is 3D playback, which is a must for this system.
Alt: Sony BDP-S5100 or Panasonic DMP-BDT230
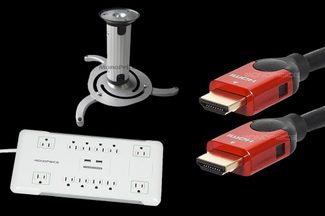
Cables, Mount, and Protection: MonoPrice Surge Protectors, HDMI Cables, and Projector Mount ($110)
Buying cables, mounts, and surge protectors isn’t exciting. We would much rather put more of the budget into speakers, but unfortunately these accessories are a necessary evil. What you’ll need will vary based on the install. For instance, some might mount a projector on the ceiling while others might place it on top of a shelf in the back of the room. Depending on where the projector goes, you may or may not need a mount or a long HDMI cable at all. Therefore, we can only make some general recommendations in this department and estimate how much everything will cost.
- Surge protectors – You will want to ensure every part of the system has some sort of surge protection. Don’t just grab that used-to-be-white-now-yellow Kmart surge protector that’s been sitting in your garage for 10 years. Go out and buy something new. Surge protectors don’t last forever, and most don’t have an alarm to tell you when they are shot. For basic protection, MonoPrice has a 3420 Joule, 12 outlet surge protector ($28) for the main equipment rack and a wall-wart style surge protector ($15) for the projector. If possible, we recommend that the projector be hooked up to a UPS (uninterruptable power supply) instead of a basic surge protector. The projector has an expensive bulb that runs very hot and needs to be constantly cooled by an internal fan. If the power goes while you are watching a movie, you risk shortening the bulb life significantly.
- HDMI Cables – Don’t get caught up in the marketing BS about high-end HDMI cables. Every reputable AV magazine and writer denounces expensive HDMI cables as a waste of money (You can read Geoffrey Morrison’s most recent article about the topic for a quick course, or a much more technical explanation of HDMI cable build quality for the uber nerds). With that said, it’s also not advisable to buy the cheapest cables you can find. Bargain bin cables are more likely to break, fall out, or simply not work than mid-level cables. With that reasoning in mind, we recommend the Metallic Series HDMI cables ($7) for short runs and the Ultra Slim Series ($39) for longer runs. We specifically recommend against MonoPrice HDMI cables that look like this solely because they are thick and bulky, making them hard to manage and increasing the likelihood they’ll pull out of equipment from their own weight.
- Projector Mount – MonoPrice has a wide selection of projector mounts ranging from stupid cheap ($12) to still stupid cheap ($28). Their $12 version will work well for most installations and comes in white, silver, or black. It sports tilt, roll, and swivel adjustment to help lineup the projector and drops down from the ceiling 6.7”. Depending on the height of your ceiling and how high/low you mount the screen, you may need to jump to one of their other mounts with a longer arm, but that’s unlikely. Just to be careful, we recommend using Projector Central’s “Projection Calculator Pro” to help you calculate everything needed to ensure the screen and projector line up. As far as actually installing the projector and positioning the screen, we just so happen to have this guide that can help you with both of those tasks.
Each room calls for a slightly different set of accessories, but we can still make a good guess. Assuming you need 2×6’ HDMI ($7/ea), 1×30’ HDMI ($39), a mount ($12) and two surge protectors ($43) you are looking at a little under $110.
Theater feel
Right now, you’ve got a killer sound system and a giant, awesome display. However, what about the feel of a movie theater? It’s not hard to spend a bunch of money on electronics. The hard part is making the system work together seamlessly and actually look like it fits in the room. In order to bring all of these pieces together into one, cohesive theater, we need the help of just a few more things.
System Control: URC RFS200 ($80)
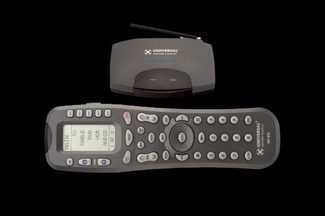
Remember the last time you went to a pay-$10-for-a-ticket-and-sit-behind-the-only-6’5”-person-in-attendance sort of theater? Rememer how before you could enjoy the movie you had to pick up 5 different remotes, click 30 buttons in the proper order and perform a 20 minute sacred ritual over the equipment? No? Of course not. That’s because in a real movie theater you simply sit down and the movie starts. We can’t quite get reach that level of convenience (unless you bribe one of your kids to do everything), but we can get you down to a single button press on a single remote.
Control systems can get very expensive, especially with a system like this where the equipment could be in one area, the projector in another, and the screen in yet another. This calls for an IR-repeater system that allows you to point the remote at a little IR (infra red) receiver that will transmit the remote signal, through a cord, to an IR connecting block, then out to the appropriate equipment. Each piece of equipment has what’s called an IR bug, or IR emitter, stuck on the front of it that transmits the IR remote signal directly to that piece of gear. The URC-RFS200 kit (RF20 Remote + MRF100B Base Station) from URC (Universal Remote Control) works exactly like this, with one difference. The remote communicates to the MRF100B base station (the IR repeater) using RF, so you never have to worry about where you point the remote. The only downside to this system is that the remote can be a bit of a pain to program for those inexperienced with universal remotes, plus the buttons are a little outdated. However, it can learn new commands from any IR remote. If you want a universal remote that’s a little more modern and easier to program, then go with the Logitech Harmony 650 plus any generic IR repeater kit. You can find the two items for around the same price as the URC kit, but the downside is that you have to point the remote at the IR receiver.
Alt: Logitech Harmony 650 + Generic IR repeater kit
Lighting: Lutron Maestro IR Digital Dimmer ($40)
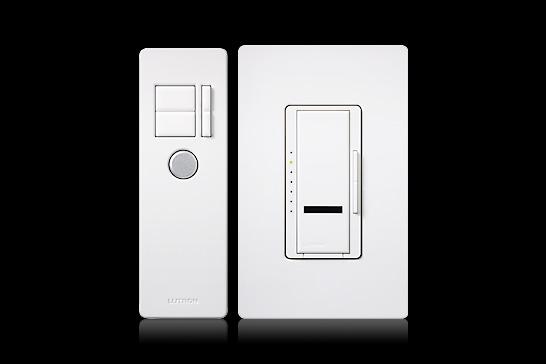
One of the coolest aspects of any fully decked out theater is lighting control. Again, it’s possible to spend a boat load of money here with different lighting styles, placements, and configurations, but not on our budget. The cheap and easy method is what we’re interested in. A simple Lutron Maestro Digital Dimmer will do the trick. It works like a normal dimmer, but has an IR receiver on the front so it can be controlled by the remote. Swap out your normal light switch for this and program it into the URC RF20 (either controlled directly from the remote, or via the IR blaster built into the base station). If programming it into the RF20 isn’t going to work for some reason, the dimmer comes with its own IR remote.
Acoustics Panels: DIY-Get out your tools ($100)

Acoustic panels say, “I’m serious about this system,” and we know you are. They not only provide a theater-like look and feel, they can also drastically improve the sound quality if properly placed. There isn’t enough money in our budget to afford professional, pre-built panels from the likes of GIK Acoustics or Auralex, so we’re going the DIY route. For anywhere between $20 and $50 per panel, you can make your own acoustic panels that will work as good as pre-built options.
We suggest checking out the tutorials from AcousticsFREQ, Audioholics, or Instructables. For more information on proper acoustic panel placement or any other questions you have about acoustics, including how to keep theater noise from leaking to the rest of the home, head over to Auralex and checkout its Acoustics 101 guide.
Décor: Movie Posters (Free!)
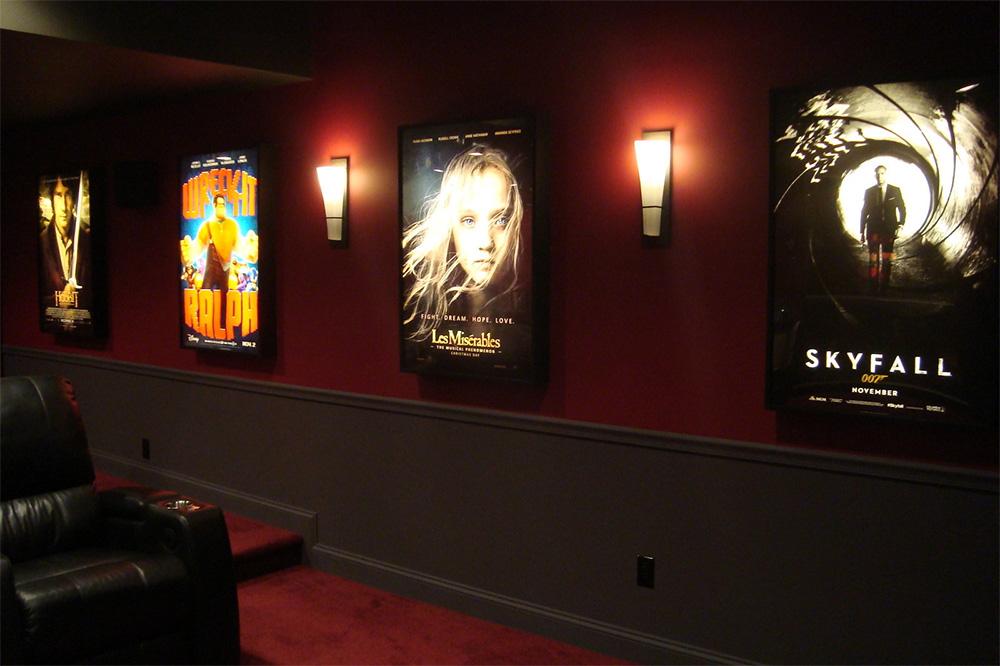 This is more of a simple tip than something to purchase. Movie theaters obviously have tons of movie posters and cardboard displays. Since movies don’t stay in the theaters forever, those promotional items eventually need to go somewhere. Most of the time employees will just take them home, so buddy up to the staff at your local Cineplex and score some free posters.
Also feel at liberty to decorate the theater with other random items. A Blu-ray disc collection, action figures, Vinyl records glued to the wall, old popcorn and soda machines all work as great props. Some of these things you likely already own and the others can be bought used for next to nothing.
Equipment List
| Sound | ||
| Front L/R | Pioneer SP-FS52 | $125 x2 |
| Center | Pioneer SP-C22 | $100 |
| Surround | Pioneer SP-BS22-LR | $129 |
| Subwoofer | SVS PB-1000 | $500 |
| AV Receiver | Yamaha RX-V475 | $450 |
| Speaker cables | MonoPrice | $39 |
| Subwoofer cable | MonoPrice | $7 |
| $1475 | ||
| Picture | ||
| Projector | Optoma HD25 | $949 |
| Screen | Elite Screens ER110WH1 | $300 |
| Blu-ray player | Samsung BD-F5900 | $129 |
| Surge protection | MonoPrice | $43 |
| HDMI | MonoPrice | $53 |
| Projector mount | MonoPrice | $12 |
| $1486 | ||
| Feel | ||
| System control | URC RF20 + MRF100B | $80 |
| Lighting controllers | Lutron | $40 |
| Room treatments | DIY | $100 |
| $220 | ||
| Total | $3181 |
Conclusion
You made it all the way to the end! Congratulations! Your reward is knowing about some of the best gear for the money in the entire marketplace. Even if you don’t like the system as outlined, the alternatives mentioned allow for customization while still maintaining great performance. We’re temped to add the clause, “for the price” at the end of that statement because each piece of this system is an outstanding value, but this system is good enough that it doesn’t need any qualifiers. What’s more, all of the prices we quoted are MSRP, or close to it, meaning that you can get most of the equipment on sale for less than we quoted. It’s also a safe bet that if you are looking to build a home theater, you already own some of the gear needed.
If you’re looking for some way to really bring the big screen home without depleting your 401k, we don’t see any better alternative than the system outlined here.
Let us know what you think in the comments below. Do you have any experience with the equipment listed? Do you plan on taking the leap and purchasing all or part of the recommended system?