
How to take a screenshot on any Kindle Fire

There are a thousand reasons you might want to take a screenshot on your Kindle Fire tablet. For instance, you might want to help a friend troubleshoot a technical problem on their device or prove to a landlord that you did, in fact, agree on a lower rate for your rent by showing them a conversation you two previously had. Whatever the reason, where there’s a will, there’s a way. Below, we’ve outlined two methods to take a screenshot on your Kindle Fire, including a short method for newer models and a long method for older versions.

3rd Gen and newer (2013 to present)

ire HD 10 - Twilight Blue Buttons
Amazon's Fire HD 10

You won’t experience any difficulty taking a screenshot when using the newest modeled devices. Follow these three steps: 

Step 1: Press and hold the Volume Down button and the Power button simultaneously.

Step 2: Wait for the screen to flash. You’ll also hear a shutter sound (if the volume is turned up) and see a thumbnail of the screen in the center of the screen. Release the buttons, and the screenshot process is completed.

Step 3: To find the screenshot, tap to open the Photos app.

1st and 2nd Gen (2011 and 2012)

If you have a 1st or 2nd Generation phone, you’re going to have a hard time taking screenshots. The older models hadn’t yet built screenshot functionality, so you have to install extra software. If you’re still committed to the idea, here are the steps to install:

Kindle Fire Enable ADB

Step 1: Go to Settings and select Device, then Developer Options. If you don’t see Developer Options, click About and tap Serial Number seven times. You should then see Developer Options or Security pop up. Either one is correct.

Step 2: With Developer Options (or Security) open, set Developer Options and USB Debugging to On. Some models only show On and Off buttons next to Enable ADB, as shown above. If that’s the case, tap On followed by OK on the Enable ADB prompt.

Step 3: Download and install the Kindle Fire driver from Amazon (Windows only).

Step 4: Download and install Android Studio from Google. This method is bulkier but easier than using command-line tools.

Step 5: Using a USB cable, connect the Kindle Fire device to your PC.

Kindle Fire Connected as Media Device

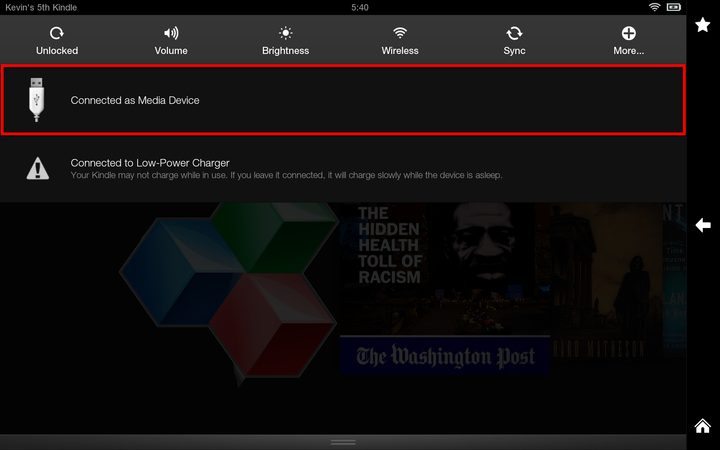
Step 6: Swipe down from the top of the tablet screen and verify that it’s “Connected as a Media Device,” as shown above. If you see instead, “Tap for Other Media Options,” tap the notification and select Media Device (MTP) or File Transfer.

Step 7: Tap OK on the Allow USB Debugging prompt.

Android Studio Show Kindle Fire

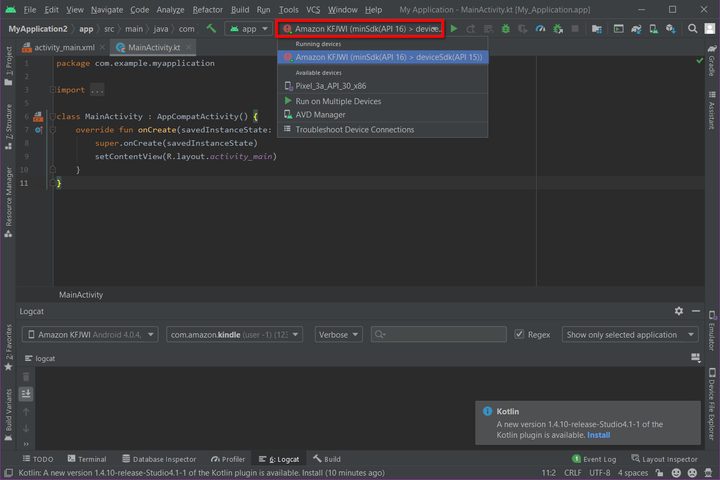
Step 8: Open Android Studio and create a new project. The Kindle Fire will eventually appear at the top, as shown above.

Android Studio Select Logcat

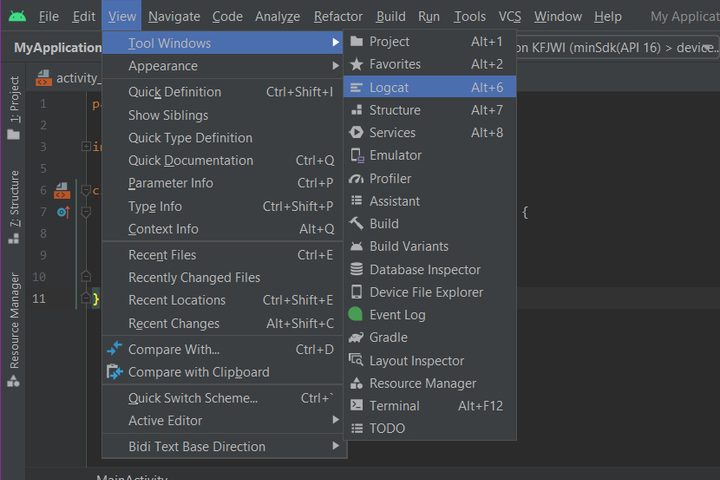
Step 9: Click View. Hover the mouse cursor over Tool Windows and select Logcat in the rollout menu.

Android Studio Click Screenshot Tool

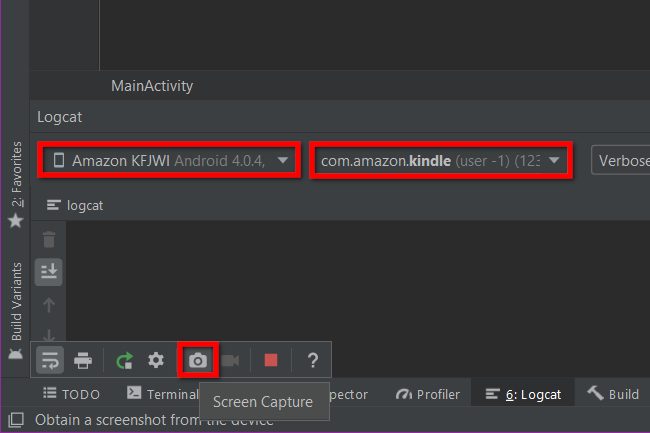
Step 10: In the Logcat window, now at the bottom, make sure the Kindle Fire (KFJWI) is selected along with com.amazon.kindle in the second field, as shown above.

Step 11: Clicking the two arrows on the left will expand the toolbar. Then click on the Camera icon to capture a screenshot from the Kindle Fire device.

Android Studio Save Screenshot

Step 12: The screen capture will open in another window on your PC. Here you can recapture the shot, rotate it left or right, and add a frame or other embellishments. You can also copy the image to the clipboard.

Step 13: Click the blue Save button to save it on your PC when finished.

Editors' Recommendations

Kevin Parrish
Former Digital Trends Contributor
Kevin started taking PCs apart in the 90s when Quake was on the way and his PC lacked the required components. Since then…
Leaving LastPass? Here’s how to take all your passwords with you
LastPass

If you, like many of us, have been happily using LastPass's excellent free tier for the last few years, you're probably dismayed that LastPass is moving to change the way its free access works. From March 16, you'll only be able to sync your LastPass database between mobile devices or computers -- but not both. So if you want to keep accessing the same passwords on your phone and laptop, you'll have to pay up and join LastPass's premium subscription for $3 a month.

Of course, not everyone is wild to pay a subscription fee -- or has the free cash to do so. If that's you, you're probably looking for a password manager to replace LastPass. But you won't want to leave all your collected passwords and logins behind. Thankfully, you can quickly and easily export your LastPass passwords and login information and import them into your new password manager of choice. So go check out our list of the best password managers, then dive into our guide on how to leave LastPass and take your passwords with you.
Export your LastPass database
Now that you know you're moving from LastPass, the first step is to make sure you take everything with you. Thankfully, exporting your database from LastPass is simple. Unfortunately, there's no way to export your passwords from the mobile app, so you'll have to use a PC or Mac to complete this action.

Read more
How to remove books from a Kindle
how to remove books from a Kindle Kindle Oasis

Is your Kindle Oasis or Kindle Paperwhite getting filled up with stuff you'll only read once? Do you just need to clear some room? Kindles are great reading devices, but they don't have all the storage space in the world, so maybe it's time to get rid of a few of the titles on your reading list. Let's go through how to remove books from a Kindle device and how to delete these items permanently, if necessary! Once done, be sure to take a gander at our roundup of the best free Kindle books and the best websites for downloading free audiobooks. After all, you need to do something with your newfound space.
How to archive a book temporarily
This option allows you to remove a book from your Kindle or the Kindle app. Technically, you have still bought and own the rights to read this book, meaning it will remain affixed to your Amazon account, and you will be able to re-download it later, if desired. However, it will not take up any more room on your device. This can be especially useful if your Kindle is running out of storage space and you'd like to speed it up while making room for new purchases.

Step 1: Navigate to the book in question -- you can't actually be reading the book for this to work. If you want to delete a recent book, go to your Home Screen. Otherwise, head to your Library or the Search Box to find the title(s) you want to get rid of.

Read more
How to set parental controls on your Amazon Fire tablet
amazon fire hd 8 2017 review 10

Tablets can be great devices for kids since they can play games, watch movies, read books, and a whole lot more. But, you need to be able to protect them from questionable content. The best kids’ tablet you can buy right now is the Fire HD 8 Kids Edition. One of the reasons that it’s our top pick is that Amazon tablets have some of the most comprehensive parental controls around.

Amazon’s parental controls work on any Amazon Fire tablet, so whether you have one of the Kids Edition tablets, a Fire HD 10, or an older Fire tablet, you can still use these controls. In this guide, we’re going to run through how to set up parental controls on your Fire tablet and highlight some of the key features you’ll want to take advantage of.
How to set up parental controls on a Fire tablet
We’ll assume that you’ve created your own profile and signed into your Amazon account on the Fire tablet in question. If you haven’t, then go to Settings > My Account and do so. Now, there are two ways to restrict access on your tablet. This first method is easier and quicker, but we recommend you skip ahead to the second as it's more versatile.

Read more