
After the Cambridge Analytica scandal and new privacy laws in Europe, Facebook’s privacy settings may not look like they did when you first created an account. And on top of that, Facebook’s privacy settings are divided up into several different locations, and paired with a long legal privacy agreement. If you haven’t visited your privacy settings on Facebook, or have no idea even where to find them, it’s probably time for a privacy check-up.
Facebook Privacy 101
Everyone can see your name, your profile photo, and the names of work and school networks you’re part of. Ditto for pages you are a fan of. You can’t tell Facebook you don’t want those publicly listed — so if you are uploading a profile photo, the only privacy option is public. If you are worried about a potential employer finding out about a quirky fetish or unorthodox political leaning, avoid becoming a Facebook fan of such groups. Your gender and current city are also available if you choose to specify them. You can uncheck “Show my sex in my profile” when you edit your profile, if you don’t want it listed, and you can leave “Current City” blank.
Facebook is equipped with various privacy levels
Facebook boasts a slew of privacy levels pertaining to different content, whether it’s your friends list, status updates, or photos. Users can adjust the privacy settings and limit profile access at any time, allowing greater specificity when choosing who can view selected content.
- Everyone: Grants access to anyone on the Internet.
- Friends: Grants access to only those who are your friend on Facebook.
- Friends of Friends: Grants access to those who are your friend on Facebook, as well as their friends.
- Friends Except: Grants access to all friends except for a specific group or individual users that you choose.
- Specific Friends: Grants access to only the friends you choose, either individually or through friend lists.
- Only Me: Grants access only to you. Helpful if you want the post to show up on your Facebook Memories in a year or if you have to grant an app access to post on your behalf.
How to keep individual posts private(ish)

Tailoring the privacy of a Facebook post during publishing hasn’t changed much over the last few years. The built-in audience selector allows users to specifically choose who they share their content with — regardless if the post is a link, photo, life event, check-in, or simple status update – directly within the posting box. Available audiences include friends, groups, and specific individuals, with an additional option for selecting only yourself. The tool remembers the audience you last shared with, retaining the same audience until you change it, but you can also choose the default option for new posts inside the privacy settings.
To use the audience selector, craft your post as you would normally and click the drop-down menu, directly to the left of the blue Post button. Afterward, select the desired audience for the post and click the aforementioned Post button to publish. The “friends except” and “specific friends” options can use friend lists, which we’ll discuss more on the next page.
How to access privacy settings
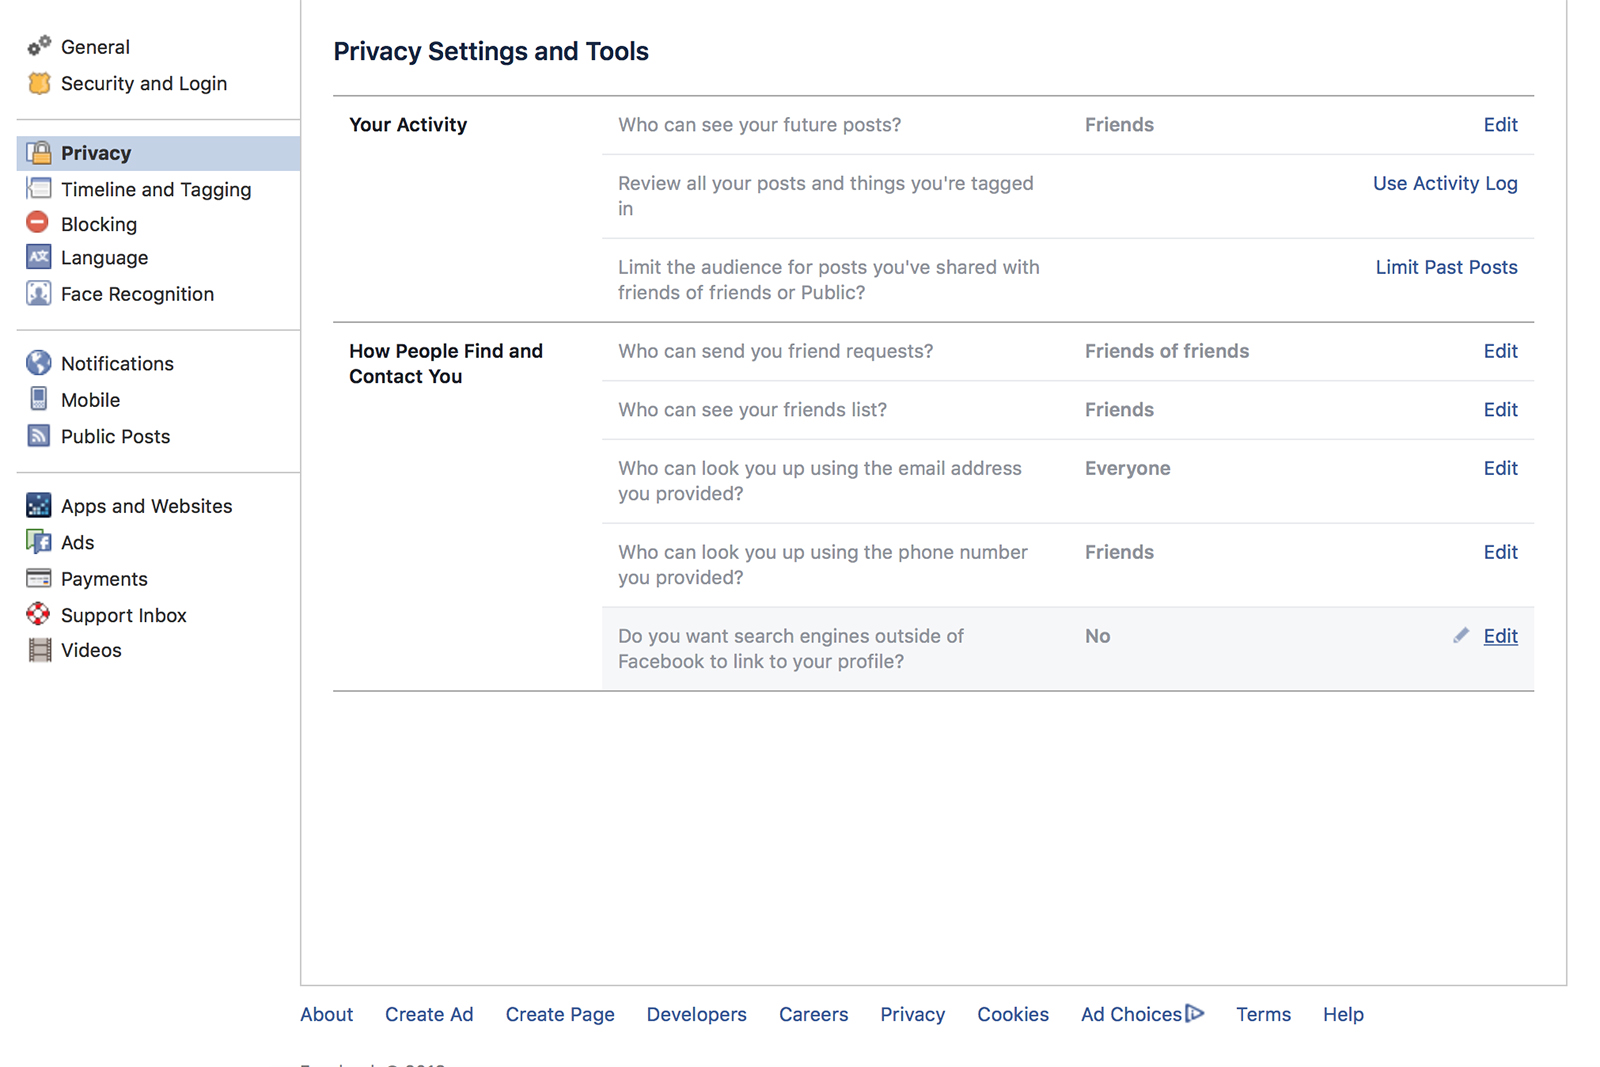
The Privacy Settings and Tools panel allows users to restrict access to future posts and personal contact information, along with who can look them up via their provided email address and phone number.
To access your privacy and tools settings, on a desktop computer, click the subtle arrow icon in the upper-right corner of the main blue Facebook toolbar. In the drop-down menu, choose the settings option towards the end to get to the main settings menu — the privacy options are under a few of the sections inside this main settings page.
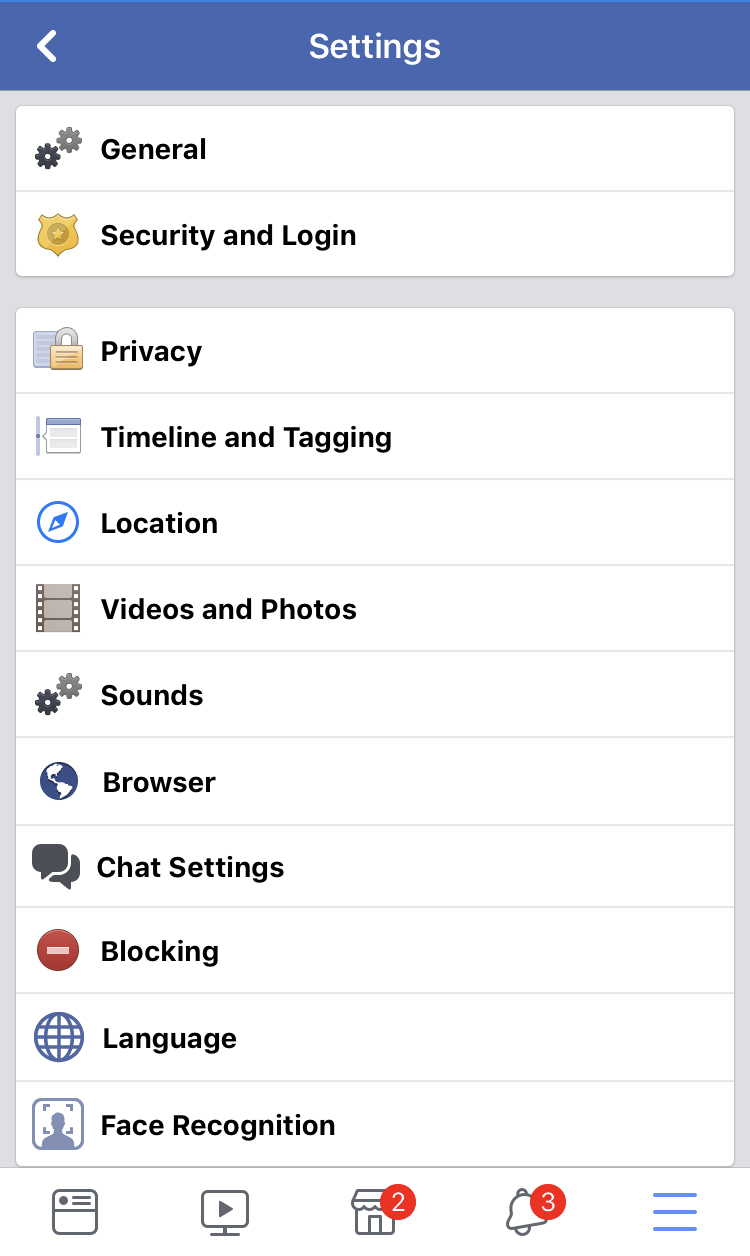 Those same settings are available from the Facebook app, too. Tap on the menu icon — the one with the three lines — then tap settings and privacy, followed by selecting account settings. You can see some options under “privacy shortcuts” but to get a full view of your privacy settings, select account settings instead.
Adjusting privacy defaults, friend requests, and look-up information
While privacy settings are located in a few different spots, once inside the Facebook Settings, a section from the lefthand side labeled Privacy Settings is the first stop. At the top of this section, you can choose to set the default privacy settings on future posts, so next time you start writing a new post, you won’t have to remember to change the privacy settings unless you’d like to go outside your norm. Click on edit and choose the default audience you’d like from the drop-down menu.
At the bottom of the top section is a tool to limit the audience of past posts — so if you’ve had your Facebook account since you were a teenager and may have posted some questionable content, or just now realized you had the default privacy settings saved to public, this is the tool for you. This option will limit all your previous posts — of course, you can’t change who has already seen the posts, but you can prevent future views. The changes also don’t apply to any audiences set to custom and any posts with tagged friends will still be visible to friends of friends.
The next section details who can reach out to you on Facebook if you didn’t initiate contact, including friend requests. If you’re getting unwelcome friend requests from users you don’t know, this is where you go to stop it.
Adjusting Timeline and tagging settings
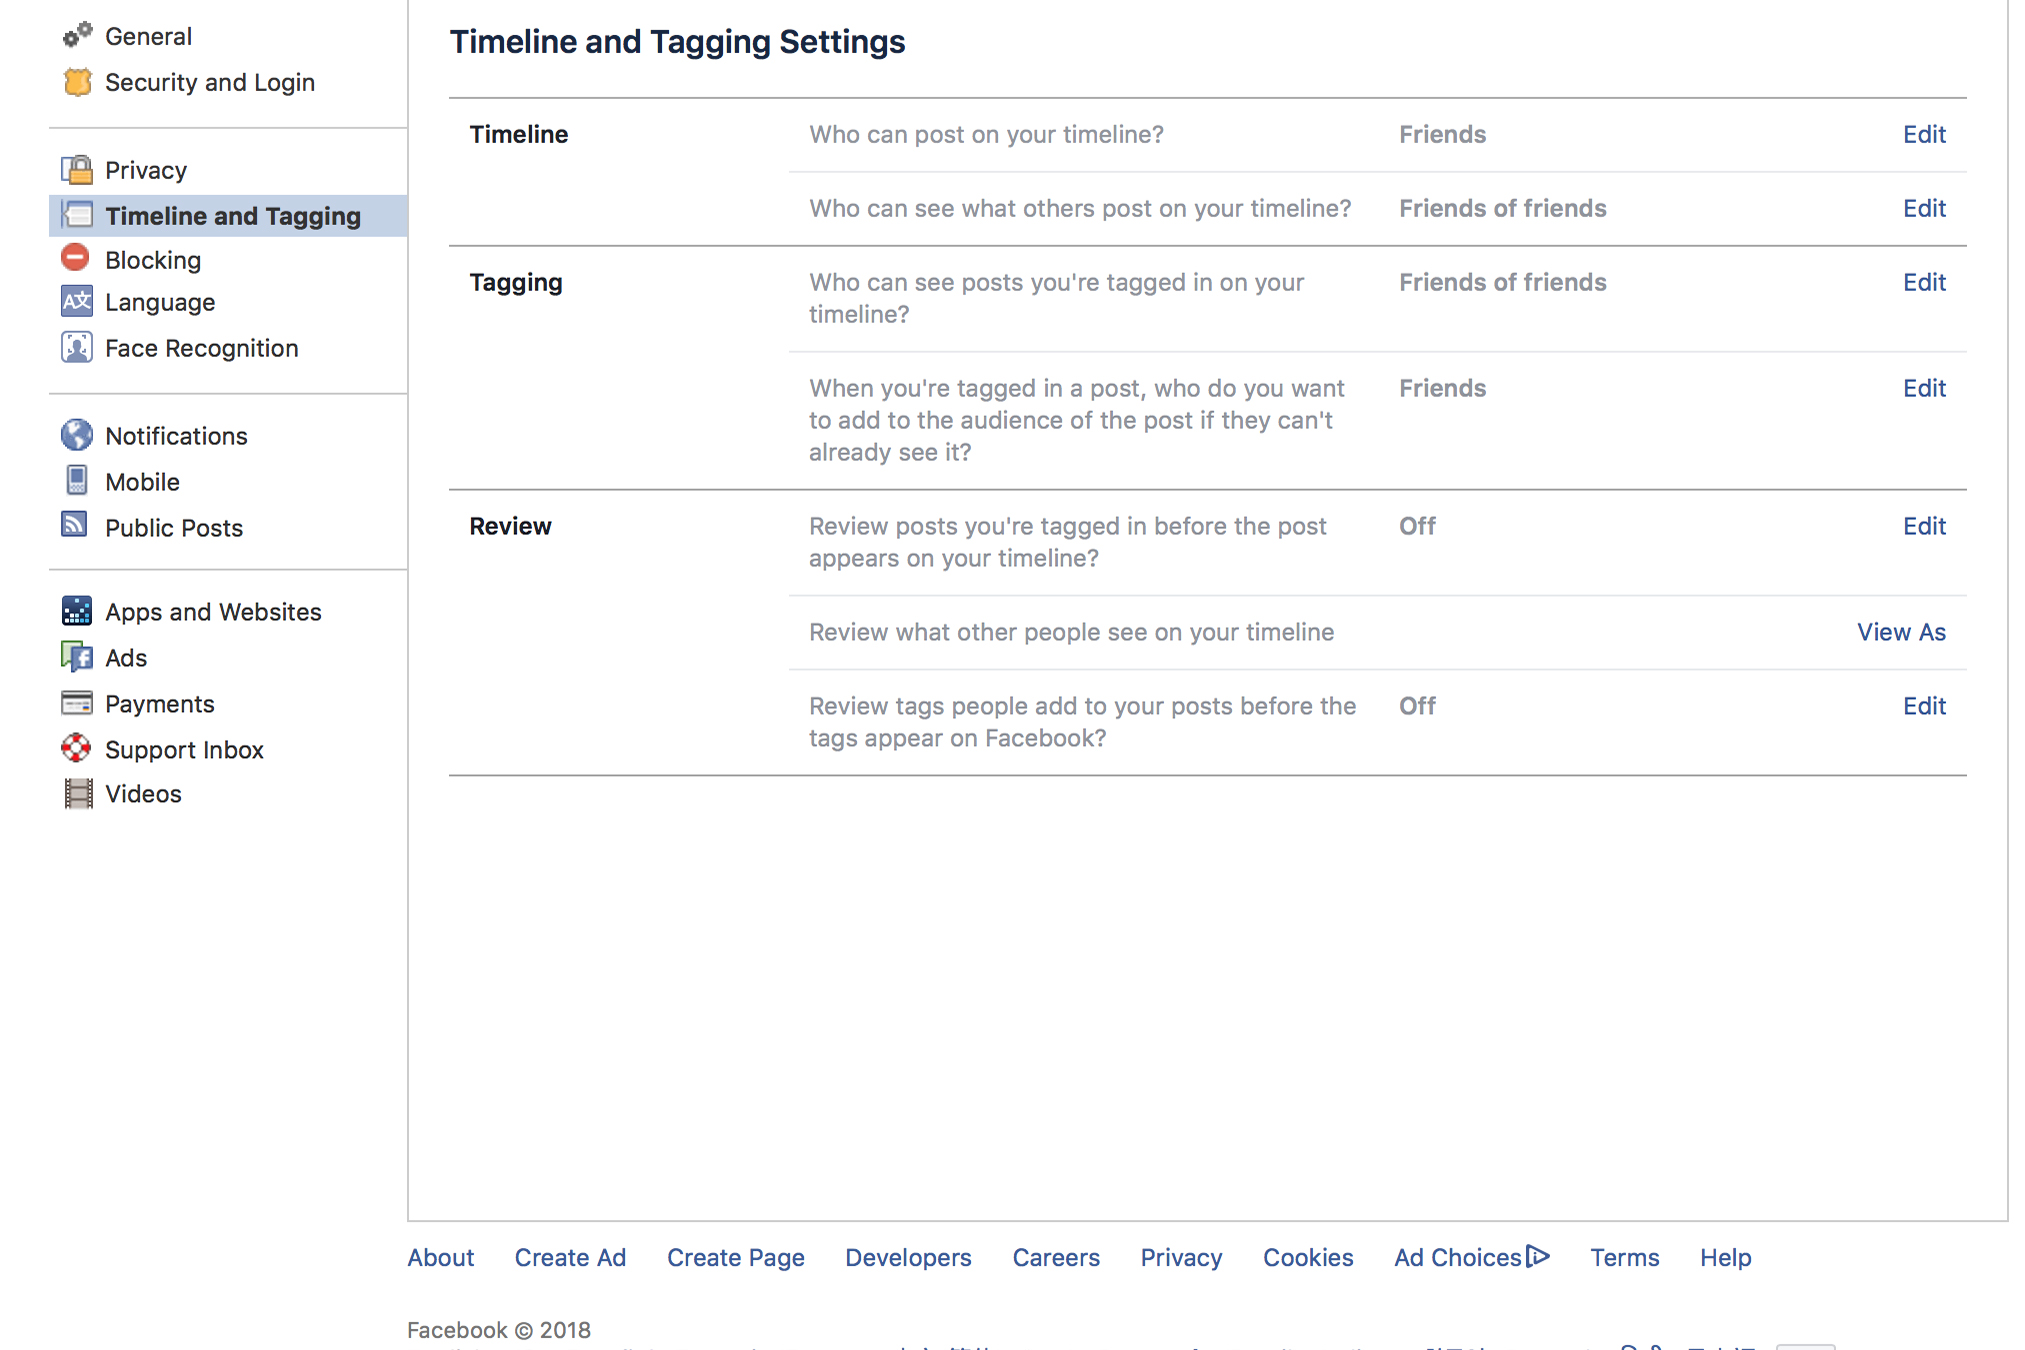
Facebook users can quickly adjust who can and cannot post on their Timeline, ensuring your page consists of posts from friends whom you trust.
To control who can post on your Timeline, click on the “Timeline and Tagging” option in the left-side menu inside the Facebook settings. Click the blue Edit link beside Who can add things to my Timeline? Then, select either Friends or Only Me from the resulting drop-down list.

To control who can see things on your Timeline, click either the blue Who can see posts you’ve been tagged in on your tagline or Who can see what others post on your Timeline. Afterward, select your desired audience from the resulting drop-down menu.

You can also choose to approve posts that you are tagged in before any of your friends see them. You can find these settings on the same page under the Review section — just tap the blue “off” link to turn the option on instead.
Turning facial recognition on and off
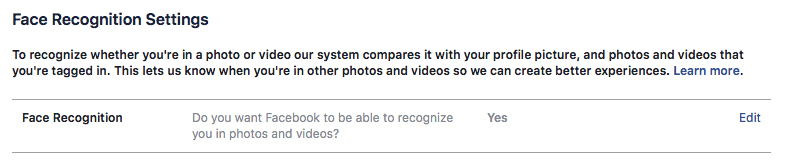
Facebook’s facial recognition tools allow the program to suggest tagging you when a friend uploads a photo of you. The setting is an opt-out, however, so you may be allowing
To turn facial recognition off, click on the Face Recognition option on the lefthand toolbar. Choose the edit option to change your answer to whether or not you want Facebook to be able to ID your face.
Hide or de-authorize third-party applications
Quizzes and games are fun, but you must first authorize each to access your profile information prior to use, even if you have made that available only to your friends. Facebook users should be wary of allowing access to any third party apps — Cambridge Analytica bought information from a third-party app and now a former employee suggests that many of those personality quiz apps are designed to track your data.
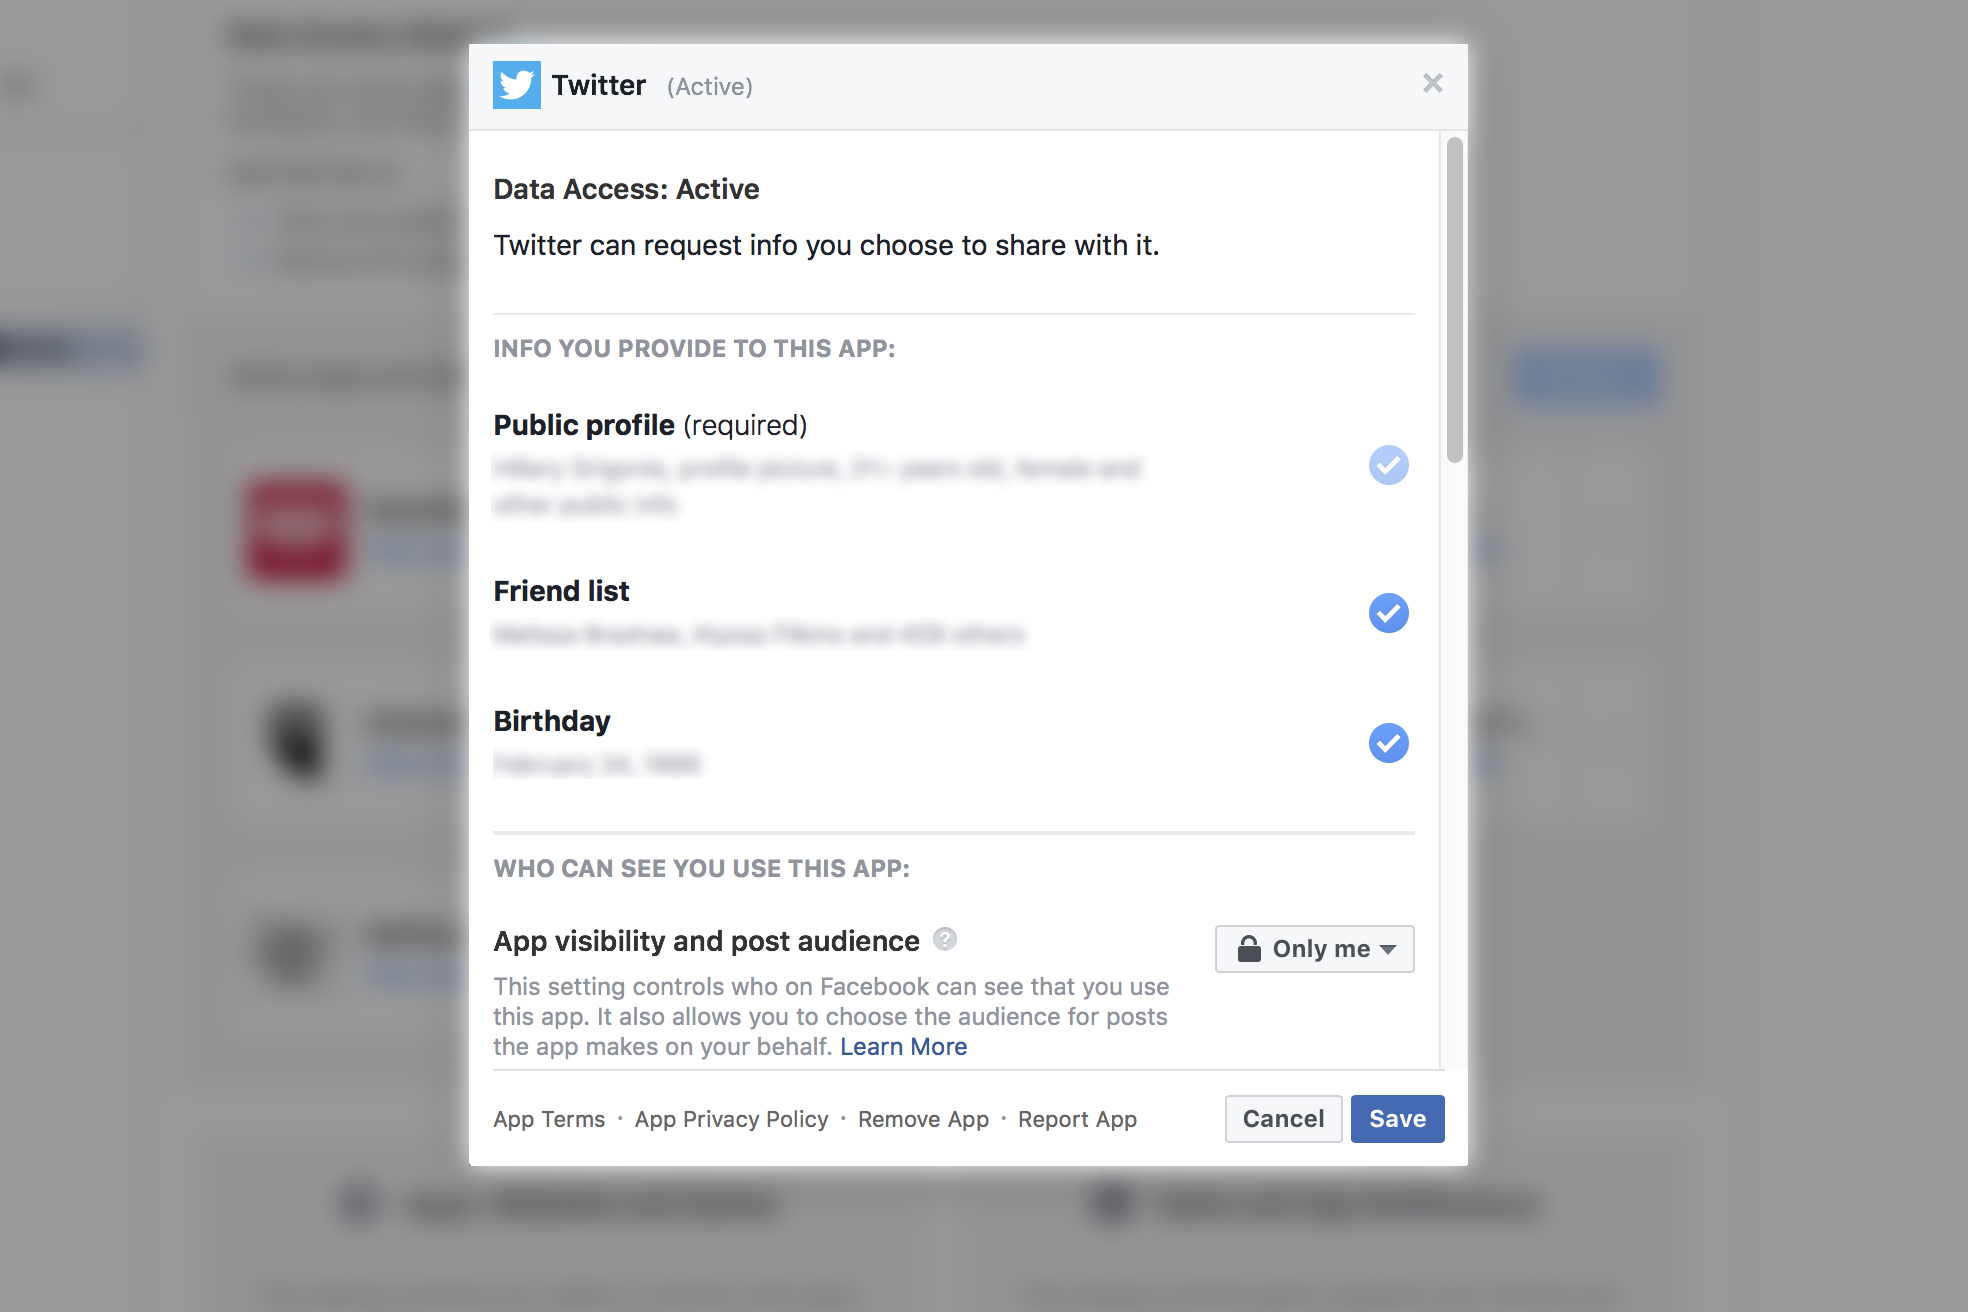
To de-authorize or otherwise adjust app settings, inside the same Privacy Settings and Tools panel, select the Apps and Websites tab from the menu column on the left side of the page (or from the privacy settings menu page on a smartphone). To edit the privacy settings for an individual app, select “view and edit” from underneath a specific app from the list. In the pop-up, you can see what information the app accesses.
You can check or remove the checkmark on the data the app has access to, and you can also choose the visibility of the app, which determines if your friends can see that you use the app. To restrict which personal information you share with others, peruse the list of personal data below the list of authorized apps and uncheck the box beside each option you’d rather not share – e.g., your birthday, bio, hometown, links, photos, etc. Remember that applications can access your public information no matter what.
To delete apps in bulk, click the checkmark next to each app that you want to delete and then click the remove button.
Facebook will expire app access if you haven’t used an app in a while, so if you can’t find a particular app, click on the “expired” tab at the top of the page. You have the same controls here that you do on the active apps, only you can also click to edit an app and also renew the access, if it’s an app that you use and want to be linked to your profile. To see the apps you’ve allowed access in the past, click on the “removed” tab.
Blocking Facebook users, games and content
Blocking prevents both parties from viewing one another’s Timeline, and additionally prevents them from messaging, tagging, and otherwise communicating with each other. Blocked users will not be allowed to friend request you and will not be notified of the action. Users can also block an app and event invites from specific people, along with specified apps entirely. No more Candy Crush Saga requests.
To block a Facebook user and specific content invites, inside that same Privacy Settings and Tools panel, select the Blocking link from the menu column on the left side of the page (or the settings menu on mobile). Here, you can block other users, messages, app invites, event invites, apps and pages. Navigate to the appropriate field for the type of content you’d like to block, then type in a name (the name of the person or app). Select the specific person or app you want to block from the resulting list. Then, click the blue Block button.

At the top of this page, you can also view your “restricted list.” Friends on the restricted list won’t see your posts marked as Freinds only — they will only see your public posts or a post that you tag them in. To restrict friends, you need to navigate to their profile to add them to the restricted list.
Privacy and Ad preferences
You can’t turn Facebook ads off — but you can keep your personal data out of it, if you choose.
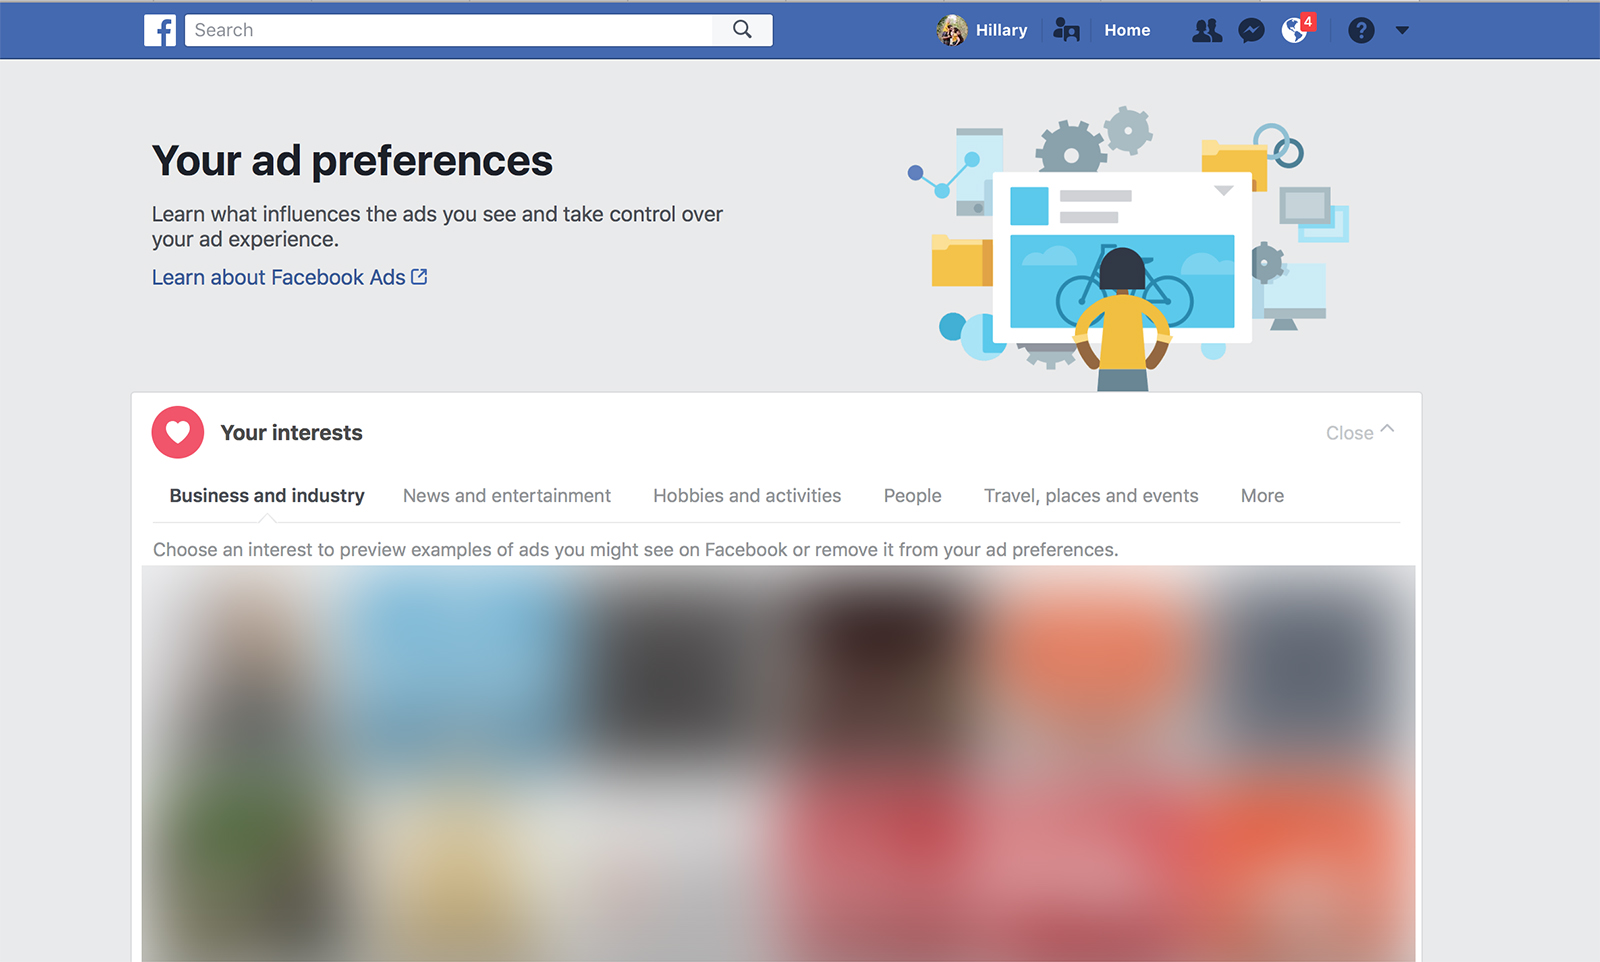
At the top of the ads settings, the category with “Your Interests” includes any interests that Facebook may use to deliver targeted ads. These interests are based on Pages and Ads that you’ve clicked on in the past. If there’s a particular interest you don’t want
The next section lists advertisers you’ve interacted with in the past — businesses can choose to target users that have interacted with them before. The first section is the contact list — that means that the advertiser had your email from somewhere else and uploaded a list to Facebook so that they could interact with users that are already interested. The remaining tabs in this section include websites and apps you’ve used, ads you’ve clicked and Pages you’ve visited. Deleting any advertiser here is the same — just hover over the icon and click the X.
In the information category, you can choose what profile details you allow advertisers to use for targeting. In the first “about you” tab, just click the switch to turn access to information like your job, relationship status and education on or off. The second tab, called “your categories,” allows you to delete categories that you are placed in for ads.
Under Ad Settings, you can choose whether or not to allow partners to use data on your online activity off Facebook, if
In the Hide Ad Topics section, you can choose to hide ads on topics that some may consider offensive or inappropriate or that you may just want to prohibit for personal reasons. Click on the topic using the tabs, then use the toggle to turn off that type of ad for six months, one year or indefinitely. To add more topics, click on the link to suggest more topics.
Want to turn ad targeting off entirely? It’s possible, but the option isn’t built into Facebook itself. For Desktop users, opting out of targeted ads is possible through opt-out programs, with different resources for users in the U.S., Canada, and Europe. Users need to sign up to opt-out from those respective platforms.
Users can also turn off ad targeting from a mobile device. On an iOS device, head to the settings (not the Facebook settings, but the device settings itself), then tap privacy and then advertising. Find the option that says Limit Ad Tracking and turn it on. Using an Android device, head to Google Settings, then ads, and select the option that says “Opt out of interest-based ads.”
Blocking Facebook’s call and text tracking
When you first downloaded the Facebook or Messenger app, you may have spotted a prompt asking you if you wanted to speed up the process of getting set up by importing your contacts list. Sounds good, right? Not for the privacy wary. Agreeing to that prompt also means agreeing to allow
To turn the continuous use of your contacts off, head to Facebook’s contact tool page and choose “delete all contacts,” then select the call logs tab and choose “delete all call logs.”
Hide personal information from the about section
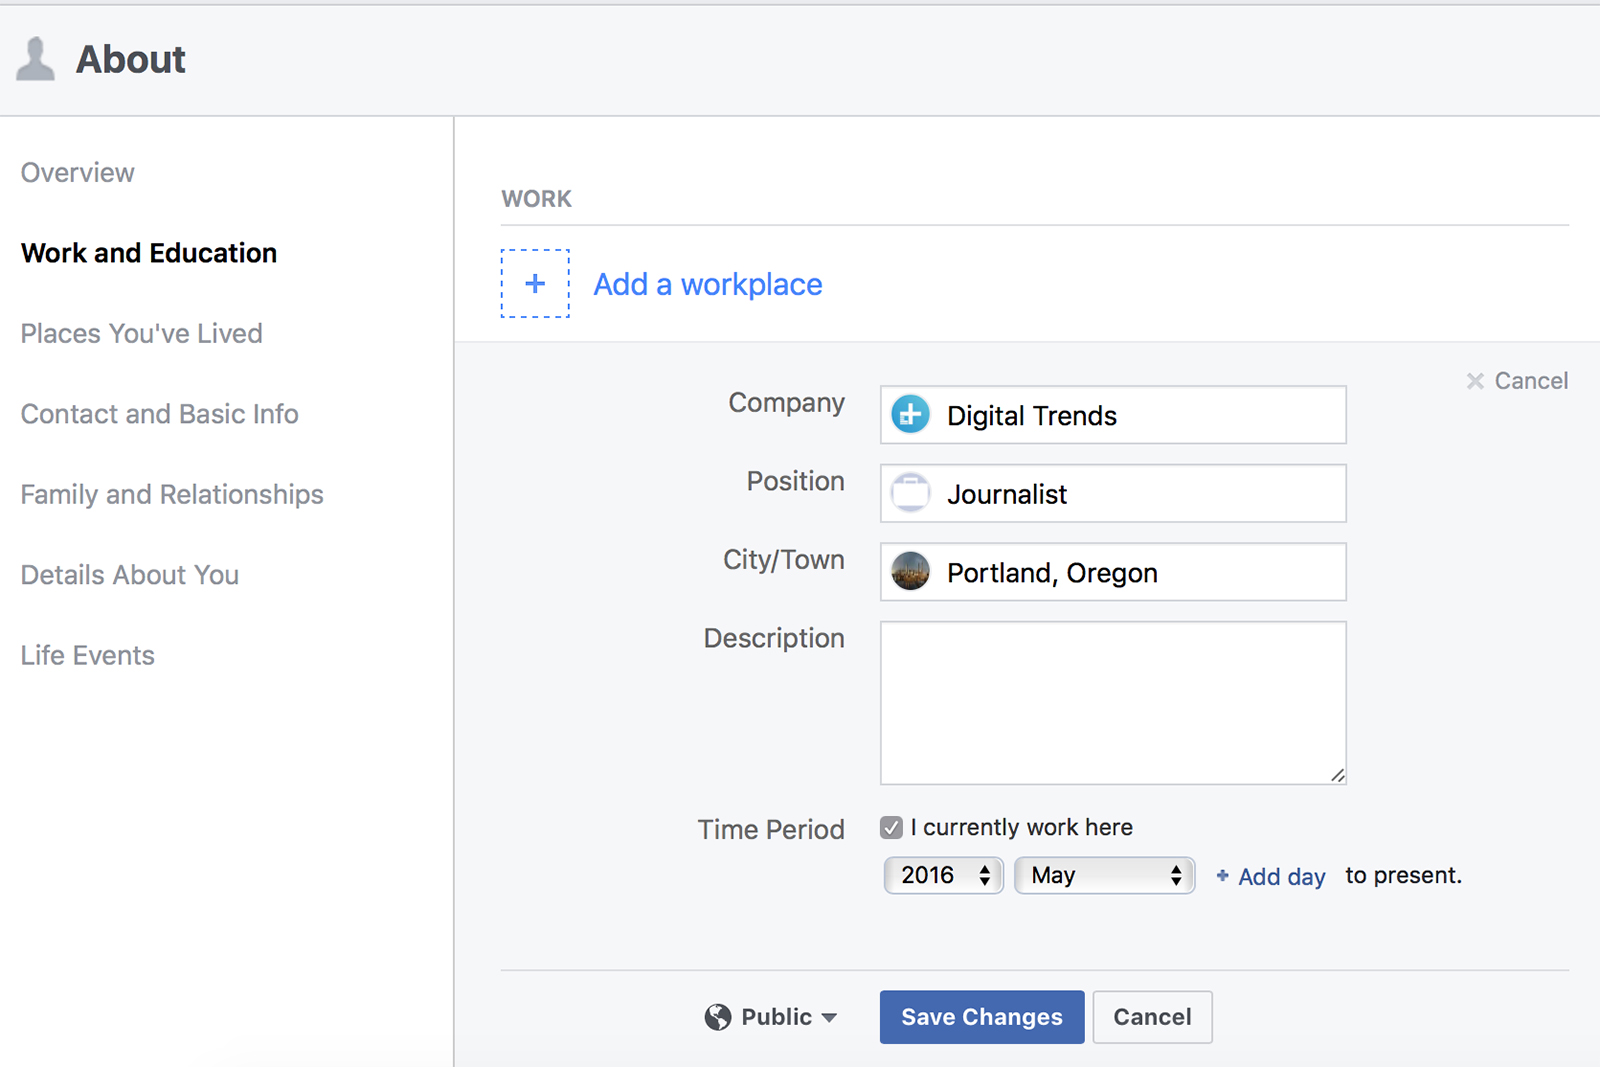
The About tab provides the bulk of the information, from your work and education to your family members and favorite quotations, all easily accessible from your Timeline. However, users can specify which facets of the About tab they wish to share, restricting access to a selected audience of their own choosing.
To adjust who sees the information within the About section, click the About tab below your cover photo while viewing your Facebook Timeline. Underneath each entry, you can change the visibility of each item by clicking the options icon and selecting edit. (Some options don’t have the drop-down and just say “edit.”) At the bottom near the save changes button, select your desired audience from the drop-down menu and save your changes. These changes can be applied throughout the About section, from work history to your hometown.
Hide friends, followers, and who you follow

Facebook considers publicly available information to include your friends list and list of people you follow. Privacy advocates worry that much can be gleaned from said lists, but there is a way to hide one or all both, if you’re worried.
To make lists private, click the Friends tab below your cover photo while viewing your Facebook Timeline, then click the pencil icon next to the “find friends” button in the upper right and select “edit privacy.” Choose whether you’d like your friends list to remain public, only visible to your friends, or only you. You can even specify individuals using the Custom option. Repeat the process for the things you follow.
Update your friends list

The average, adult Facebook user has 338 friends. But many people interact with a much smaller group when commenting on status updates, photos, and links. So it doesn’t hurt to occasionally review your list of your friends to get an idea of who should view your status posts, vacation photos, and funny memes you’ve shared over the years. Don’t feel obligated to add anyone as a friend. For a professional acquaintance, you don’t want to snub, send them to a LinkedIn profile you can set up. Some workplaces and schools have rules about
To unfriend a friend, click the Freinds tab below your cover photo while viewing your Facebook Timeline. Scroll through your friends list, hover over the Friends button to the right of the person you wish to remove, and select Unfriend from the resulting drop-down menu.
Create custom friends lists
If you have friended a lot of people, sort them. Think of the groups you interact with in real life – co-workers, college buddies, family, acquaintances – and organize your Facebook friends into these groups, too. Doing so allows you to set different levels of access for each group, granting individuals restricted access to status posts, photos, and other content.
Facebook automatically generates some friend lists for you based on information you’ve already provided, such as gleaning your education data to create a list of the friends that you went to high school with. These lists are called smart lists. To see or edit friends lists, head to the friends tab on your own profile.
Hover over the “friends” icon next to the name of a friend and click on “add to another list.” Then, click on one of the existing lists in the next menu (smart lists are designated with a lightning bolt) or click on the “new list” option and type in a new name and hit enter. Freinds can be on multiple lists at once, and Facebook doesn’t tattle and tell friends which list they are on.
Once you have the friends list created, when you write a new post, you can now choose “specific friends” from the drop-down menu and select a friends list, allowing you to choose to only allow certain friends to see the post. Another option is to use the “friends except” option and type the name of the list you want to be excluded.
Editors' Recommendations
- How to go live on Facebook
- How to change your Twitter username and display name
- How to post a GIF on Instagram
- Zuckerberg may have known more about Facebook’s privacy scandal than we thought
- How to link Instagram to Facebook


