Although you can go many months without noticing any grime on your favorite Xbox controller, it's probably littered with dust and hand oil after only a few weeks playing the best Xbox Series X games. Controllers are not an expensive accessory, and obviously a requirement for playing, so you would be wise to take good care of them so they remain reliable when all the upcoming Xbox games arrive.
If you're having troubles with the console itself, check out our guide on the most common Xbox Series X problems.
How to clean your Xbox controller without taking it apart
Most Xbox controller cleaning jobs require nothing more than an external sweep. Still, even if your controller seems relatively clean, you should give it a full cleaning. Sweat and dust can easily build up in the crevices of your controller, and although you may not see the buildup, it’s almost certainly there.
Step 1: Start by using your can of compressed air to blow away any surface dust, pet hair, or human hair from the face of your controller. If you have an air compressor, you can also use that to clean surface dust, but be careful. Too powerful of an air stream may push crumbs and dust deeper into your controller.
Step 2: With the large bits out of the way, give your controller a rub down using your microfiber cloth. The goal is to remove things like dust from your controller before using the microfiber cloth, as the more junk that gets stuck in your cloth will make it less effective. If you’re having a hard time, you can mix a little bit of water with your isopropyl alcohol inside a spray bottle (the goal is a 50/50 mix).
Step 3: Lightly dampen your microfiber cloth with the spray and run over the controller again, paying close attention to the inner space between buttons and the undersides of the thumbsticks.
Step 4: After you’re done, leave your controller to dry naturally. The leftover moisture will pull lint from towels, paper towels, and tissues, so it’s best to let the air do its work rather than drying off your controller manually.
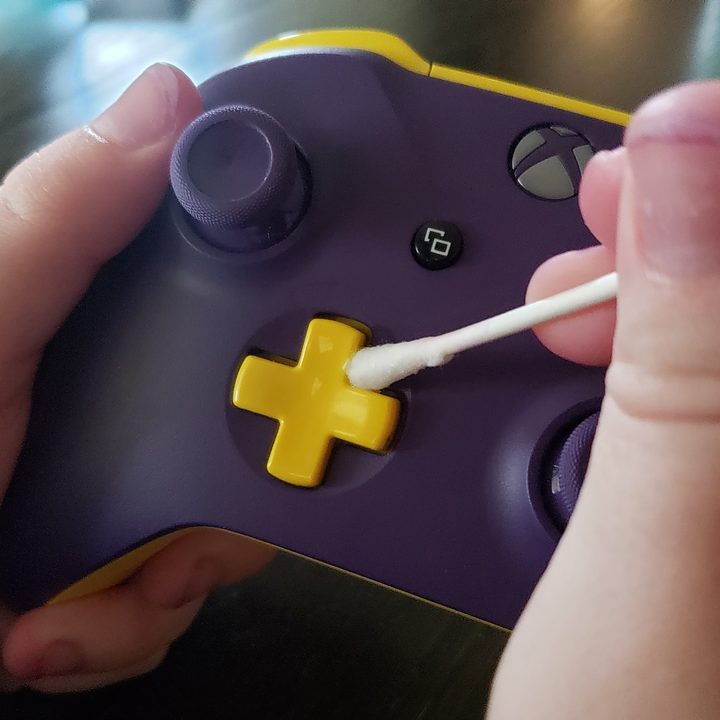
Step 5: With the surface cleaned, it’s time to move on to the details. Grab a cotton swab and gently dip it in your isopropyl alcohol (no extra water this time). You don’t want the swab to be dripping, just saturated enough so that alcohol covers all of the cleaning surfaces.
Step 6: Gently clean your controller’s buttons, thumbsticks, d-pad, and triggers, being sure to lightly cover these surfaces with alcohol. You don’t want to drown them, but you do want enough on there to clean off any residue. Repeat as many times as necessary.
Step 7: Leave your controller to dry naturally. Rubbing alcohol dries very quickly, so you shouldn’t be waiting too long.
Step 8: Take a dry toothpick and gently scrape the seams of the controller. Although you may not see it, there’s likely oil from your hands that’s found a home in the creases of your controller.
Step 9: Repeat this process on the edge of the d-pad and on the textured surface of the thumbsticks. You may need to go over the thumbsticks a few times. The textured ring at the top has a knack for trapping and hiding the oil from your hands.

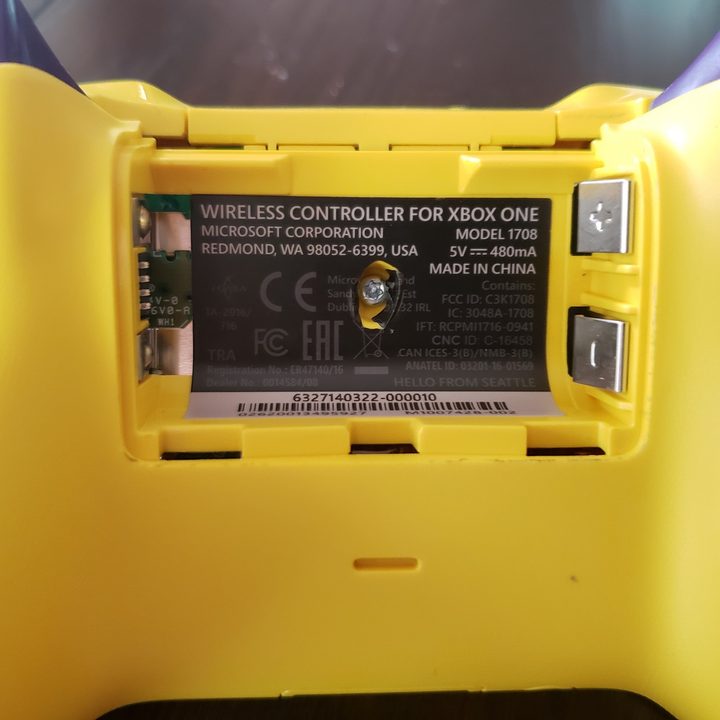
Step 10: You may want to check under your battery cover, too. During our teardown, we even found oil buildup there, despite using a relatively new controller.

How to take apart an Xbox One controller
If you still have more cleaning to do, you’ll need to take apart your Xbox controller. Although the cleaning process above works for Xbox 360 and Xbox One controllers, we’re going to cover how to take apart an Xbox One controller specifically. It should go without saying, but this is an advanced process, so attempt it at your own risk.
Step 1: First, take the batteries out of your controller. In addition to removing the risk of electrocuting yourself, there’s a hidden screw in the battery bay that you’ll need access to.
Step 2: Remove the handle covers by depressing one of the triggers and use the opening to wedge your plastic pry tool into the controller. Don’t go too deep, though. The goal is to gently pry the handle cover away from the body, not damage any of the internal components. Work your way around the edge of the handle, rocking back and forth with a little bit of force.

Step 3: With them removed, you’ll find four screws, two on each handle. Unscrew them using a TR8 bit, being careful not to strip them. If you’ve never used this type of bit, it’s for Torx heads, which look like a star with six points. It’s impossible to remove these screws with a Phillips-head screwdriver, and although you may be able to fit a flathead screwdriver inside, you’ll almost certainly strip the screws before removing them.
Step 4: Carefully remove the screws and place them in your magnetic parts tray corresponding to their position on the controller (top left screw goes in the top left of your tray, for example).
Step 5: Finally, grip the front of the controller and gently poke at the sticker in the battery bay. You’ll find a small hole. Puncture it with your screwdriver gently to reveal another screw.
Step 6: At this point, this screw is the only thing holding your controller together, so be sure to grip the body when removing it. Once it’s out, you can freely remove the back by pulling down and back. The front should fall right off.
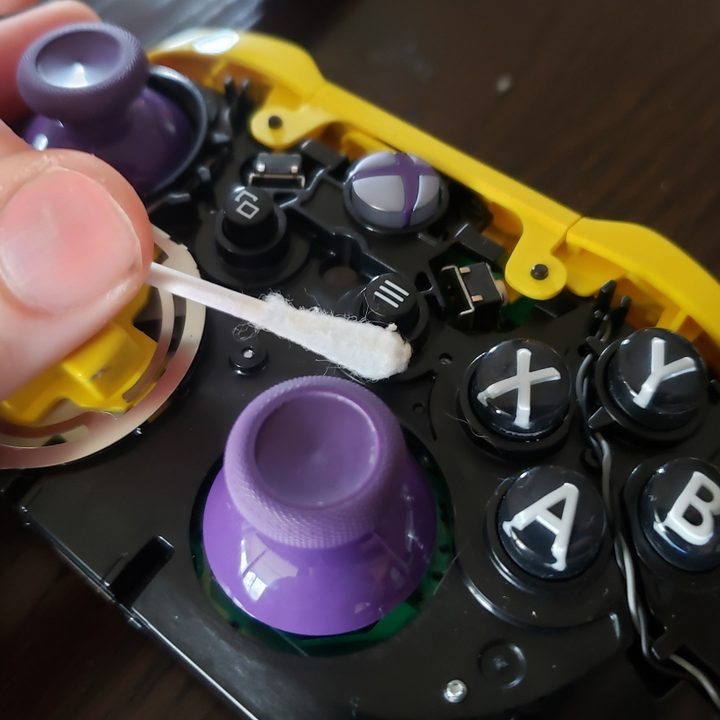
Step 7: Between the two, you’ll find the bones of the controller. Everything is still held in place, just with a little more room. Again, clean around the buttons and thumbsticks using a cotton swab soaked in rubbing alcohol. This is pretty easy to do, as there’s a plastic cover internally that holds the buttons in place.
What to do if your Xbox One controller has a button jammed
If you have a button jammed, the most likely culprit is a rogue crumb that’s worked its way between the controller face and the button. If you’re able to implement the cleaning process outlined above, you’ll be able to dislodge anything stuck beneath the controller’s buttons. If not, though, there’s a problem inside your controller.
Once you take the controller apart, you’ll be able to really focus your cleaning on the button that is messed up. If you’re still having trouble with any of your buttons, then the issue might be with the connection pad on the motherboard. In that case, we recommend seeking out a professional repair service.