I’ve written optimized settings for dozens of PC games, painstakingly tweaking them to recommend the ultimate bang-for-your-buck performance. That experience can vary wildly too — with some of the most demanding PC games will bring your graphics card to its knees, regardless of the settings you tweak, and titles like the annual Call of Duty release are so bogged down with settings that it’s hard to know where to start.
And although every title is a little different, there are a few key rules I always keep in mind when optimizing PC performance that can make games look and perform their best. Follow these, and hopefully, they’ll help you become a wizard in the graphics settings menu, optimizing your performance and image quality within a matter of minutes rather than digging through lists of half-baked settings.
Resolution rules all
There’s no amount of tweaking you can do in graphics settings that can overcome resolution. It’s the overlord of your performance, for better or worse. That’s why upscaling features like Nvidia’s Deep Learning Super Sampling (DLSS) — which render the game at a resolution lower than your display — show such a massive performance improvement. The fewer pixels your GPU has to render, the more frames it can crank out. And on the flip side, the more pixels your GPU has to render, the fewer frames it can handle.
Resolution also exposes a lot about a game and how it interacts with your PC. When your PC renders a game, the goal is to have your CPU get out of the way of your GPU. You essentially want your game to be bottlenecked by your GPU, meaning that all of your GPU’s horsepower is being used up since it’s the main component driving your frame rate.
That plays into your resolution in a big way. As mentioned, there’s more pressure put on your graphics card when it has to render more pixels. That’s why turning down the resolution in a game can expose a CPU bottleneck — with fewer pixels to render, your CPU may hold your GPU back from pushing out more frames.
Understanding resolution and how it impacts your performance allows you to get a view into how a game is stressing your components. If turning down the resolution doesn’t yield a big increase in performance, maybe the game is heavier on your CPU. There’s also a chance that increasing your resolution can improve performance. Particularly with high-end GPUs like the RTX 4080, you may improve your performance by increasing the render resolution on a lower-resolution monitor. You can also figure out these bottlenecks through monitoring tools like RTSS Rivatuner, but understanding how resolution impacts your performance is essential for getting a deeper look into how a game behaves under real use.
Monitor your frame rate (and then ignore it)
The first thing I do when I start tweaking my graphics settings is pull up a frame rate counter. I play a bit, adjust a few settings, play some more, and then go back to adjusting. It’s an iterative process that takes about 20 or 30 minutes to get the game looking and playing how I want, but it’s important not to get bogged down in the settings menu. You’re here to enjoy playing games that look and perform their best, so turn the frame rate counter off (or ignore it) once you’ve settled on something that looks and plays the way you want.
It seems obvious, but it’s easy to get locked up for hours tweaking your settings without ever settling on something. You’re probably not missing out on extra performance, and the more time you spend staring at minor areas of a scene, the less time you spend enjoying the game you’re playing. It’s important to monitor your frame rate early on and see how settings changes impact performance — that, like resolution, can reveal a lot about how a game works — but you’ll want to ditch the frame rate counter later. Even if demanding scenes show an impact on performance, if you’re still getting the experience you want out of the game, your settings are working just fine.
That’s why I created a list of recommended settings for the latest games, going through and testing each setting on its own so you have a good starting point for performance in games like Call of Duty Modern Warfare 3 and Baldur’s Gate 3. You don’t need to go through that same process just to play a game. Tweak a bit early on, but let the game overtake after that point.
Start with upscaling on
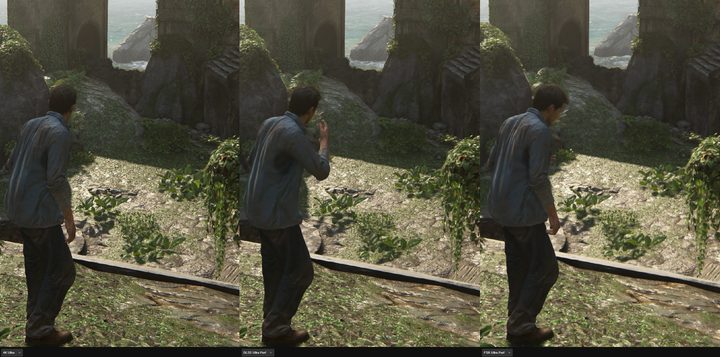
Most modern games include some form of upscaling, and usually multiple versions. You’ll most likely find Nvidia’s DLSS and AMD’s FidelityFX Super Resolution (FSR) in a game, and I recommend starting your game with one of these features turned on. That doesn’t mean you should leave them on, but it can set a good baseline for performance and image quality that you can easily tweak later on. I would default to DLSS if you have an RTX GPU that supports it, but AMD’s FSR 2 isn’t a bad option.
I usually start with the Quality mode and play the game for a bit to see where performance ends up. True to the previous tip, if you’re having a good experience while playing the game, you don’t need to mess with the upscaling further. Starting with upscaling on exposes what the tool is doing to the game, for better and worse. After playing for 15 or 20 minutes, toggle off the upscaler and see how the game is running. There are cases, such as Resident Evil 4, where you’ll see a slight reduction in performance for a big boost in image quality. Best leave upscaling off. Then there are others, such as Starfield, where the visual improvements aren’t worth the performance losses. Best leave upscaling on.
I wouldn’t start with upscaling off and then turn it on, though. It’s easy to see a slight drop in image quality and write the upscaler off, regardless of the performance improvements it brings. By starting with upscaling on, you can settle in and see if the image quality trade-off is truly worth it for the performance gains you’re seeing.
Lighting taxes
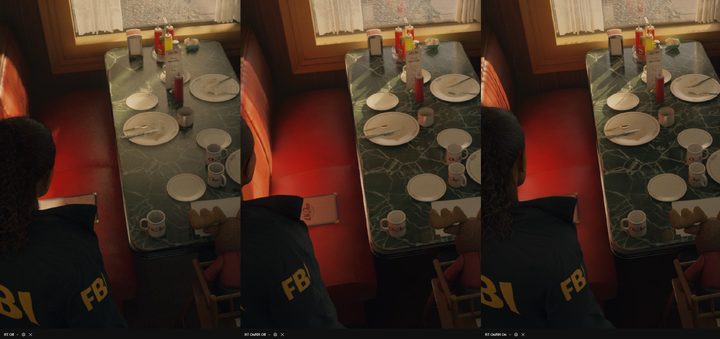
We’ve covered some high-level thoughts about how to approach your graphics settings, but let’s get specific. When you first start tweaking your graphics settings, look to the light. Lighting, shadows, ambient occlusion, and global illumination are all very taxing on hardware, so you’ll want to point your cursor in their direction when looking to make cuts. Consequently, these settings also have the biggest impact on image quality, so it’s key to find a balance.
This doesn’t apply to every game, but it’s a good place to start if you’re struggling to decipher the graphics menu. This is especially true if a game supports ray tracing or full-on path tracing. It’s tempting to flick on ray tracing if you have some high-end hardware, but if you’re not seeing the performance or image quality you want, leave it turned off.
Volumetrics
In the same vein as lighting are volumetrics. Air isn’t clear, and volumetrics are meant to simulate the effect of light moving through space. You’ll see volumetric lighting — commonly known as “god rays” — and volumetric fog most commonly, both of which can tank your frame rate. In some games, these volumetrics can provide a huge visual payoff, but they should be among the first settings you reach for when optimizing performance.
I suggest making big cuts to volumetric fog and clouds if they’re available. Volumetric lighting has a much larger impact on visual quality. Fog and clouds, in most games, won’t be apparent as much as lighting will, allowing you to save a lot of performance for a minor visual sacrifice. Some titles even allow you to turn off the volumetrics entirely, replacing fog and clouds with decals. That can provide a huge boost to performance.
Don’t ignore post process
You’ll generally find a list of post process settings at the bottom of the graphics menu — things like chromatic aberration, depth of field, motion blur, and film grain. The traditional wisdom has been that you can largely ignore these effects, short of turning off motion blur. That’s changed over the past few years, though, and post process effects can have an impact on performance for minor visual gain. There’s an argument they make the game look worse, even.
Although they’re called post process, many of these effects are still part of the rendering chain. Things like motion blur and depth of field aren’t just overlays like camera grime; they’re part of the rendered frame, and everything that’s rendered has some impact on performance (no matter how small). These are some of the few effects that, in certain cases, can improve performance and image quality, so you’ll want to cut them if you can. The only downside this can have is that post process effects can cover up imperfections in the game, so turning them off may reveal lower-resolution textures that you otherwise wouldn’t see.
The anti-aliasing paradox
Anti-aliasing is complicated. It’s supposed to make your games look better by filling in the missing detail between pixels. Pixels are squares, and objects don’t fit neatly into squares. Anti-aliasing steps in to smooth out the rough edges — known as “jaggies” — to improve image quality. It doesn’t always work out that way, though. Depending on the type of anti-aliasing you’re using, and the resolution of your monitor, it can make your game look worse.
Anti-aliasing was originally intended as a way to improve image quality on lower-resolution displays. Lower resolution leads to larger pixels, and that makes jaggies more noticeable. Today, when 27-inch 4K monitors are common, however, those imperfections are harder to spot. Anti-aliasing is still essential at lower resolutions, but the smoothing of jagged pixels can actually make the game look softer at higher resolutions, as well as introduce artifacts with techniques like Temporal Anti-Aliasing (TAA).
That doesn’t mean you should turn anti-aliasing off entirely, but you shouldn’t necessarily default to leaving it on, either. In the best case, you can use something like Nvidia’s Deep Learning Anti-Aliasing, or a high-quality mode of FSR or DLSS, to apply anti-aliasing. Some games, such as Alan Wake 2, solely rely on these upscaling tools for anti-aliasing.
Use your eyes
Ultimately, the best thing to do when tweaking graphics settings is to use your eyes. Articles or videos may say one setting destroys image quality, or that another doesn’t have an impact. But if you like what you’re seeing, both for performance and image quality, go with it. It’s important to remember lists of optimized settings are just a starting point, and if you find something that works for you, then those are the best settings to run with.
This still requires a critical eye. Although it’s best to get your head out of the graphics settings at some point, you should spend some time when first beginning a game to closely look at your performance and image quality to see if everything is working out how you want. And after adjusting your settings, pay attention to how that impacts the final image. This exercise can make adjusting settings in other games much easier as you learn what works and what doesn’t.