You installed Apple’s new MacOS Catalina on your Mac, but you might be having issues with the latest version. Unfortunately, you can’t simply revert to Mojave. The downgrade requires wiping your Mac’s primary drive and reinstalling MacOS Mojave using an external drive. If your Mac initially shipped with Mojave, however, you can skip the external drive instructions.
Note: These steps work just as well for switching from MacOS Big Sur back to Catalina. Just make sure to choose the right operating system (OS) version for what you want.
Further reading:
Step 1: Back up your Mac
Before anything, create a current Time Machine backup to save your files, or send everything to the cloud, whether it’s Dropbox, OneDrive, iCloud, or so on. Chances are you may already have a backup before installing Catalina. If not, create one now before moving on to the next step. As stated, downgrading to Mojave requires wiping your Mac’s drive.
If you need help backing up your Mac, follow these step-by-step instructions.
Step 2: Enable external media booting
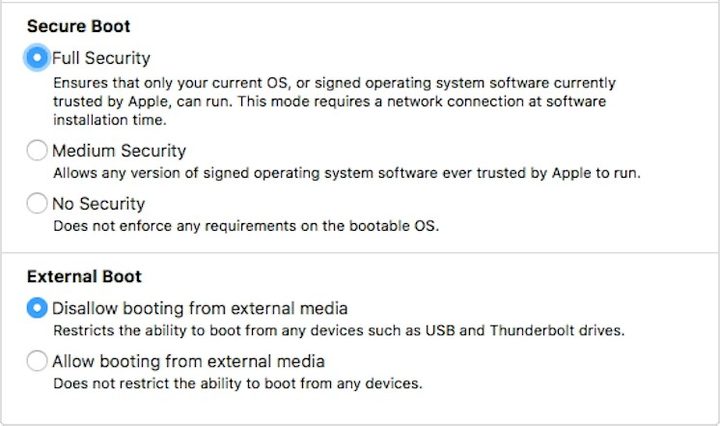
This step applies to MacBook Pro, MacBook Air, and Mac mini models released in 2018 and newer. It also applies to the iMac Pro released in 2017 and newer. These devices include Apple’s T2 security chip providing secure boot, encrypted storage, live “Hey Siri” commands, and more.
To verify that you have this chip, follow this path: Apple button > About This Mac > System Report > Controller (or iBridge).
If your Mac doesn’t include Apple’s T2 security chip, you won’t need to enable external media booting. Otherwise, restart the Mac and hold down the Command and R keys until the device boots into Recovery Mode.
With Recovery Mode open, click Utilities on the toolbar followed by Startup Security Utility in the drop-down menu. Enter the administrator credentials when prompted, then check the box next to the Allow Booting From External Media option listed under External Boot.
Step 3: Download MacOS Mojave
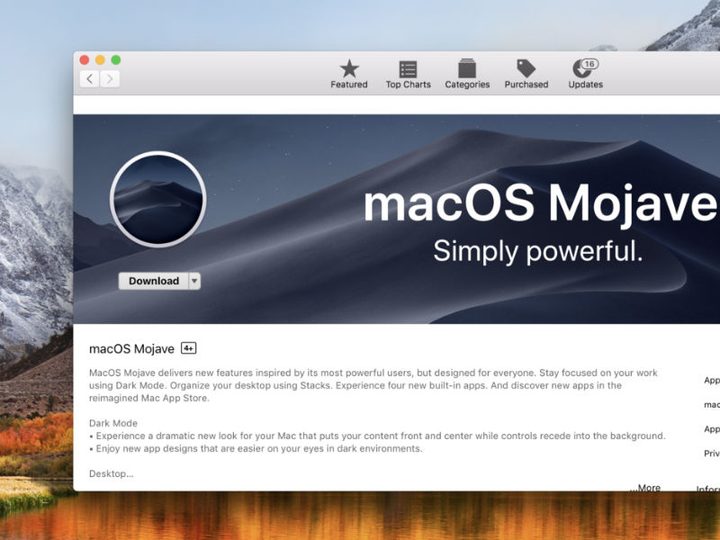
You’ll need to grab MacOS Mojave from the Mac App Store. The best way to retrieve a copy is to follow this link on a Mac, as Mojave doesn’t show up when performing a search within the Mac App Store itself.
Clicking the link should automatically load Mojave’s product page within the Mac App Store app.
Step 4: Prepare your drive
To continue, you’ll need to format an external drive. Connect an external drive and follow this path:
Finder > Applications > Utilities > Disk Utility
Select your drive listed under External and click the Erase tab. Name the drive, select the proper format (MacOS Extended or APFS), select GUID Partition Map if available, and then click Erase. Select Done when the formatting completes.
Now the external drive needs to be bootable. Follow this path:
Finder > Applications > Utilities > Terminal
Type the following into the Terminal. Remember to replace YourExternalDriveName with the drive’s actual name that you created in the formatting step.
sudo /Applications/Install macOS Mojave.app/Contents/Resources/createinstallmedia –volume /Volumes/YourExternalDriveName
Press the Enter/Return key after typing the command. You’ll need to enter the administrator password when prompted, followed by the Y key to confirm.
Step 5: Wipe your Mac’s drive
With MacOS Mojave now installed on an external drive, you’re ready to wipe your Mac’s drive. Don’t connect the drive just yet. Instead, restart and hold down the Command and R keys until the device boots into Recovery Mode.
Next, click the Disk Utility option, followed by Continue. On the following screen, select your Mac’s primary drive and click the Erase button. Follow the instructions to pick a drive name, file format, and GUID Partition Map.
Step 6: Install Mojave
If your Mac shipped with MacOS Mojave, restart and hold down the Shift, Option, Command, and R keys simultaneously. Doing so will automatically install Mojave from an image located on a dedicated partition.
Otherwise, connect your Mac to the internet, connect the external drive, and restart via the Apple icon in the top left corner. As the Mac restarts, hold down the Option key.
The following screen will present a list of startup disk options. Select your external drive that contains the MacOS Mojave installer. Then click Continue.
Alternative: Use Time Machine

If you have a Time Machine backup saved from when your Mac was using Mojave, you can also choose to reinstall this particular backup to fully wipe out the Catalina OS. While most of us don’t have a backup that extends as far back as Mojave, you should always double-check as certain Time Machine backups are old enough to do it. We must remind you to revise the data for anything you want to salvage from Catalina before wiping it out.
The Time Machine app operates when your Mac is set to Recovery Mode. To access Recovery Mode, press the Command and R keys while restarting your Mac. This will open your macOS Utilities, which will have a feature called Restore From Time Machine Backup. You’ll need to select this option, then confirm you want to restore the backup by clicking Continue.
To begin the backup restoration, you need to choose your backup source. Look for the most up-to-date Mojave backup you have and use it to serve as your starting position. Note that if you keep your Time Machine backups on an external hard drive, it will need to be connected before Utilities searches for it.