One of the best parts of macOS is learning and executing all of Apple’s many internal shortcuts. These are hidden commands built into the company’s hardware that are total godsends when it comes to things like click consolidation (one command instead of three clicks) and workflow optimization. Some of these commands you may already know, but we’re willing to bet there’s at least one or two we can introduce to you!
That’s our goal at any rate, and we’ve gone ahead and created this roundup of several trackpad gestures you can use in macOS for all our readers. Even if you don’t use shortcuts all the time, one of these quick executables could come in handy down the line.
Zoom in or out

When one needs a digitized magnifying glass, you don’t have to resort to manual macOS controls for adjusting your page zoom (clicking View > Zoom In or Zoom Out repeatedly). Instead, you can just execute zoom-in and zoom-out gestures using your trackpad.
To do so, simply pinch with two fingers anywhere on your trackpad. Spreading your fingers outward will zoom in, while pinching inward acts as a zoom out.
Swipe between pages
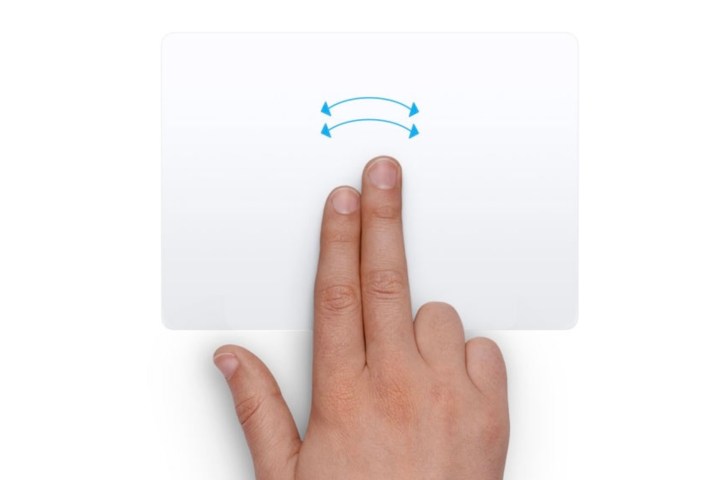
Let’s say you have a PDF open with multiple pages you need to sift through. On top of scrolling through the document, or inputting whatever page number you’d like to jump to, you can also turn pages using your trackpad.
Just put two fingers together and swipe from left to right for a a page forward command, or right to left to go back one page.
Open Notification Center
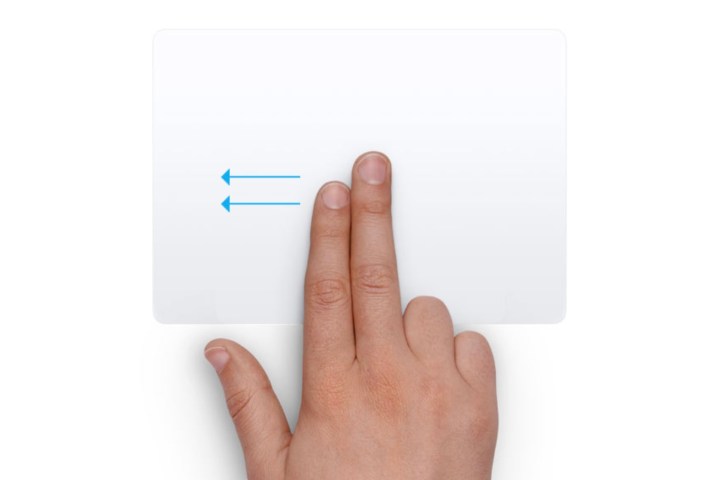
All of your macOS notifications are stored in a hidden menu called the Notification Center. It’s not all that hidden though, as Apple makes it pretty simple to pull up the column with one trackpad command.
Put two fingers together, position them to the right edge of your trackpad, and swipe left.
How to open Launchpad
Whether you want to gain a quick overview of your installed Mac apps or just launch something quickly, this gesture is invaluable. It opens the Launchpad app, which shows all of your apps on a grid for swift access.
To perform it, just move your thumb and first three fingers together on your trackpad. To close Launchpad, simply move your fingers and thumb apart, or press the Esc key.
How to show your desktop
You can also do the reverse of the Launchpad gesture above. In macOS, spread your thumb and first three fingers apart and your open apps will be cleared out of the way, revealing your desktop.
This is a handy way to find files and folders on your desktop that would otherwise be obscured by an app window. It’s also a great way to drag a file from your desktop into an open app. Just move your fingers and thumb apart, then click and drag the file onto the app’s icon in the Dock until it starts flashing. The app will return and you’ll be able to drop the file in place.
How to drag files (the better way)

If you’ve ever tried to drag a file from one side of your screen to the other using just your trackpad, you’ll know this can be tricky, especially if you reach the edge of your trackpad. Luckily, there’s a better way to do it.
Open the Settings app and select Accessibility > Pointer Control > Trackpad Options. Enable Use trackpad for dragging and choose Three-Finger Drag from the dropdown menu.
This lets you move a file by positioning the macOS pointer over it and moving it using three fingers at once, at which point the pointer ‘latches on’ and starts moving the file. The best part of this is you can let go of the trackpad, and then do another three-finger drag to move the file again. That means you can quickly do multiple swipes and move the file around without having to keep your fingers on the trackpad, which isn’t always easy.
How to Force click

Apple’s trackpads let you ‘Force click’ (or press a little harder) in order to get extra functionality. That works really well and is definitely worth incorporating into your daily routine.
For example, if you do a single-finger Force click on a word in Safari, you’ll see a pop-up window with a definition of the word. At the bottom of the window are other categories with extra info, such as relevant films, map data, Siri knowledge, and more.
This works on what Apple calls “data detectors.” These can be addresses, phone numbers, email addresses, web links — anything you can take subsequent action on in macOS. Force-click a link, for example, and you get a pop-up preview of the web page. The many different uses of this gesture make it a very useful one to have on hand.
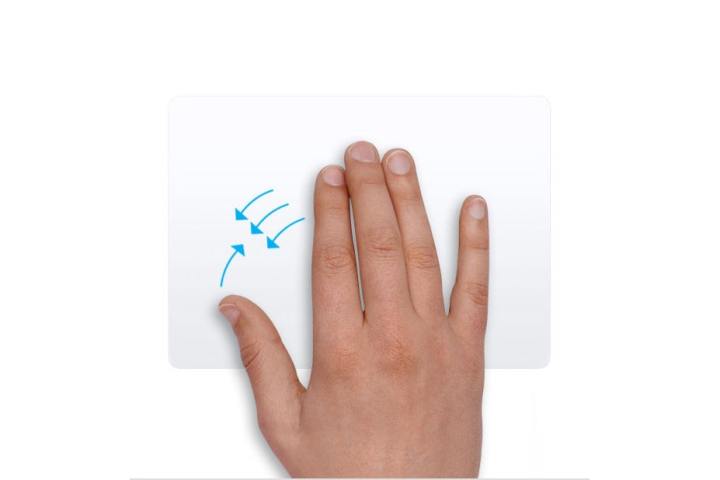
How to open Mission Control
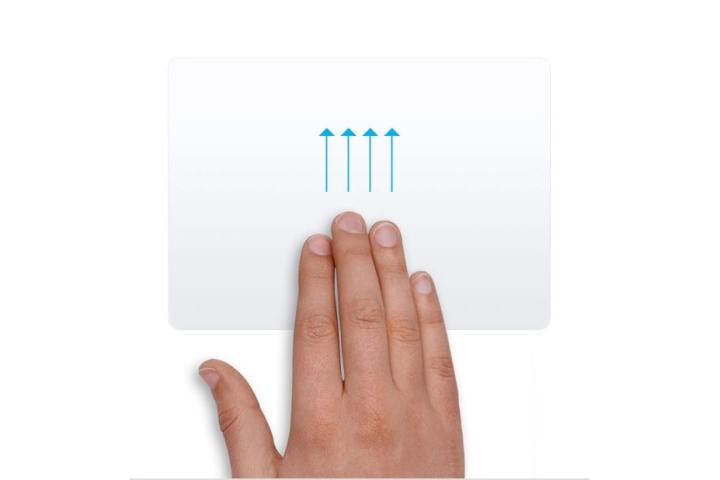
Sometimes, you’ll find your macOS screen crowded with a bunch of apps and windows. That can make it hard to locate an app you used a while ago without minimizing every window to the Dock, one by one. However, a quick gesture solves this problem.
Swipe up on your trackpad with four fingers and you’ll open Mission Control, which shows every window that’s currently open, letting you click the one you’re after. This gesture also reveals any virtual desktops you have open (more on that shortly).
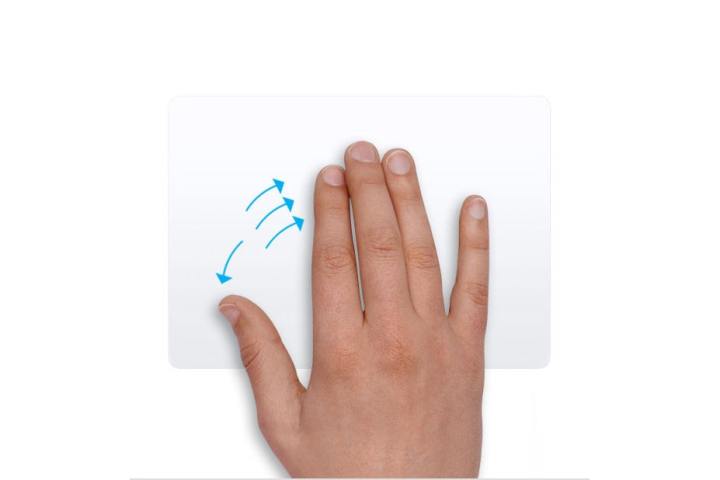
How to hide all other apps

While swiping up with four fingers shows all of your open apps, sometimes you just want to focus on the app you’re using right now. To do that, it’s a four-finger swipe down. This gesture (called App Exposé) shows any open windows for the current app next to each other, with a list of recent documents running along the bottom of your screen.
To run this gesture, you need to enable App Exposé. Open the Settings app, then select Trackpad > More Gestures. Next to App Exposé, choose Swipe Down with Four Fingers from the dropdown menu (there’s also an option for swiping down with three fingers if you prefer).
How to switch desktops
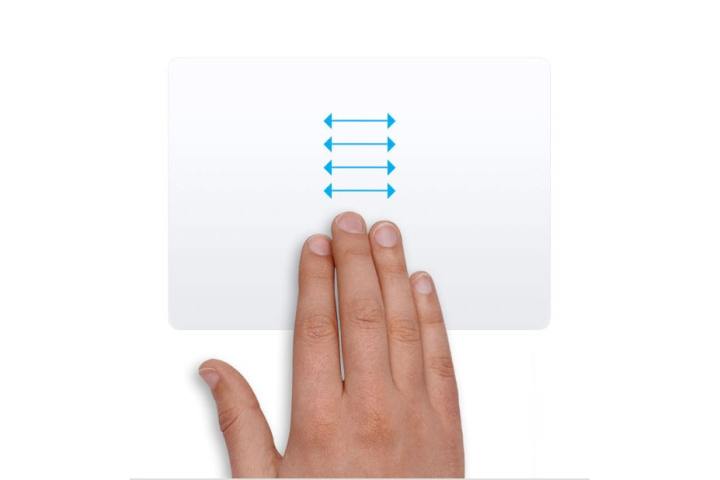
Mission Control is a great way to manage multiple desktops, and you can access it by swiping up with four fingers. But there’s actually a quicker way to move through your desktops: swipe left or right with four fingers on your trackpad.
Note that if you have a number of apps open in full-screen mode, this same four-finger drag will incorporate them into your swipes through your desktops. For example, you might have Desktop 1, then a full-screen app, then Desktop 2, all linked by four-finger swipes.