Your AirPods are shiny, new, and fully charged: Now how do you start using them? Our complete guide on pairing AirPods or AirPods Pro with your iPhone is exactly what you need to get started and master these smart earbuds early on. Here’s what to do.
Step 1: Prepare for setup
A couple of steps before you start will make the pairing process much easier. First, head into your iPhone’s Settings and make sure that all available updates have been installed. Missing updates could cause problems with the pairing process.
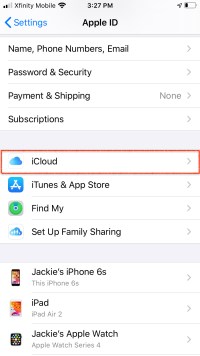
Second, make sure you are signed in to iCloud on your iPhone by heading to Settings, selecting your name at the top, and selecting iCloud. If you are signed in with iCloud, then your AirPods will be automatically paired with all your other devices on Apple ID, so you only need to do this once.

Step 2: Start pairing

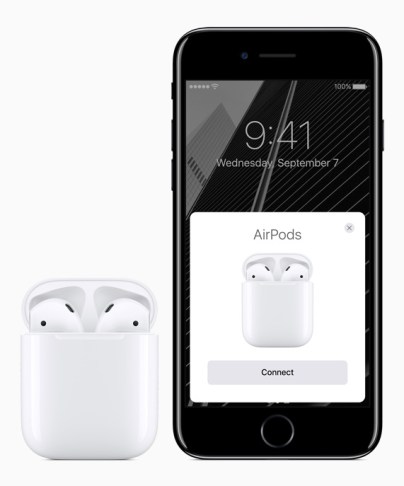
Make sure your AirPods are in their case. Unlock your iPhone so you can see the home screen, and open your AirPod case near your phone to begin. Your iPhone will detect a new pair of AirPods and ask if you want to start pairing. Select Connect to begin.
Step 3: Make the necessary pairing decisions

Pairing is usually a quick process, but sometimes you will need to select a few more options in setup. If you haven’t already set up your “Hey Siri” voice commands, then Apple will ask you to set up Siri so that your AirPods can use the voice assistant. For newer AirPods, Apple will also ask if you want to enable Siri to read out your iPhone messages automatically.
If you have AirPods Pro, this setup will be a bit longer, because it will talk about additional features. It may also suggest running through the ear tip test for proper fitting.
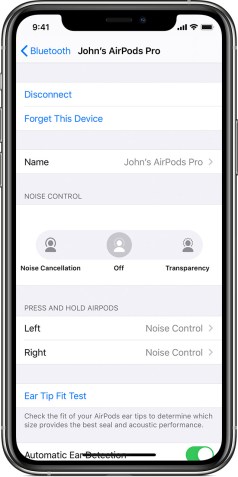
When finished, double-check to make sure that your AirPods have the desired name. You can change the name at any time by going to Settings > Bluetooth, and select the blue “i” next to your connected AirPods.
Step 4: Test your AirPods

When your AirPods are paired, you can take them out of the case and place them in your ears. Your AirPods should let out a low beep to let you know they have connected to your nearby iPhone and are ready to work. Try pulling up a song or video on your iPhone, and test out how they sound.
Despite being minimalist, AirPods do have a number of on-board control options that you should start practicing. Start by double-tapping an AirPod: This should start playing a track, or skip forward when a track is already playing (if it activates Siri by default instead, don’t worry, we’ll show you how to change this below). Get used to this double-tapping feature and how to initiate it.

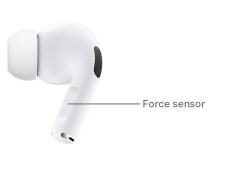
But there’s more. Double-pressing the AirPods Pro sensor will skip forward to the next track, while triple-pressing it will skip back a track. Finally, try pressing and holding down briefly on the force sensor, which will switch between Active Noise Cancellation, Transparency mode (which lets external noises filter in), and Off mode. This may take a little getting used to, so it’s important to practice the motions when first using your AirPods Pro.
Step 5: Try out Siri commands

Your AirPods also include a small mic that can register when you say “Hey Siri,” allowing you to give Siri a variety of voice commands to control playback.
Try this now with your AirPods in by saying, “Hey Siri, turn down the volume.” This should lower your volume a few notches without you needing to touch your phone at all. Siri can also raise the volume and perform a variety of other useful commands. You might want to try things like:
- “Hey, Siri, pause music.”
- “Hey, Siri, skip to the next song.”
- “Hey, Siri, play my Favorites playlist.” (You can also try naming a specific playlist.)
- “Hey, Siri, how is the battery on my AirPods?”
Siri can also respond to more generic commands that aren’t related to playback, and even provide directions from Apple Maps if you are out on a jog, for example. If you only have one AirPod in, it will automatically become the one that listens for Siri commands, so they will still work.
The exception to this rule is if you have an older pair of first-generation AirPods, which cannot be activated with a “Hey Siri” voice command. This is where double-tapping becomes even more useful, so let’s go over customization options.
Step 6: Customize your double-taps or press-and-hold
Your AirPods also have useful customization options, so you can change the controls based on how you use them.
First- and second-generation AirPods
For first- and second-generation AirPods, you can customize the double-tap option. To begin, head to Settings on your iPhone and go to Bluetooth. Look for your AirPods in the Bluetooth setting and make sure they are connected — if they aren’t connected, pop open your AirPod case and select your AirPods in the Bluetooth section to connect. Now press the blue “i” icon to go into your AirPod settings.
Now look for the section that says Double-Tap on Airpod. You will see options for both right and left AirPods, and what the current default control is. Select either right or left, and you will be able to change this to any of several different commands, including Next Track, Play/Pause, and Previous Track. Adjust each earbud based on what you prefer.
AirPods Pro

You can also customize the AirPods Pro, but only the press-and-hold option. Follow the same instructions by going to your AirPods settings in Bluetooth, but this time look for the section that says Press and Hold AirPods. You will again have options for both left and right earbuds, including the ability to change one earbud to a manual Siri activation. Adjust as needed.
You’re now ready to use your AirPods out in the real world! Have fun and remember that if you lose an AirPod, Apple’s Find My app can help you locate it again — but only as long as it has battery life!
Editors' Recommendations
- Best Apple deals: Save on AirPods, Apple Watch, iPad, MacBook
- The MacBook Air and iPad Pro could soon get a major upgrade
- Apple ‘Unleashed’ event: New MacBook Pros, M1 Pro/Max, AirPods 3, and more
- New report points to redesigned MacBook and AirPods later this year
- How to transfer photos from an iPhone to a computer


