
As the old saying goes, the best camera is the one you always have with you. If you're like most iPhone users, that means you've likely amassed a sizeable collection of photos on your device. However, while Apple's Photos app is a great way to manage and view your photo library, it's never a good idea to keep all your eggs in one basket. After all, suffering a lost or broken iPhone is painful enough without also losing all your precious digital memories in the process.
Even if you're backing up your iPhone to iCloud or your computer, it's a good idea to keep your photos backed up separately. After all, opening a folder or a photo management app is a much easier way to get at your photos than trying to extract them from an iCloud or iTunes/Finder backup, which requires either restoring them to another iPhone or relying on special software tools.
Fortunately, Apple makes it easy to transfer your photos from your iPhone to your computer, and offers several ways to do so. Apple's iCloud Photos will seamlessly keep your library in sync between your iPhone and your Mac or PC, and Apple also lets third-party cloud apps like Dropbox access your library so you can sync through those cloud services instead. However, those who would rather avoid the cloud, for whatever reason, can also go old-school and simply plug their iPhone into their Mac or PC, or even take advantage of iPhone apps that will automatically upload your photos to a network attached storage (NAS) device in your home or office over your private Wi-Fi network.

How to transfer your photos to a Mac using a USB cable
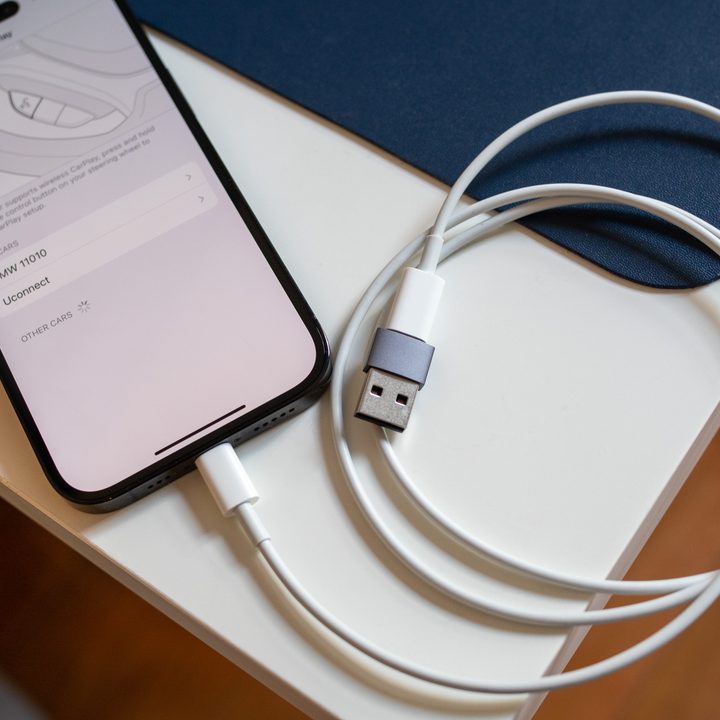
While it may feel low-tech in today's wireless world, the simplest and fastest way to get photos from your iPhone to your computer is still the trusty old USB port. Whether that's a USB-C to USB-C connection with the latest iPhone 15 models or an older USB-to-Lightning connection, the process and the principle are the same: your iPhone appears to your Mac like a traditional digital camera, letting you download photos from it using the built-in photo import tools in macOS or nearly any third-party photo transfer utility or photo management app of your choice.
Since you're dealing with a wired connection, it's also typically faster than any of the wireless methods. Most iPhone models will transfer pictures at USB 2.0 speeds of around 480Mbps, while the new iPhone 15 Pro and iPhone 15 Pro Max support USB 3.2 speeds of up to 10Gbps, letting you offload even the largest photo libraries in minutes.
Step 1: Unlock your iPhone and plug it into your Mac using an appropriate USB cable.
Step 2: If this is the first time you've connected your iPhone to this computer, you'll be prompted to trust the connection on both ends. Select the Trust option when it pops up on your iPhone and your Mac to confirm the connection and enter your passcode when prompted.

Step 3: Open either Photos or Image Capture on your Mac.
Photos is the counterpart to your iPhone's Photos app, and will allow you to view and manage your photos in a similar way. However, keep in mind that despite the similarities, this is a one-way transfer when working over a USB cable; you can organize your photos into albums on your Mac, but these will be managed separately from any albums you create on your iPhone, unless you're using iCloud Photos to sync the two via the cloud.
Image Capture lets you download your photos into a folder. This is a better choice if you're mostly interested in just keeping an extra backup or archive or your photos, rather than viewing or managing them on your Mac.

Step 4: Select your iPhone from the left-hand sidebar in Photos or Image Capture.
Step 5: If you're using Image Capture, click the drop-down beside Import To and select a destination folder where you would like your photos to be saved.
If you're using Photos, you can optionally click the drop-down beside Album and select an existing album to organize your imported photos, or create a new one.
Step 6: To transfer all the photos on your iPhone to your Mac, select Download All (Image Capture) or Import All (Photos).
Alternatively, you can select one or more individual photos by clicking on them, and then use the Download or Import buttons to transfer only the selected images.
Note that selecting Import All New Photos in Photos will skip any images that have already been imported to your library. However, if you select individual images to import, they'll be transferred even if they're already in your library, resulting in duplicates.
How to transfer your photos to a Windows PC using a USB cable
It's nearly as easy to transfer your photos to a Windows PC over a USB cable as it is to transfer them to a Mac, since Microsoft also offers built-in photo import tools designed to work with smartphones and digital cameras.
The only extra requirement is that, depending on the version of Windows you're using, you may need to have either iTunes 12.5.1 or later or the new Apple Devices app installed on your PC to provide the necessary drivers for Windows to recognize your iPhone. However, it doesn't matter if this is installed from the Microsoft Store or downloaded directly from Apple's website. As long as iTunes or Apple Devices is there and it's up to date, you should be good to go. After that, everything happens in the apps that Microsoft provides as part of Windows.
Step 1: Unlock your iPhone, and plug it into your PC using an appropriate USB cable.
Step 2: On your iPhone, select Allow from the dialog box that pops up on your iPhone to allow your PC to access the photos and videos on your device, and enter your passcode to confirm.

Step 3: Open the Photos app on your PC.
Step 4: Select Import near the top-right corner.

Step 5: Select your iPhone from the list of connected devices that appears and wait for the content to load from your device.
Step 6: Select one or more photo or video to import.

Step 7: Select Add (#) items.
Step 8: Choose the folder where you would like to save your photos and select Import.

How to transfer your photos wirelessly to a Mac
If you only need to transfer a few photos at a time, Apple has some quick and easy ways to get your photos from your iPhone over to your Mac without relying on a USB cable:
- With AirDrop you can beam one or more photos to any nearby Mac using a direct Wi-Fi connection.
- Alternatively, if you're using iCloud Drive you can save photos to any iCloud folder using the Files app on your iPhone and they'll show up in the appropriate folder on your Mac or even your Windows PC (provided you have iCloud for Windows installed).
- For a really fun trick, you can also use Apple's Handoff feature to copy photos to your iPhone clipboard and then paste them directly into Finder or any other Mac app where a photo can normally be pasted.
Step 1: Open the Photos app on your iPhone.
Step 2: Choose the Select button in the top-right corner and select the photos you would like to copy to your Mac or PC.

Step 3: Select the Share button in the bottom-left corner.

Step 4: From the Share Sheet that appears, choose your preferred method:
To transfer the selected photos using AirDrop:
- Select the AirDrop button
- Select your Mac under "My Devices." You can also send photos to someone else's Mac, iPhone, or iPad by choosing their name under "People."
- Accept the transfer on your Mac when prompted.
To transfer the selected photos via iCloud Drive:
- Scroll down and choose Save to Files.
- Under "Locations" select iCloud Drive.
- Choose a folder to save the photos in.
- Select Save in the top-right corner.
- Locate the corresponding folder in Mac Finder or Windows File Explorer by selecting iCloud from the left sidebar and navigating from there. Note that it may take a minute or two for the photos to appear depending on the speed of your internet connection.
To transfer the selected photos using your clipboard:
- Scroll down and choose Copy Photos.
- Open Finder on your Mac and navigate to a folder where you'd like to save the photos.
- Choose Edit > Paste from the menu or press CMD+V to paste them in to the current folder. You can also paste the photos directly into any other app that supports photos, such as Photoshop or a Microsoft Word document.

How to sync your photos to your Mac or PC using iCloud
If you have enough iCloud storage, you can upload your photos to your Mac or PC by synchronizing them through iCloud Photos. Unfortunately, this is an all-or-nothing affair; it's designed to keep your entire photo library in sync between your iPhone, computer, and other devices such as an iPad or Apple TV. However, if you like using Apple's Photos app to manage your library and you're willing to pay for iCloud storage, it's by far the best and simplest way to have all of your photos available on your computer almost as soon as you take them. Here's how to set it up:
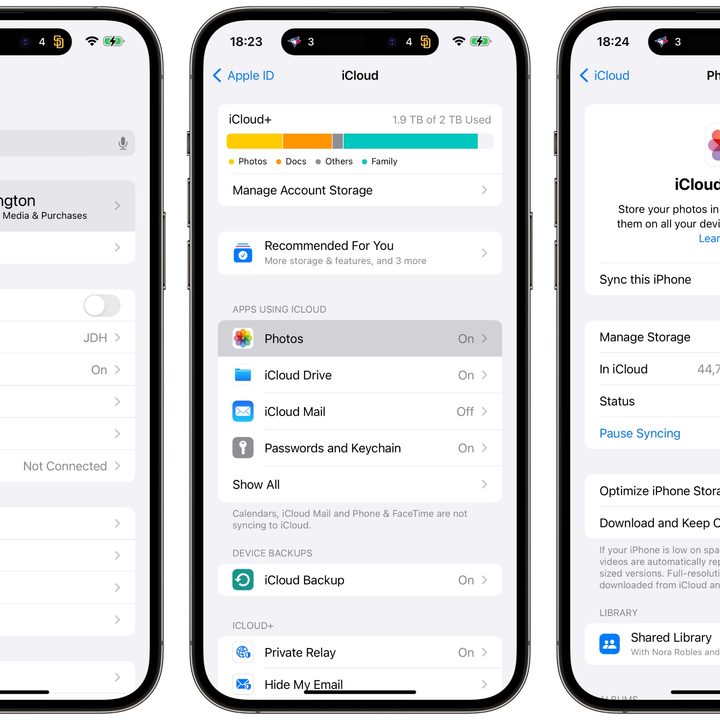
Step 1: First, enable iCloud Photos on your iPhone:
- Open the Settings app.
- Select your name at the top of the screen.
- Choose iCloud.
- Select Photos.
- Turn on Sync this iPhone. Your iPhone will begin uploading all of the photos and videos in your Photos app to iCloud. If you don't have enough space in your iCloud account to store them all, you'll be notified and given the option to either disable sync or purchase additional storage for a monthly fee.
You can also optionally choose Optimize iPhone Storage from this screen if you want to free up some space on your iPhone. Once your original, full-resolution photos are safely stored in iCloud, this setting allows them to be replaced on your iPhone with lower-resolution versions suitable for viewing on your device. The original will be re-downloaded on demand whenever it's needed for editing or sharing.
Step 2: To enable iCloud Photos on your Mac:
- Open the Photos app.
- From the menu, select Photos > Settings or press CMD+, (CMD+comma)
- Select the iCloud tab.
- Turn on iCloud Photos.
- Select Download Originals to this Mac to ensure that the full-resolution versions are always transferred to your computer. Alternatively, you can choose Optimize Mac Storage if you're comfortable leaving your photos in iCloud and only downloading the originals as needed.

Step 3: To enable iCloud Photos on your Windows PC:
- Download iCloud for Windows from the Microsoft Store.
- Open iCloud for Windows.
- During setup, confirm that you want to sync iCloud Photos to Microsoft Photos by selecting the Sync Photos button.
- Continue through the other steps to finish setting up iCloud for Windows.
Once iCloud for Windows is installed and configured, you'll be able to access the photos and videos sync from your iPhone via iCloud by opening either File Explorer or Photos and choosing iCloud Photos in the navigation pane.

Step 4: It's also possible to use iCloud Photos purely as a transfer method without paying for iCloud. Apple provides 5GB for free, and while that won't be enough to store most photo libraries, it should be fine if you only want to keep your most recent photos on your iPhone and archive the rest to your Mac or PC. You can export them to a folder and delete them from your Mac Photos app or Windows iCloud Photos folder; this will also remove them from your iPhone, leaving only the exported copy on your computer.
Here's how to do this on a Mac: 1. Select the photos you want to export in the Mac Photos app 2. Choose File > Export > Export Unmodified Original(s) for (#) Photo(s) to save the original photo. You can also use the standard Export (#) Photo(s) option here if you want to preserve any edits you've made in the Photos app on your iPhone, iPad, or Mac. 3. Once you've exported the photos, you can remove them from the Photos app on your Mac and iPhone by selecting them and choosing Image > Delete (#) Photo(s)
This is slightly easier on Windows, as your iCloud Photos present themselves in a folder in File Explorer. You can copy or move photos out of this folder in the same way you would any other folder, and if you move them out they'll be removed from iCloud Photos and the Photos app on your iPhone.

How to transfer your photos using other cloud services
You don't necessarily need to pay for iCloud storage if you already subscribe to another cloud storage provider. Many services offer iPhone apps that can automatically upload your photos to cloud storage, letting them sync back down to your computer using their Mac or PC sync client. The method for doing this varies slightly depending on the app you're using, but in all cases the photos will be saved as files in your cloud storage and mirrored down to your PC in some way.
- Dropbox, OneDrive, and Sync all offer straightforward camera upload features directly in their iPhone apps. In many cases, you'll be prompted to turn these on when you first install the app and sign in, but if not, you can easily find the switch in settings, with options to upload either all of your photos or only those you take after turning it on. You'll need to install the appropriate desktop client to automatically pull these down from the cloud services, but OneDrive is an especially great choice for Windows users since, like iCloud, it's available as part of Windows right out of the box.
- Google Drive will let you upload photos manually for your camera roll which will then sync down to your Mac or PC as long as you're running the Google Drive app. Unfortunately, it no longer offers an automatic camera upload feature, as that's been moved to the Google Photos app. Using Google Photos will store your images in the cloud, but you'll have to download them manually to your computer through your browser. There are third-party apps that can sync your photos to Google Drive, but they typically cost extra and you'll need to be comfortable giving them access to your Google Drive. They also may be blocked if you're using a work or school account.
- Amazon Photos may be a tempting option for Prime subscribers as you get unlimited free storage for photos with your membership (5GB for videos). However, like Google Photos, your images won't automatically download to your computer. But Amazon has the benefit of a desktop Windows app that can help you pull them down manually.
- Lastly, while it's not a cloud service per se, Synology Photos deserves an honorable mention here for folks who have a Synology network attached storage (NAS) device. It offers a camera upload feature similar to Dropbox and OneDrive, but instead of storing your photos in the cloud, they're transferred directly to your NAS.
As with iCloud, you can also use most of these cloud services without paying a subscription by using the free storage they offer as a conduit for transferring your pictures; just move them out of the synced folder on your Mac or PC to wherever you'd like to permanently store them, and that space will be freed up for the next transfer.